Ford Raptor Fuel Pump Fuse Issue

Disclaimer: Links on this page pointing to Amazon, eBay and other sites may include affiliate code. If you click them and make a purchase, we may earn a small commission.

HAP

Full Access Member
Joined
Feb 11, 2014
Posts
807
Reaction score
433
Location
NE NC
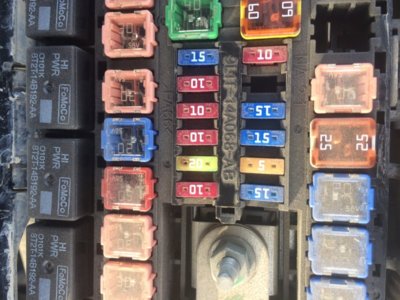
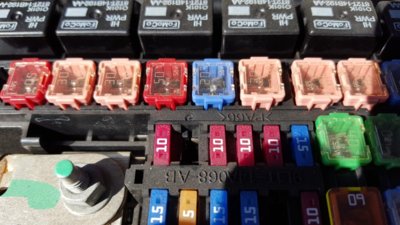
I just did my on today. I was pretty annoyed at the instructions though. They make it more confusing than it really is. The wire colors are inconsistent with the directions... Basically needs to say: cut the 12 gauge Blu/Rd wire from fuse #27, cap Blu/Rd wire left in place, solder/crimp new Blk wire to Blu/Rd wire, insert fuse terminal blade of new Blk wire in slot #70. Replace all the stuff removed and insert fuse. Test.
 

Bigeffr

Full Access Member
Joined
Jul 10, 2013
Posts
162
Reaction score
44
Location
Manassas, VA
My 2013 is at the dealer with this same issue. They are ordering the kit and installing it
today. All of this is under warranty but the sad part was watching the flat bed pull up my street with my Raptor on it in the middle of a snow storm yesterday.
 

Shortbusdriver

Full Access Member
Joined
Apr 14, 2013
Posts
107
Reaction score
44
Location
Phoenix, AZ
I think I had the first indication that mine will most likely be affected by this the other day. I had a crank no start, but I started with the fuel pump relay, pulled and reinserted and it clicked. Fired right up and no problems since. I just read through this entire thread and I will have to check #27 when I get home.

Now I just to decide to do it myself or take it to the dealer.

edit: its a 2013 with 43K.

2nd edit: are the kits still back ordered or do most dealers have them in stock?
 

Yukon Joe

FRF Addict
Joined
Nov 16, 2011
Posts
18,379
Reaction score
11,620
Location
Russellville, AR
I think I had the first indication that mine will most likely be affected by this the other day. I had a crank no start, but I started with the fuel pump relay, pulled and reinserted and it clicked. Fired right up and no problems since. I just read through this entire thread and I will have to check #27 when I get home.

Now I just to decide to do it myself or take it to the dealer.

edit: its a 2013 with 43K.

2nd edit: are the kits still back ordered or do most dealers have them in stock?
I would call the dealer and see if they would install it for you and how much it may cost. If they do the work, it is warranted for two years (I think).

The kits seem to be available now.

Vote for your favorite pic
http://www.fordraptorforum.com/f18/january-2017-calendar-vote-46906/
@Yukon Joe :baby: :baby:
Delta Lead
www.runraptorrun.com
 

Juiced4ever

Full Access Member
Joined
Feb 22, 2013
Posts
227
Reaction score
286
Location
Tahoe
Well I had it happen twice, long cranks no fire, would always fire up the second or third time I tried. Today saw this thread, went out and looked and low and behold. Fuse was blown up, came out in two pieces. Put a new fuse in there and it fired right up. Have a handful of them till I can get in and get it fixed. UGH

Oh 2013 Screw with 58k on the clock
 

Attachments

  • IMG_5720.jpg
    IMG_5720.jpg
    116.1 KB · Views: 167
  • IMG_5721.jpg
    IMG_5721.jpg
    104 KB · Views: 162

Shortbusdriver

Full Access Member
Joined
Apr 14, 2013
Posts
107
Reaction score
44
Location
Phoenix, AZ
OK well mine is melted. Not as bad as some, and the box is still good. Problem is that I called my dealer and they don't show that TSB or part number. I also looked on the nhtsb website and it doesn't show it either. Does anyone know if they changed the number.

I found the part on tasca parts so I will probably just end up doing it myself.

I love this site!!!
 

Attachments

  • 20160225_104232.jpg
    20160225_104232.jpg
    57.3 KB · Views: 153
  • 20160225_104244.jpg
    20160225_104244.jpg
    92.2 KB · Views: 158

Hiapo510

Full Access Member
Joined
Aug 15, 2014
Posts
111
Reaction score
40
I did mine myself today, I had no signs of it being bad. But did it just to be on the safe side. It took less than an hour.


Sent from my iPhone using Tapatalk
 

R1jamn

Full Access Member
Joined
Jun 18, 2011
Posts
401
Reaction score
299
I too installed the relocation kit today.
This is certainly doable for the DIY crowd.
It was a bit of pain in the A$$.
Luckily everthing is front and center and accessible.

Fuse #27 on my raptor was healthy.
It did not have any melting, burning or discoloration.
Just making sure this won't be an issue in the future.

Take your time on this one.
Be sure to lay out some aluminum foil around the engine bay before you start soldering.
Don't go crazy. Just the immediate area with a bowl shape to catch any solder.

Aluminum%20Foil%20for%20Soldering_zps7ax1zfki.jpg

Solder%20for%20Fuse%20Relocation_zpspq23f1ig.jpg
 
Last edited:

Forum statistics

Threads
93,202
Posts
1,955,937
Members
56,485
Latest member
bjorn-dpc
Top