Idaho
Full Access Member
Looking to create a post that explains some basics of suspension for those interested in learning more about the subject. I'll happily take any input via replies or PM's on this matter to edit as appropriate. I have attempted to keep this as objective as possible without personal opinion.
Thanks for reading
Factors that affect ride characteristics:
Spring rate:
The spring rate is generally measured in how many pounds of force it takes to compress the spring one inch and is usually either a linear or progressive rate. A linear rate means the spring is the same spring rate through its entire compression range. A progressive rate means that the spring rate will build as it compresses.
Progressive springs are generally better at absorbing smaller bumps as the spring is softer at the start of its compression. For larger bumps, they will help provide a smoother transition into “bottom out” of the suspension due to the spring rate ramping up as it is compressed fully.
Linear springs generally provide a firmer or “sportier” feel as they are only a single spring rate through the entire compression cycle. This means on smaller bumps they may feel firmer but may provide a “sportier” feel as they resist compressing as weight shifts in cornering compared to progressive springs.
Spring rates generally determines the overall “feel” of a suspension. Too stiff of a spring rate and the suspension will feel jarring and harsh on smaller impacts . Too soft of a spring rate and the suspension will be cycle through the suspension travel range easily and not resist large impacts well.
Shocks:
Raptor shocks have many aspects that determine ride quality.
First, the basic construction of a high-end shock is a piston at the end of a shaft moving through oil inside of the shock.
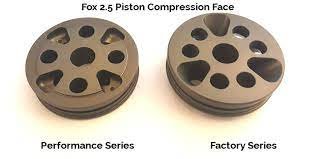
Shock piston compression side:
Shock piston rebound side:
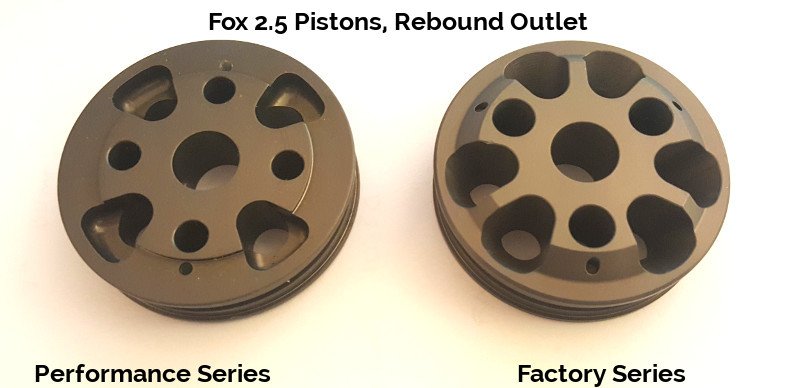
The piston has two sides to it with cutouts on each side narrow to openings on the opposite side. The top of the piston is commonly referred to as the “compression side” and the bottom side is the “rebound side”. As the shock compresses, it pushes the shaft into the body of the shock with the piston moving through the shock oil at the end of the shaft.
Shock piston next to a piston with a shim stack. The shock oil hits these shims and bends them as it flows through the piston:
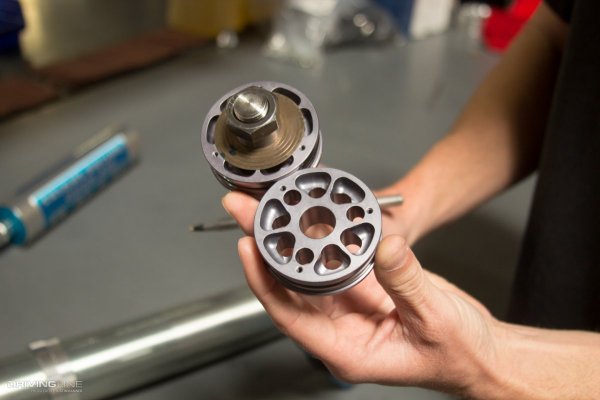
On each side of the piston is a stack of shims. These shims are essentially very thin washers of varying diameters and thicknesses. This stack of shims is referred to as the “valving” or “shim stack”. As oil flows through the piston, it hits the shim stack on the back side of the piston. This causes these thin shims to bend and flex as the oil passes by them. How the shims are arranged on the back of the piston greatly determines how much resistance to oil flow there is and therefore how “stiff” the shocks feel. A “stiff” shim stack needs oil pushed with more force to bend the shims and will provide superior damping on larger impacts such as drop offs or jumps. This shim stack will feel stiff on smaller impacts. A “soft” shim stack will have the shims bend easily resulting in smaller impacts such as washboard or street potholes absorbed by the shocks. This shim stack will feel under-damped on larger impacts and use the full travel easily.
On the opposite side of the piston is the rebound shim stack. This is the opposite effect of the compression shim stack in that it controls the flow of oil back through the piston as the shock shaft is extended back to the normally extended position. The spring rate for the front and rear suspension are what “pull” the shock from it’s compressed position (the nitrogen fill aides in this as well). While compression damping determines how resistant a shock is to impacts, rebound determines how fast the shock will extend to be ready to absorb the next impact. Too slow of a rebound setting results in a suspension that feels like it’s “packing up” resulting in successive impacts feeling harsh and jarring. Too fast of a rebound setting and the suspension will “buck” after impacts as the suspension is extending too fast for the weight of the vehicle / spring rate.
“Custom valving” simply means that a shim stack has been designed to a specific specification versus what a shock brand determines will be their off the shelf shim stack arrangement.
Remember that both compression and rebound are centered around shock shaft speed. When someone is “over-driving” a shock off-road, they are simply hitting things too fast for what their valving can resist. Likewise with someone says you have to “push through” the valving on a heavily-valved shock, this means that the impacts must occur faster or be larger impacts to move the shock shaft through the oil faster to put more force against the shim stack. All of this is why a truck with suspension valved for the baja may feel very stiff in daily driving with small impacts. Slam that truck into a curb however and the larger impact will move the piston through the oil rapidly and the impact will feel minor.
Bypasses:
Bypasses on a shock can be internal or external. In the case of the OEM Raptor shocks, the bypasses are internal. Bypasses may be for both rebound and compression. They are essentially ports with routes for the oil to move around the piston and shim stack at various points along the body of the shock. The more bypasses a shock has, the more it can be “tuned” but generally the price of a shock increases.
Bypasses simply do what the name implies, allow shock oil to bypass the shock piston / shim stack. This allows for impacts that move the shock shaft and piston to feel softer while having a shim stack designed to resist larger impacts. Bypass shocks offer the ability to use a stiffer shim stack to absorb larger impacts while reducing the harshness of small impacts by using the bypass.
Fox's own explanation and diagram of internal bypasses from YouTube:
Internal bypasses, such as what is in the OEM Raptor shocks, work in a configuration of a “cylinder within a cylinder”. This meaning that the inner cylinder houses the shock shaft, piston, shim stack, and bulk of the shock oil. This inner cylinder has ports in it that bleed oil to the outer cylinder when pressure is applied via the shock shaft and piston moving through the oil. This allows oil to move into the outer cylinder and return to the back side of the piston and shim stack as it moves through this inner cylinder. The reverse happens as the shock rebounds and now pressurizes the oil behind the piston shim stack as the shock shaft extends on the rebound stroke from its compressed state. This is repeated at multiple places or “stages” within the full stroke of the shock. This may be referred to as “multi-stage internal bypass shock”.
Picture of external bypass tubes on a Fox shock:
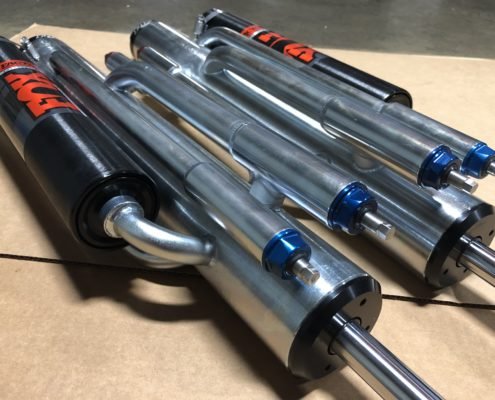
External bypasses function similarly to internal bypass shocks except the ports for oil to bypass the piston and shim stack lead to an external tube on the shock body. This external tube will route oil back into the shock body and is often adjustable via a pre-loaded valve often on a threaded rod. This allows the user to adjust how much oil flows through the bypass which can change the feel or tune of the shock. External bypass tubes usually come in pairs (one for the compression stroke and one for the rebound stroke) and shocks may have multiple pairs of bypass tubes placed at different points along the shock body to maximize tuning capability.
Bypasses are used to tune the feel of a shock by changing how much oil bypasses the shock piston and shim stack versus how much flows through it. Internal bypasses are fixed and cannot be changed while external bypasses allow for adjustment.
Shock Reservoirs:
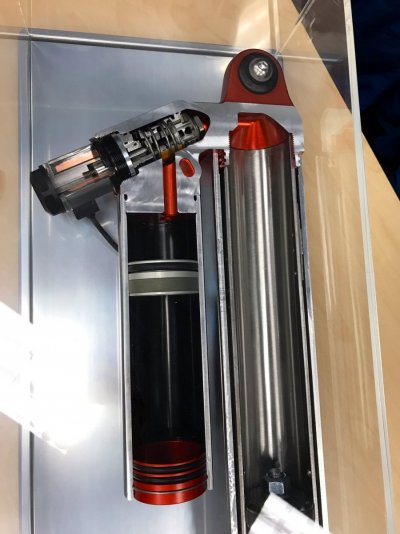
Shock reservoir cutaway:
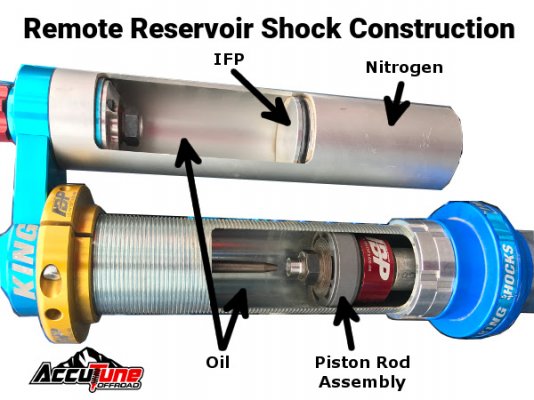
Shock reservoirs serve the purposes of resistance to bottom-out and to increase the oil capacity of a shock. Increased oil capacity results in less “fade” of the shock as more oil volume takes longer to heat up during extended use. Internal to the reservoir is an internal floating piston or IFP. One side of this IFP, the side that does not connect to the shock body, is pressurized with nitrogen. This pressure resists the flow of oil into the reservoir as the shock is compressed and pushes oil from the main shock body into the reservoir. This reservoir pressure helps resist bottom-out when combined with other factors such as the valving of the shocks and shock size / oil volume.
Thanks for reading
Factors that affect ride characteristics:
- Spring rate
- Valving
- Tire pressure
- Vehicle weight
Spring rate:
The spring rate is generally measured in how many pounds of force it takes to compress the spring one inch and is usually either a linear or progressive rate. A linear rate means the spring is the same spring rate through its entire compression range. A progressive rate means that the spring rate will build as it compresses.
Progressive springs are generally better at absorbing smaller bumps as the spring is softer at the start of its compression. For larger bumps, they will help provide a smoother transition into “bottom out” of the suspension due to the spring rate ramping up as it is compressed fully.
Linear springs generally provide a firmer or “sportier” feel as they are only a single spring rate through the entire compression cycle. This means on smaller bumps they may feel firmer but may provide a “sportier” feel as they resist compressing as weight shifts in cornering compared to progressive springs.
Spring rates generally determines the overall “feel” of a suspension. Too stiff of a spring rate and the suspension will feel jarring and harsh on smaller impacts . Too soft of a spring rate and the suspension will be cycle through the suspension travel range easily and not resist large impacts well.
Shocks:
Raptor shocks have many aspects that determine ride quality.
- Valving
- Internal Bypass
- Live Valve options
First, the basic construction of a high-end shock is a piston at the end of a shaft moving through oil inside of the shock.
Shock piston compression side:

Shock piston rebound side:

The piston has two sides to it with cutouts on each side narrow to openings on the opposite side. The top of the piston is commonly referred to as the “compression side” and the bottom side is the “rebound side”. As the shock compresses, it pushes the shaft into the body of the shock with the piston moving through the shock oil at the end of the shaft.
Shock piston next to a piston with a shim stack. The shock oil hits these shims and bends them as it flows through the piston:

On each side of the piston is a stack of shims. These shims are essentially very thin washers of varying diameters and thicknesses. This stack of shims is referred to as the “valving” or “shim stack”. As oil flows through the piston, it hits the shim stack on the back side of the piston. This causes these thin shims to bend and flex as the oil passes by them. How the shims are arranged on the back of the piston greatly determines how much resistance to oil flow there is and therefore how “stiff” the shocks feel. A “stiff” shim stack needs oil pushed with more force to bend the shims and will provide superior damping on larger impacts such as drop offs or jumps. This shim stack will feel stiff on smaller impacts. A “soft” shim stack will have the shims bend easily resulting in smaller impacts such as washboard or street potholes absorbed by the shocks. This shim stack will feel under-damped on larger impacts and use the full travel easily.
On the opposite side of the piston is the rebound shim stack. This is the opposite effect of the compression shim stack in that it controls the flow of oil back through the piston as the shock shaft is extended back to the normally extended position. The spring rate for the front and rear suspension are what “pull” the shock from it’s compressed position (the nitrogen fill aides in this as well). While compression damping determines how resistant a shock is to impacts, rebound determines how fast the shock will extend to be ready to absorb the next impact. Too slow of a rebound setting results in a suspension that feels like it’s “packing up” resulting in successive impacts feeling harsh and jarring. Too fast of a rebound setting and the suspension will “buck” after impacts as the suspension is extending too fast for the weight of the vehicle / spring rate.
“Custom valving” simply means that a shim stack has been designed to a specific specification versus what a shock brand determines will be their off the shelf shim stack arrangement.
Remember that both compression and rebound are centered around shock shaft speed. When someone is “over-driving” a shock off-road, they are simply hitting things too fast for what their valving can resist. Likewise with someone says you have to “push through” the valving on a heavily-valved shock, this means that the impacts must occur faster or be larger impacts to move the shock shaft through the oil faster to put more force against the shim stack. All of this is why a truck with suspension valved for the baja may feel very stiff in daily driving with small impacts. Slam that truck into a curb however and the larger impact will move the piston through the oil rapidly and the impact will feel minor.
Bypasses:
Bypasses on a shock can be internal or external. In the case of the OEM Raptor shocks, the bypasses are internal. Bypasses may be for both rebound and compression. They are essentially ports with routes for the oil to move around the piston and shim stack at various points along the body of the shock. The more bypasses a shock has, the more it can be “tuned” but generally the price of a shock increases.
Bypasses simply do what the name implies, allow shock oil to bypass the shock piston / shim stack. This allows for impacts that move the shock shaft and piston to feel softer while having a shim stack designed to resist larger impacts. Bypass shocks offer the ability to use a stiffer shim stack to absorb larger impacts while reducing the harshness of small impacts by using the bypass.
Fox's own explanation and diagram of internal bypasses from YouTube:
Internal bypasses, such as what is in the OEM Raptor shocks, work in a configuration of a “cylinder within a cylinder”. This meaning that the inner cylinder houses the shock shaft, piston, shim stack, and bulk of the shock oil. This inner cylinder has ports in it that bleed oil to the outer cylinder when pressure is applied via the shock shaft and piston moving through the oil. This allows oil to move into the outer cylinder and return to the back side of the piston and shim stack as it moves through this inner cylinder. The reverse happens as the shock rebounds and now pressurizes the oil behind the piston shim stack as the shock shaft extends on the rebound stroke from its compressed state. This is repeated at multiple places or “stages” within the full stroke of the shock. This may be referred to as “multi-stage internal bypass shock”.
Picture of external bypass tubes on a Fox shock:

External bypasses function similarly to internal bypass shocks except the ports for oil to bypass the piston and shim stack lead to an external tube on the shock body. This external tube will route oil back into the shock body and is often adjustable via a pre-loaded valve often on a threaded rod. This allows the user to adjust how much oil flows through the bypass which can change the feel or tune of the shock. External bypass tubes usually come in pairs (one for the compression stroke and one for the rebound stroke) and shocks may have multiple pairs of bypass tubes placed at different points along the shock body to maximize tuning capability.
Bypasses are used to tune the feel of a shock by changing how much oil bypasses the shock piston and shim stack versus how much flows through it. Internal bypasses are fixed and cannot be changed while external bypasses allow for adjustment.
Shock Reservoirs:
Shock reservoir cutaway:

Shock reservoirs serve the purposes of resistance to bottom-out and to increase the oil capacity of a shock. Increased oil capacity results in less “fade” of the shock as more oil volume takes longer to heat up during extended use. Internal to the reservoir is an internal floating piston or IFP. One side of this IFP, the side that does not connect to the shock body, is pressurized with nitrogen. This pressure resists the flow of oil into the reservoir as the shock is compressed and pushes oil from the main shock body into the reservoir. This reservoir pressure helps resist bottom-out when combined with other factors such as the valving of the shocks and shock size / oil volume.
Last edited:


