I hadn't paid too much attention to my coolant other than looking to see whether it was within the cold range from time to time when I had the hood open. Have never had any overheating issues. The expansion reservoir is kind of opaque, but you can see the coolant through it and it looked dark orange - kind of. Anyway, I thought it was time to change the coolant and opened it up and saw some brown milkshake residue in the reservoir which I figured was going to be run-of-the-mill bad or very bad. I first thought it was old coolant but realized it was oil mixed in when you touch it.
I have done the last several oil changes and the oil always looks good. For the first time in 10 years of owning it, I had to add a quart of oil around July but I didn't have any external leaks so I figured it was just getting old. Now I know where it was going. I assumed it was the oil cooler and not the head gasket.
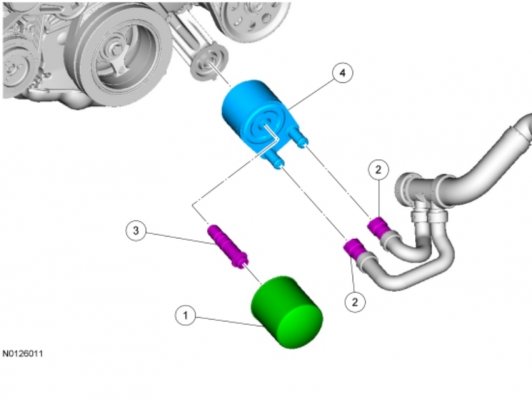
The oil cooler is on the driver's side and it has two coolant hoses going into it from the lower radiator hose - the oil filter screws into the hollow engine oil cooler bolt up the center of the oil cooler. One way or another, oil was getting from there into the coolant lines and ending up throughout the coolant system. I didn't take a photo of the original milkshake concoction but when you see it, you will know.
Anyway, I have fixed it now and learned a lot so thought I would pass it on.
1. No point in doing a flush until you get rid of the (assumed) source of the oil so ordered a new oil cooler from Ford - was just over $100. Part#: AL3Z6A642B. Engine Oil Cooler Assembly. Comes with a new oil cooler bolt.
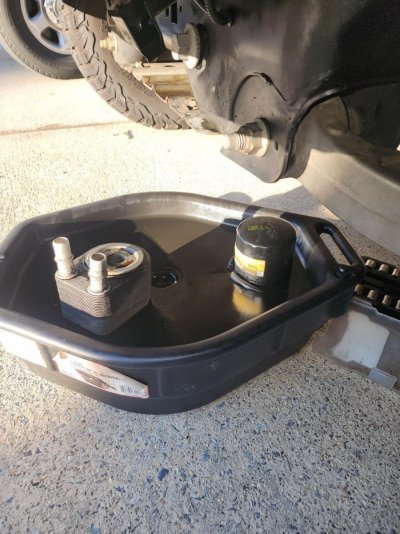
Remove the skid plate. Drop the coolant and oil. The radiator drain plug is on the passenger side of the radiator at the bottom, is red. Use a screwdriver to open it. If you turn it enough, you can pull it out. With the multiple flushes I did, one of the o-rings on it broke so plan on getting a new one, it was $6.
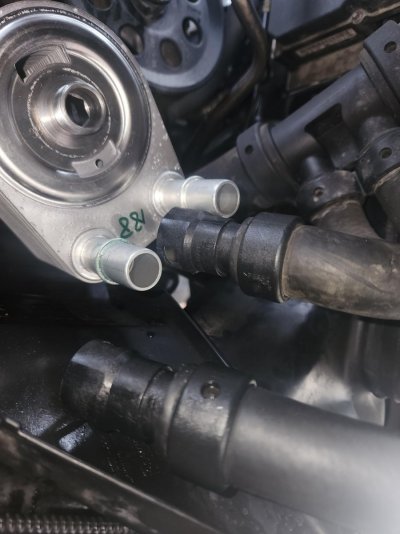
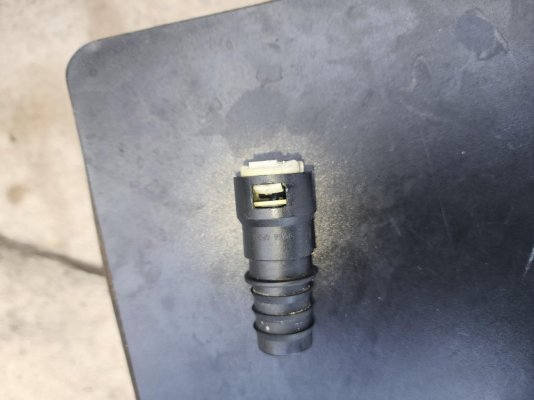
Remove the oil cooler, this is when I first learned about the joys of Quick Connects and how they are not Quick Disconnects. Ford says they are non-service items and dealer to improvise. The coolant hoses are supposed to come off by pushing forward, pressing in the white tabs at the top and pulling them off. That is what the YouTube videos show but they are working with new ones. The photo below shows the new oil cooler and the two hoses. I eventually got the upper right-hand one off intact with 10 or 15 minutes of swearing and skinned knuckles but the lower one on the left was stuck solid and I ripped up my fingertips trying to get it off. Had multiple goes at it over half a day but nothing was moving and ended up zip tieing around the white tabs to keep them in and then yanking on it as hard as I could and it came off along with the internal hard and soft o-rings and the retainer - they must have been stuck onto the tube. They do not go back in. If I did this again, would see if the connectors came off easily, and if not, carefully take a hacksaw to those factory plastic clamps and put new quick connects on. I replaced the one I broke but since Napa only had one, I re-used the unbroken one. O'Reillys has Gates or Dorman 3/4 inch versions for around $22 and $13 and secure them with $3 screw clamps.
The oil cooler is held on by the oil cooler bolt and you need a 14mm hex socket. Put the new oil cooler on and tighten the bolt to 43 lb-ft. The oil filter is 44 in-lb plus 180 degrees then replace the oil.
Now the fun part - flushing the coolant endlessly and getting rid of the milkshake.
1. Remove the thermostat, required with the number of flushes needed. It is near the front of the engine at the bottom end of the upper radiator hose. Two 8mm bolts, remove the air cleaner outlet pipe to make room and then undo the bolts with a socket and swivel. Take out the o-ring and thermostat and then reinstall the o-ring and the thermostat housing. Bolts to 89 in-lb and be careful as that is less than 8 ft-lb and will be a job if you strip them or cross thread.
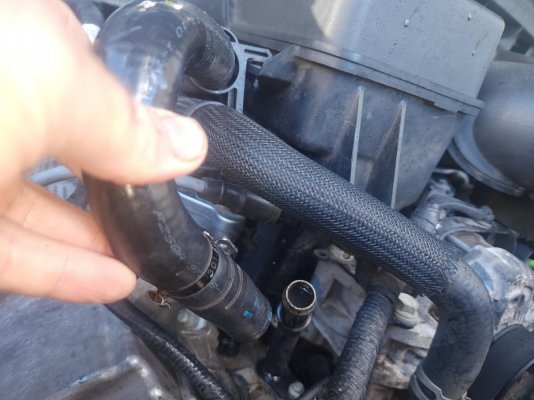
2. Stick a hose in the radiator and start flushing as much as you can after pulling out the drain plug fully. You then realize it is not doing much so you need to remove the heater inlet hose from the heater inlet tube. This is near the front on the passenger side center. This allows you to get a lot more out. There is a reusable clamp you can squeeze with pliers and move up the hose then it is a job and a half to get the hose off the tube but you will get there eventually. I ended up disconnecting the oil cooler hose too and flushed everything with hose water and it only started to get some of it out as the oil sticks to the inside of the hoses.
3. Now to Home Depot and get two gallons of the purple Simple Green ProHD. I poured a quart or so in each time and then filled the rest with tap water, buttoned it up and ran the engine for 10 minutes, let it cool down then opened everything up, and flushed as much as I could with the garden hose through the expansion tank, radiator inlet, the heater inlet, and the oil cooler hose.. Eventually after doing that more than 5-6 times, you are starting to get somewhere.
4. Then you need to clean the expansion tank as the brown oily milkshake has coated the inside. Airbox lid off, air filter out. Remove the hood sensor and then the two bolts and the airbox and the expansion tank lifts out. It took a while to get it clean and I used degreaser, the garden hose, and ended up putting a dishwasher tablet in it and some boiling water from the kettle and shook it. There was still residue all on the inside so put some shop rags and a handful of nuts and washers and shook it until the shop rags absorbed everything and it was more or less clean. Just have to improvise but it takes a good while.
5. Now I started putting in distilled water to try and flush the tap water out and good luck with getting that all out. The capacity is 19.5 quarts and most of it seems to stay in the engine block. I drained as much as I could and filled it with distilled water, then ran the engine up to heat three different times then drained, I think I used 20 qts but it seems futile. No way you are getting all the hose water out, and good luck flushing with just distilled water and not hose pressure.
6. Now time to put the thermostat back in the reverse of how you took it out.
7. The mix of yellow coolant and distilled water is supposed to be 50:50 so you are aiming for 9.75 quarts of concentrated yellow coolant. I drained everything out as much as I could and blew air in all the open hoses. The way to do it is to fill through the radiator and you know it is full when water starts coming out the heater inlet pipe. Over 10 or 15 minutes, including running the engine for short times, I was able to get a total 8 quarts of concentrated yellow coolant in and 1 quart of distilled water in the radiator and the expansion reservoir (which takes 1.5 quarts up to the max cold fill line). That left 10.5 quarts of water or air that was still in the engine block, heater core, and hoses. I emptied two gallon bottles of concentrate and used the quart of distilled thinking there was plenty to go but it was full. I wish I had opened the 3rd bottle instead of using the quart of distilled water. I was expecting a lot more air to burp out but nothing yet.
8. Going to take it for a decent run tomorrow and I expect some more air will burp out but not much. Assuming that all air is out, the way I will get 50% concentration is to take the 8 quarts of concentrate and 10.5 quarts of water -> 41% concentration. With a bit of algebra, if I take 3 quarts of 41% out and replace it with 3 quarts of 100%, it will be at 50% concentration. => (19.5 qt - X qt) * 41% + X qt x 100% = 9.75 qt x 100%. X =~ 3qt concentrate. Failing that, i bought a cheap refractometer off Amazon and that will test the concentration as I go. You are aiming for 48-50%
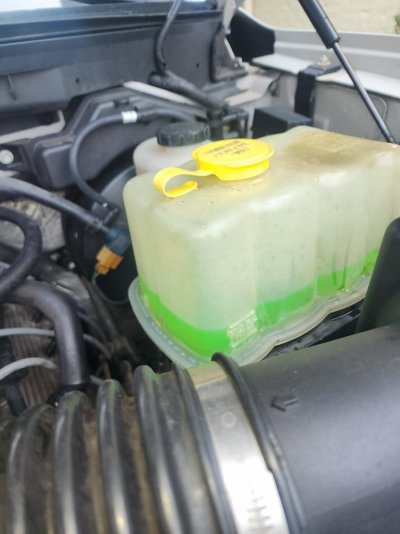
Lastly, would be very expensive labor-wise to get a shop to do this to the extent I did, it took several days and I did a lot of flushes. I don't think they would clean it as thoroughly (and I did not get it all). I expect the coolant will dirty up with the few percent that is left and maybe next year, will do another round of degreaser flushes then take it to a shop to get a full machine flush and vacuum refill for the last one and that can last the next 50k miles or so.
I have done the last several oil changes and the oil always looks good. For the first time in 10 years of owning it, I had to add a quart of oil around July but I didn't have any external leaks so I figured it was just getting old. Now I know where it was going. I assumed it was the oil cooler and not the head gasket.
The oil cooler is on the driver's side and it has two coolant hoses going into it from the lower radiator hose - the oil filter screws into the hollow engine oil cooler bolt up the center of the oil cooler. One way or another, oil was getting from there into the coolant lines and ending up throughout the coolant system. I didn't take a photo of the original milkshake concoction but when you see it, you will know.
Anyway, I have fixed it now and learned a lot so thought I would pass it on.
1. No point in doing a flush until you get rid of the (assumed) source of the oil so ordered a new oil cooler from Ford - was just over $100. Part#: AL3Z6A642B. Engine Oil Cooler Assembly. Comes with a new oil cooler bolt.

Remove the skid plate. Drop the coolant and oil. The radiator drain plug is on the passenger side of the radiator at the bottom, is red. Use a screwdriver to open it. If you turn it enough, you can pull it out. With the multiple flushes I did, one of the o-rings on it broke so plan on getting a new one, it was $6.
Remove the oil cooler, this is when I first learned about the joys of Quick Connects and how they are not Quick Disconnects. Ford says they are non-service items and dealer to improvise. The coolant hoses are supposed to come off by pushing forward, pressing in the white tabs at the top and pulling them off. That is what the YouTube videos show but they are working with new ones. The photo below shows the new oil cooler and the two hoses. I eventually got the upper right-hand one off intact with 10 or 15 minutes of swearing and skinned knuckles but the lower one on the left was stuck solid and I ripped up my fingertips trying to get it off. Had multiple goes at it over half a day but nothing was moving and ended up zip tieing around the white tabs to keep them in and then yanking on it as hard as I could and it came off along with the internal hard and soft o-rings and the retainer - they must have been stuck onto the tube. They do not go back in. If I did this again, would see if the connectors came off easily, and if not, carefully take a hacksaw to those factory plastic clamps and put new quick connects on. I replaced the one I broke but since Napa only had one, I re-used the unbroken one. O'Reillys has Gates or Dorman 3/4 inch versions for around $22 and $13 and secure them with $3 screw clamps.


The oil cooler is held on by the oil cooler bolt and you need a 14mm hex socket. Put the new oil cooler on and tighten the bolt to 43 lb-ft. The oil filter is 44 in-lb plus 180 degrees then replace the oil.
Now the fun part - flushing the coolant endlessly and getting rid of the milkshake.
1. Remove the thermostat, required with the number of flushes needed. It is near the front of the engine at the bottom end of the upper radiator hose. Two 8mm bolts, remove the air cleaner outlet pipe to make room and then undo the bolts with a socket and swivel. Take out the o-ring and thermostat and then reinstall the o-ring and the thermostat housing. Bolts to 89 in-lb and be careful as that is less than 8 ft-lb and will be a job if you strip them or cross thread.
2. Stick a hose in the radiator and start flushing as much as you can after pulling out the drain plug fully. You then realize it is not doing much so you need to remove the heater inlet hose from the heater inlet tube. This is near the front on the passenger side center. This allows you to get a lot more out. There is a reusable clamp you can squeeze with pliers and move up the hose then it is a job and a half to get the hose off the tube but you will get there eventually. I ended up disconnecting the oil cooler hose too and flushed everything with hose water and it only started to get some of it out as the oil sticks to the inside of the hoses.

3. Now to Home Depot and get two gallons of the purple Simple Green ProHD. I poured a quart or so in each time and then filled the rest with tap water, buttoned it up and ran the engine for 10 minutes, let it cool down then opened everything up, and flushed as much as I could with the garden hose through the expansion tank, radiator inlet, the heater inlet, and the oil cooler hose.. Eventually after doing that more than 5-6 times, you are starting to get somewhere.
4. Then you need to clean the expansion tank as the brown oily milkshake has coated the inside. Airbox lid off, air filter out. Remove the hood sensor and then the two bolts and the airbox and the expansion tank lifts out. It took a while to get it clean and I used degreaser, the garden hose, and ended up putting a dishwasher tablet in it and some boiling water from the kettle and shook it. There was still residue all on the inside so put some shop rags and a handful of nuts and washers and shook it until the shop rags absorbed everything and it was more or less clean. Just have to improvise but it takes a good while.
5. Now I started putting in distilled water to try and flush the tap water out and good luck with getting that all out. The capacity is 19.5 quarts and most of it seems to stay in the engine block. I drained as much as I could and filled it with distilled water, then ran the engine up to heat three different times then drained, I think I used 20 qts but it seems futile. No way you are getting all the hose water out, and good luck flushing with just distilled water and not hose pressure.
6. Now time to put the thermostat back in the reverse of how you took it out.
7. The mix of yellow coolant and distilled water is supposed to be 50:50 so you are aiming for 9.75 quarts of concentrated yellow coolant. I drained everything out as much as I could and blew air in all the open hoses. The way to do it is to fill through the radiator and you know it is full when water starts coming out the heater inlet pipe. Over 10 or 15 minutes, including running the engine for short times, I was able to get a total 8 quarts of concentrated yellow coolant in and 1 quart of distilled water in the radiator and the expansion reservoir (which takes 1.5 quarts up to the max cold fill line). That left 10.5 quarts of water or air that was still in the engine block, heater core, and hoses. I emptied two gallon bottles of concentrate and used the quart of distilled thinking there was plenty to go but it was full. I wish I had opened the 3rd bottle instead of using the quart of distilled water. I was expecting a lot more air to burp out but nothing yet.
8. Going to take it for a decent run tomorrow and I expect some more air will burp out but not much. Assuming that all air is out, the way I will get 50% concentration is to take the 8 quarts of concentrate and 10.5 quarts of water -> 41% concentration. With a bit of algebra, if I take 3 quarts of 41% out and replace it with 3 quarts of 100%, it will be at 50% concentration. => (19.5 qt - X qt) * 41% + X qt x 100% = 9.75 qt x 100%. X =~ 3qt concentrate. Failing that, i bought a cheap refractometer off Amazon and that will test the concentration as I go. You are aiming for 48-50%

Lastly, would be very expensive labor-wise to get a shop to do this to the extent I did, it took several days and I did a lot of flushes. I don't think they would clean it as thoroughly (and I did not get it all). I expect the coolant will dirty up with the few percent that is left and maybe next year, will do another round of degreaser flushes then take it to a shop to get a full machine flush and vacuum refill for the last one and that can last the next 50k miles or so.


