After receiving my GJ Motorsports 3rd brake light and noticing the instructions are terrible. I decided to do some good research and figure it out on my own and hopefully, this makes it easier for the next person. First off, I received mine without the connector to plug directly into the stock harness so I had the vampire connectors which made it a little more difficult. Below is a basic wiring diagram (if you have the connector) that I made. Please note all the wires that you are connecting to the truck harness have no ends on them if you received it without the connector like mine. If you have just the vampire connectors just take the connector for the truck harness out of the equation and you still connect the wires to the same spot. On my 2021, the blue marked wire was to the purple wire on the truck harness. The wire from the "in" on the reverse harness went to the white wire on the truck harness. The red marked wire went to the red on the truck harness. The black wire went to the black wire on the truck harness.
View attachment 393154
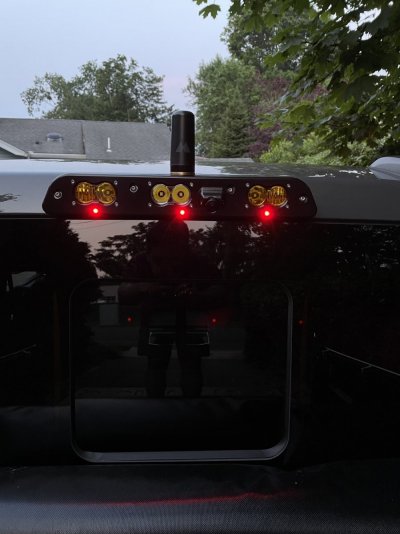
View attachment 393156
I had the NMO mount and the cable wasn't attached as well. This was pretty straightforward since the screws are different sizes and the cable ends are to accommodate the proper size screw. Just make sure you also use the plastic washer on the antenna cable between the connector and the antenna to prevent it from grounding out.
Running the cables was fairly easy. You just need to pop off both the front and rear door sills on the passenger side and then remove the cover for the fuses on your kick panel. I was able to pull my headliner down just a little bit to grab the cables and then routed both the nmo antenna cable and the wiring harness behind my c-pillar, then through the bottom of the b-pillar, and then just the harness to the kick panel. The nmo cable, I was able to route to my center console through a divot you can find below the passenger side seat. If you follow the wiring harness, you will see it T off here and there is enough space to run it under the carpet to a part that is cut out under the seat that you can pull it through there. I then removed the back side of my center console to route the cable there to my icom radio. I also used the youtube video below on how to remove the center console. I drilled a hole on the back driver's side of it to accommodate the cable size and then the rubber mat also covers it so you can't even notice it is there when it is removed.
Removing center console:
View attachment 393164
I ended up terminating both side S2 lights into a weather pack connector and then pulled the wire for the 6th upfitter switch to run both at the same time. You could also use the Y connector right off the lights and just use one of the wires to terminate into the upfitter wiring harness. Remember if you want to use the upfitter wiring in the kick panel, you have to connect the two wires by your battery in the engine bay for that same upfitter switch to work.
I grounded the cable to the 10mm screw by the fuses. This is also where I put my ground for my icom radio.
The last part that was more confusing is where to attach the reverse harness. The GJ motorsports show the cable location and color as green/brown. There was no green brown cable located where they show on the instructions. I can tell you there are THREE Green/Brown cables. There is one with a very thick green and brown color, this one IS NOT the one you want to tap into. The other two green/brown cables actually go to the same location. One is the same size as 80% of the other cables in the harness and one is much smaller. I tapped into the one that was the same size as the majority of the wires in the harness. In the fuse diagram below, I rotated it to show the proper way up as you will see it in the kick panel. I attached the vampire connector right behind where the wires come into the fuse panel.
View attachment 393163
View attachment 393165
I hope this helps save some time for those looking to install this. I am not sure if there are any wire color variations between 2021 and the newer trucks as we have seen in the past, but the wires should be in the same locations. I wish I would have taken more pictures while I was doing this install but hopefully everything else is fairly straight forward! Also, if anyone sees anything that is wrong or unclear, please let me know!