Upgrading the TWINS

Disclaimer: Links on this page pointing to Amazon, eBay and other sites may include affiliate code. If you click them and make a purchase, we may earn a small commission.

Graybeard

Active Member
Joined
Apr 15, 2021
Posts
56
Reaction score
210
Location
Detroit
3D9D4C2F-AA12-4807-839B-BD9283552626_1_201_a.jpeg

So, I decided to upgrade the TWINS. And since I am no longer restricted by my warranty, I am removing the factory restrictions from the intake and exhaust in one fell swoop. I am calling this project “No Restrictions".

I’ve done a lot of things with engines. This was my first turbo swap. I wasn’t able to find much information on the Garrett Power Max stock location turbos in this forum (or in general online), so I thought I would share more of my experience for those whom may be considering similar modifications. I have a 2017 Gen2 that has 73k on the clock. I have no warranty left and these parts look gorgeous. She is still young enough to have some fun. I have read a lot about different performance modifications and it’s now time to play. I assume a few others are nearing my situation with their Raptor and considering doing all the things you thought you would lose your warranty over. Here is my write up on a turbo swap for the Gen2 Raptor including part numbers, some great tools, and a few lessons learned. I hope to use this myself for future reference, and certainly hope that it may help others understand the process steps. Sometimes it’s just nice to see what these parts look like.

I took notes during my recent install. Some of this is repeated elsewhere. My apologies for the duplication, but I am attempting to be comprehensive in one post such that this can be used to reference the whole job.

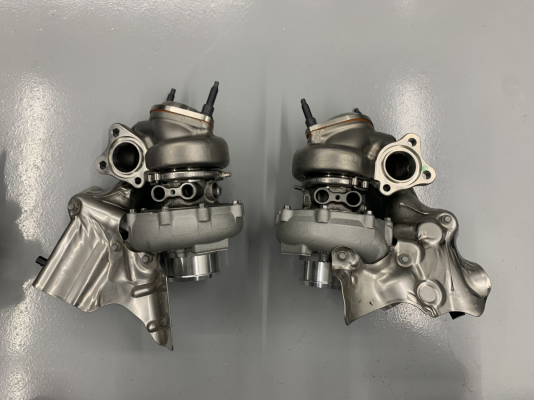
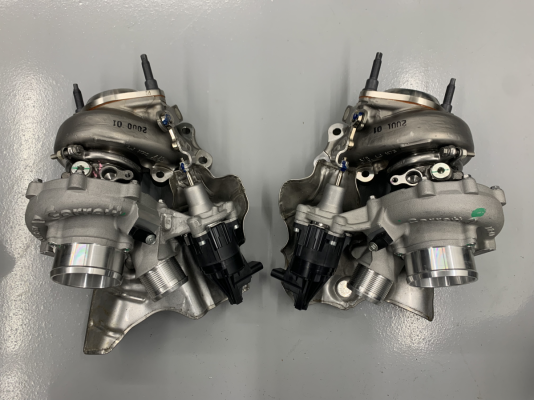
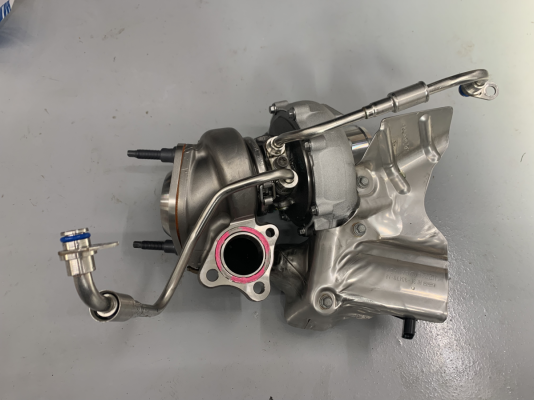
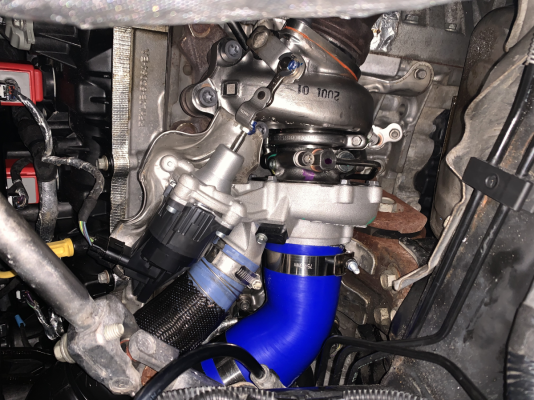
First thing…. You WANT these. These turbos are just gorgeous. The first thing to point out is that these are electronically controlled wastegates, just like the stock parts. Many may not realize this, but these are super fancy parts. I’d recommend staying away from vacuum actuated turbo wastegates that are available out there. You know how it feels when parts turn up looking better than expected? I do now! These things give me serious wood. Really nicely made. I took photos like these turbos were my newborn children. Are these emissions compliant? I don’t know. My modifications retained the stock downpipe, exhaust, and all catalytic converters so there is a reasonable chance it would still be compliant with an emissions test. Michigan for better or worse does not conduct an annual emissions audit, so I am unable to confirm compliance.

When considering doing this job, I knew it would be a fair amount of effort. I purchased the service manual to read up on what I was getting myself into. I felt prepared, but we always seem to forget a few odds and ends. Can you do a turbo swap yourself? Sure! But possibly not over a single weekend. I spent a few days waiting for parts and a few more days waiting for tools. Then a few more days waiting for parts. Ha! Those unfamiliar with service manuals may be surprised with a few maintenance items buried in the overall service. These necessitated new seals for the most part. No biggie, but hopefully this information will help you guys spend less time driving to the dealership.

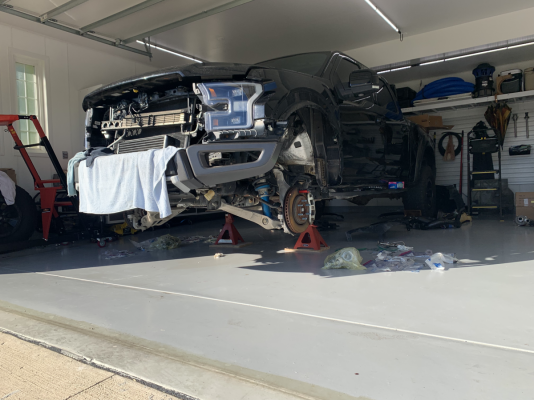
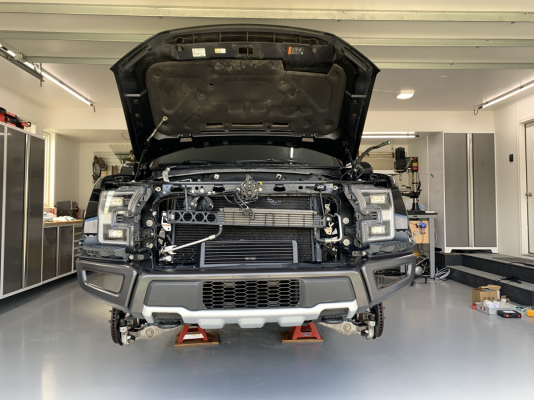
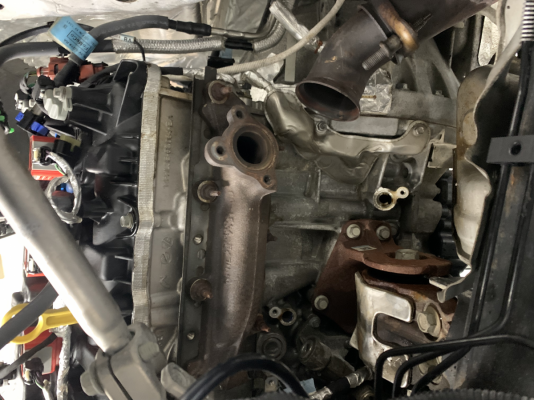
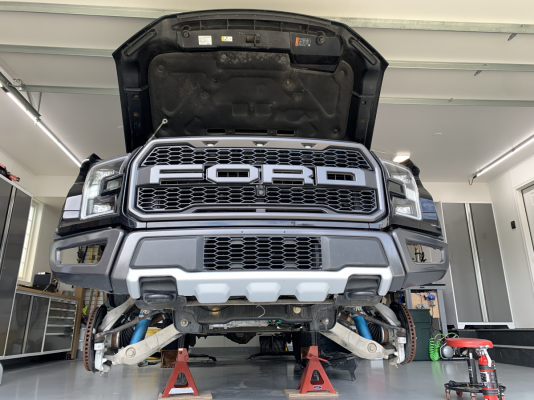
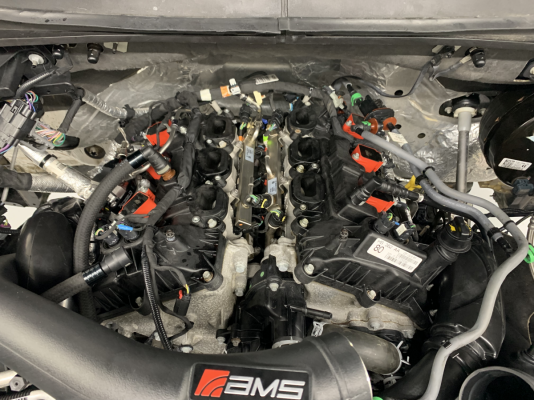
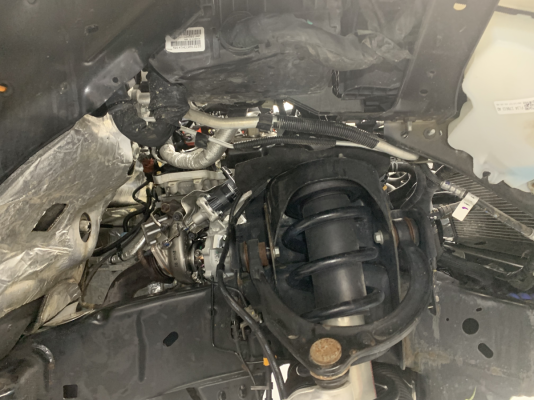
So, how hard is it? Well, she really isn’t as easy to work on as those old muscle cars. Most of the time spent doing this job is removing and replacing things in the way of what you want to work on. To do this job, you will be draining the coolant, pulling all intake tubes, removing the grille, radiator, the intake manifold, the starter, unbolting the AC compressor, as well as removing all of the skid plates, fender flares, front wheels, and their liners. You will disconnect the PCV tubing as well as the brake booster (That's what all those tubes are on the right of the engine bay!). All of this is removed to provide access to the turbos - which you access through the wheel wells with the tires off. Clearly, a lift or jack stands are required. It’s tight but it’s manageable. Take your time.

I spent two weeks doing the mechanical portion of this job, working on it a few hours a day and spending a lot of time waiting for things. If I planned better, I assume I could knock this out in about 3-4 days. I am not a professional mechanic. White collar here with a love of tools and a few bloody knuckles. I would plan a full day for disassembly, a full day for reassembly, and 1-2 days for swapping out parts and dealing with those pesky lines. A helper would be nice, but not required. The real time input seems to be tuning. I spent roughly 3 weeks going back and forth with a tuner to get everything dialed in. While you could pull off the mechanical portion of this job over a long weekend, you may want to plan adequate time to complete the tuning process.

I consider myself a good wrench, even though I have not needed to work on my daily driver in almost 2 decades. After taking on this project, I was surprised at how many things have changed. As a quick example, I was all ready to wrestle open the lower radiator hose to drain the coolant for a flush and fill. I mistakenly thought I could just fill up the reservoir tank to refill. I guess this is showing my age! Ford pleasantly includes a drain valve on the radiator itself. There is even a nipple to attach a 3/8 hose so that you don’t make a mess. If that is not fast enough for you, there is a quick disconnect on the lower radiator hose. The manual requires a vacuum purge and fill of the coolant. This actually makes a lot of sense for keeping out trapped air. Let’s get the new tool on order :)


Before you start taking your truck apart….
Buy the service manual, then read it including the subchapters. I found my service manual to be fairly complete. The pictures were great. Torque specs appreciated. It did not include part numbers, but the local Ford dealership was great help with that and I included the numbers below for easy reference. The most I had to wait was about 2 days for an OEM part to come in. No, unfortunately Ford doesn’t yet ship to your house. I got my manual here; https://www.factory-manuals.com/expand-2017-ford-f150-repair-manual-1924.html

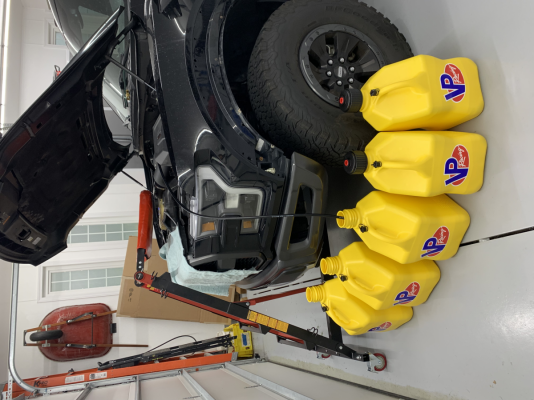
What fuel do you have in your tank? How many gallons? If you are like me, you have half a tank of 93 sitting in the garage. I had to drain the tank and refill with 91 in order to start tuning. That sounds simple…. But is sort of a pain in the ***. Can you siphon the tank? Maybe. The cap-less design does make that a little more challenging. Do you have enough containers for roughly 30 gallons of fuel? Even temporary storage can be challenging.

Check what grade of fuel is available near you. This may sound stupid. I expected 91 to be everywhere. Nope. Not at the three locations closest to my house. I was able to find 91 at Sunoco which has sparse coverage up here in Michigan. Whatever fuel you are starting with for tuning - It would be easiest if that were already in the tank when you complete the turbo installation. Proper planning here can save a fair amount of hassle. You will need to empty the tank between fuel types. Make sure you have adequate storage available. If you are swapping injectors or fitting the HPFP you will need to depressurize the fuel system anyway. So, this seems to be a good time to drain the fuel off and swap in those fuel system components. Make sure you depressurize before you start disassembly or drain coolant as you need to run the engine for a brief period of time.

You will at minimum need to drain and refill the coolant. I chose to change to a colder thermostat at the same time. The thermostat requires a new gasket seal. It also requires collaboration with a tuner. There are electric fans that work in concert with the mechanical thermostat. If you don’t change the temperature that the fans come on, they will only cool at the factory temperature setting negating the thermostat change. Pick up enough coolant (around 4 gallons) to refill. This truck requires a vacuum purge and fill. Do you have orange coolant? If so, you may need to switch color and do a full flush. Different colors are not compatible.


Why did I do this?
Well, this just seemed like a good bit of fun. Don’t get wrong. These trucks are real performers. I’m smitten. But, there were a few parts I did not like when I took her apart.

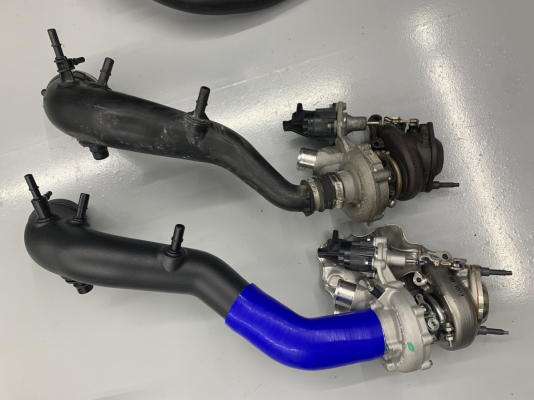
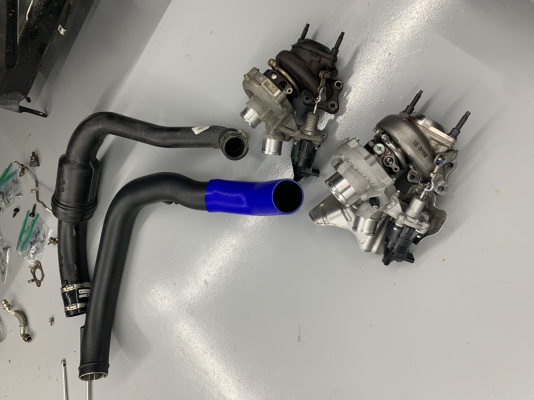
Ford does a great job hiding the intake restrictions in packaging. Take a look at the driver side turbo inlet. This was the most offensive part under the hood in my opinion. The Ford engineers give you a decent air filter and voluminous 2.5” intake tubes as far as the eye can see. As soon as they tuck down out of sight, these inlets shrivel down to 1.75” as they enter the stock turbos. OK, OK…. It’s a gradual taper (on the passenger side) down to 1.75” and one could argue that this may still allow for high velocity flow. Explain the tight elbow at the turbo inlet on the driver side. No bueno.
tempImageSyhXR6.png

tempImageUgAAl2.png

Most any pump is not a “fan" of intake restriction. They all build pressure and can push, but few like to pull air into them. Turbos aren’t terribly different. The inlet tubes are the most apparent restriction under the hood. So, I purchased a set of AMS inlet tubes that provide a full 2.75” all the way down to the turbo. These mate up perfectly to the Garretts. A pair of 45 degree silicone intake elbows and we now have eliminated our intake restrictions. It’s kind of pretty. Packaging is a bit tight. You actually want the plastic tubes and not metal here. Metal allows for too much heat transfer to the intake air in most cases. The plastic are actually quite nice and will protect those air charge temps that we invest so heavily in (intercooler). Fitting the charge tubes in general is a bit fussy. I combined the AMS inlet tubes with the COBB cold air intake. I really like the two completely separate air intake tubes coming from the filter housing. Their filter is a nice reusable filter. I now have a full 2.75” inlet tube from filter to turbo on each side. That will flow more air than this thing can digest. Restriction eliminated.

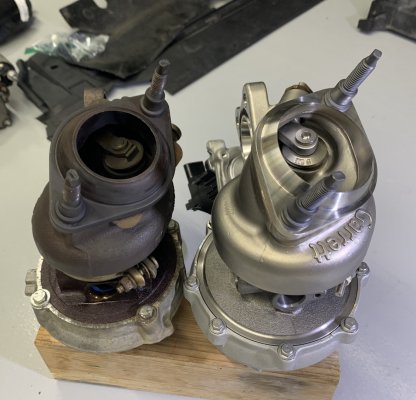
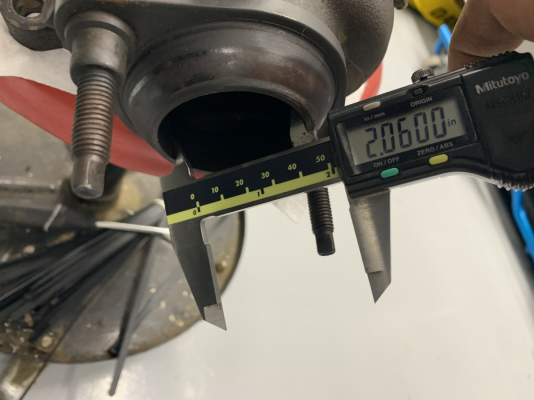
Possibly more surprising is what I see as a significant exhaust restriction in the stock turbo downpipe adapter. This is only apparent after you take it apart. Regardless of turbo size, this downpipe adapter seems to have been designed to guarantee a nice exhaust seal. Maybe it does that well. What I see is at minimum a 0.250” (that’s a quarter of an inch) lip all the way around where the flange protrudes into what should be exhaust gas flow. Over half an inch in diameter. There is no port matching. Just an abrupt shoulder on the stock parts. One could argue that hot exhaust gases are less dense than incoming air and flow through these ports without too much difficulty. I don’t like how these look. My eye can’t do CFD but I have always had great luck with port matching in the past. A 1/4” step has never been good design practice for flow in my experience. This almost looks like a restrictor plate. ID measures at 2.060” here on the stock adapter.
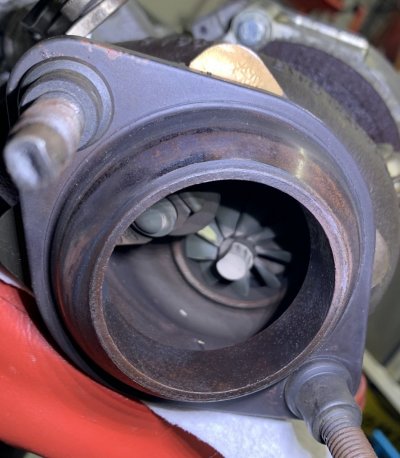
tempImage0rmtIs.png

8B4D963A-6128-44ED-983C-90872D18B0C8_1_201_a.jpeg
 
OP
OP
G

Graybeard

Active Member
Joined
Apr 15, 2021
Posts
56
Reaction score
210
Location
Detroit
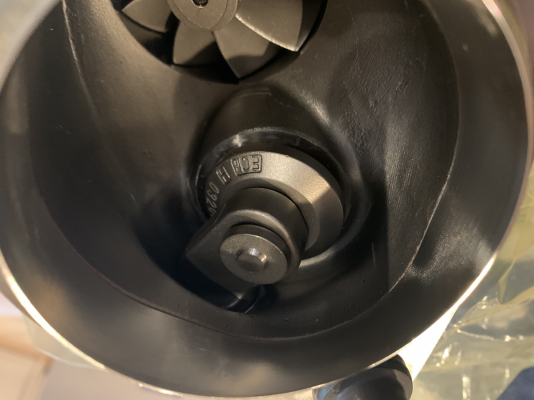
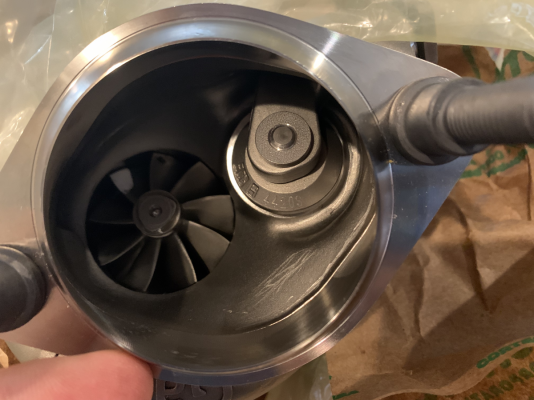
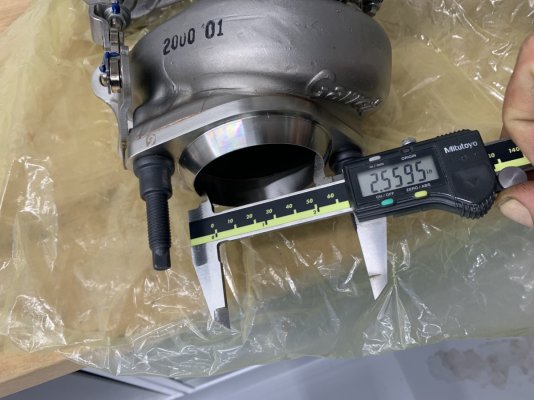
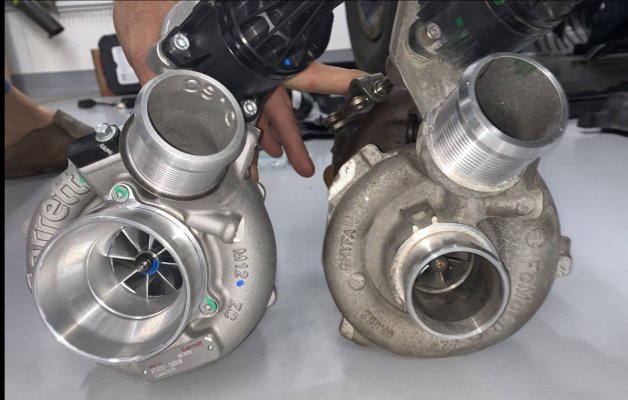
Now…. Let me sing the praises of the guys down at Full-Race. They hooked me up with the Garrett turbos and their matching billet downpipe adapters. Wow. Look at the pictures. Did I say WOW? This is turbo p Orn. Note that Full-Race’s billet adapters have nearly perfect port matching. As in I don’t think I could do much better with a die grinder myself. Very impressive. Nice and smooth contours, absolutely no restriction here. Looking at the photos of the Garrett outlets with Full-Race billet adapters makes them look gargantuan next to stock parts. The CNC adapters have an ID dimension of 2.560” - a full half inch larger in diameter and massive cross sectional area increase. Surprisingly, these have the same OD and bolt right up to the stock exhaust downpipe. No need to swap out that exhaust or even the downpipe. The only down side of the Full-Race billet adapters is that I had to use Ultra Copper to seal them up. I’d prefer a metal gasket of some kind and Full-Race assures me they have something in the works here. Maybe we can see a matching metal gasket soon.

tempImage3Gn4g0.png

tempImagehLXKye.png

tempImageVMgE5I.png

58A3224D-C2BC-46BF-9664-213116652376_1_201_a.jpeg

D2A40D4A-158A-45AE-9707-0289A3394EE0_1_201_a.jpeg

As a side note - While I would really like a full TIG welded stainless exhaust, my research indicates that you can spend a lot of money but receive little to no performance enhancement here. All the exhaust systems do is make more noise, not power. The stock exhaust has dual 2.5” pipes all the way back (plus muffler and resonator) which seems to flow quite well. Referencing Dyno pulls and other threads on here seems to support that the stock exhaust flows pretty well. I prefer quiet. So, cat back remains stock for now. Post turbo swap, the exhaust note is slightly deeper but substantially stock sounding. I imagine it is pretty loud directly behind me.

I had some oil building up in my intercooler and in my intake from “normal” driving. Without getting into the catch can debate, I decided that this is something required for my truck and the way I drive. Pretty much any WOT operation pukes oil from the PCV into the intake. Yes, this generates more maintenance to drain the can, but I believe this will reduce other issues I have had with the truck. After installing and running the PCV catch can I noticed that I was still seeing some oil residuals in the intercooler. The catch can was obviously working but oil was present in both locations. What I found was that there is a valve on each cylinder head. One is PCV and the other is CCV. The PCV is located on the passenger side valve cover and will dump oil sludge directly into the intake manifold, building up crud on the back side of those intake valves. The CCV is on the driver side valve cover and dumps its sludge into the driver side turbo inlet and then your intercooler. I have now ordered up a CCV catch can to eliminate oil accumulation from the driver side valve. While the stock system is likely great at hydrocarbon capture, those oil residuals will give you headaches that you can’t believe. Oil consumption seemed high on my vehicle, but has never been high enough to warrant topping off the oil between oil changes.

In addition to adding the catch cans, I opted for the Turbosmart e-BOV which vents excess charge air to atmosphere. This BOV handles higher boost and is electronically actuated just like factory. It’s also made from billet aluminum so it is pretty beefy. Not only does this sound cool as hell (and overall quieter than I expected) but it prevents recirculation of air that could be polluted with oil. She is a bit ”huffy” though…. Snorting when you let off throttle at anything above moderate go-pedal. It kind of sounds like the truck lets out a sigh when you take your foot off the gas. It expected more from its' human.

I want to play with E85 again. It’s been about 20 years for me. The economics are inverted to the last time I had some fun here. This is a great fuel.
 
Last edited:
OP
OP
G

Graybeard

Active Member
Joined
Apr 15, 2021
Posts
56
Reaction score
210
Location
Detroit
Fun TOOLS for this project;

Wera 1/4” metric ratchet set. No lie, this disassembled 90% of the truck. I’m really impressed, and am making this a daily carry item in the truck. This particular ratchet (Zyklop) has a pivoting head so that the tool can be used like a ratchet, at an angle, or like a screw driver. Not only does this metric kit have the socket sizes most needed under hood, but it also includes quite a few Torx bits that hold securely to the tool. All sockets and extensions have knurling so that you can finger turn things. Exceptional tool. It’s small and well packaged. This tool is a pleasure to use.
https://www.amazon.com/dp/B00IMF1CDO/?tag=fordraptorforum-20

It’s time to invest in a decent torque wrench. The manual references Nm for the most part. ft-lbs are usually also included. Most commonly I saw 10Nm referenced with one measurement down at 6Nm. The highest torque spec may have been around 42Nm. I screwed up and purchased a Gearwrench 3/8” electronic torque wrench. Well, maybe that’s a bit strong of a statement. It’s a very nice product. You can switch between units with a button touch. It somehow can measure a torque with angle, all with one beep. That is amazing in itself. Their version without ANGLE goes down to 10Nm. This one unfortunately only goes down to 13.5Nm (10 ft-lb). The Ford manual references 10Nm more than any other torque. Just out of range for this fancy guy. Wow! Torque and angle with beeps you say? 1/3 the price of SnapOn? Game on! Of course the expensive SnapOn electric torque wrench will go down to 5Nm while still reading angle. Maybe it’s worth it. I found the Gearwrench electronic torque wrench to be difficult to read while using (limited viewing angle) and was disappointed with the torque range.
https://www.amazon.com/dp/B078Z3QNLB/?tag=fordraptorforum-20

So many M8 fasteners under the hood require 10Nm to torque properly. So, naturally I found more Wera tools to drool over - 1/4” torque wrench in Nm. This one is really nice. Use something from China and you will value this tool immensely. I kind of like the mechanical “click” of this guy. Super easy to use and read. This thing is a keeper.
https://products.wera.de/en/tools_for_bicycles_and_e-bikes_click-torque_a_5.html

https://www.amazon.com/dp/B07B7VSM88/?tag=fordraptorforum-20

You will need a fuel disconnect tool - https://www.amazon.com/dp/B07JDDWPXV/?tag=fordraptorforum-20
I only used the one golden in color (9.5MM or 3/8”). Just pop this over the line, and push into the disconnect. Voilla.

Vacuum purge / refill kit - (UView 550000 Airlift) https://www.amazon.com/dp/B0002SRH5G/?tag=fordraptorforum-20

Clip removal tool. If you don’t have one, you need one. You’re welcome. https://www.amazon.com/dp/B072LWS2H6/?tag=fordraptorforum-20

Knipex water pump pliers. These things easily pull off those big hose clips. You can then use then use them to grab the hose and break it loose. Yeah buddy. https://www.amazon.com/gp/product/B01I3H6RBC/?tag=fordraptorforum-20

The “stretchy belt tool” - You can make this. It’s just a strap. I used an old 1” ratchet strap about 3 feet long. This is helpful to remove the belt on the AC compressor. I’d recommend a loop on one end to hold onto. It’s a bit of a fight, but not awful. Feed it on into the compressor wheel (rotating crankshaft CLOCKWISE ONLY) until you have about 180 degrees covered. Loop the strap behind the lower belt and yank like hell.

Top side creeper - I am going to just say that this is pretty much a necessity. One might attempt climbing on the truck to work on it, but you may do more damage than good. A top side creeper can allow you to be suspended over the engine bay like Tom Cruise in mission impossible. While mine has some things I’d like to work better, this really helps. Even with this creeper, I found a few fasteners were at the tips of my fingers, fully extended arms, and blind. But I could do it. This will make changing plugs and pulling the intake so much easier. The ones in the back always feel so far away. I can’t recommend the unit I have. I bought what Google said was the best rated one. It’s junk. Maybe I’ll make one. Maybe I’ll pay the premium for this thing;

I have looked at this one and believe this would be the most useful and least aggravating. The price made me standoffish. I bought something for $400 rather than $1,200 and regret my purchase. My Chinese creeper has a horrible ladder design and the pad actually tore the first day I used it. I’m not a huge dude. The ladder alone makes me want to scrap the one I bought. It somehow knows how to take my shoes off while I'm working and the placement of the double rung setup makes going up and down the ladder difficult. After dealing with my imported junk, I lust after this;
https://www.nomadmfg.com/the-fold-away/

Torx bits - All of the turbo coolant and oil lines on my ’17 have a T45 head on them. The largest Torx Allen wrench in my inventory is a T40…. So, this necessitates a 3/8” ratchet. The turbo to manifold bolts are T50. You need a good impact rated bit here for removal, as these bolts are super tight. I twisted off one T50 3/8” Tekton bit. Thankfully the fastener did not break, but I expected more from Tekton. All six manifold bolts came out clean. I did use penetrating oil a few days before attempting to remove them.

https://www.matcotools.com/catalog/product/A1TX45V/1-4-drive-stubby-x-torx-driver-t45/ - Now, here is a tool I wish I bought before I started! Not only is this the only T45 for 1/4” drive ratchets that I was able to find, but it is also a stubby bit allowing greater access. This bit in combination with the Wera 1/4” Zyklop above may be the ultimate solution for accessing that coolant line on the driver side. $10 will save you an awful lot of swearing and frustration.

Last thing that would be nice. If you are super cool and have a lift, it seems that the turbo swap is easiest with the body off. I’m not that cool. So, I am working with a top side creeper, a regular creeper, and doing a little Braille. One YouTube video I saw claims it only takes 45 minutes to pull off the cab. This would make the driver side coolant bolt a lot easier to work on.
 
OP
OP
G

Graybeard

Active Member
Joined
Apr 15, 2021
Posts
56
Reaction score
210
Location
Detroit
Ford parts list;

For any turbo swap /replacement you should completely replace the oil lines, the oil drain line, turbo oil filters, and all seals. You can clean and reuse the coolant lines. New seals are required. Those o-rings seem to somehow dissolve into the block. They are a bit fussy pulling out and also require thorough cleaning (brake cleaner). Pick everything up in advance if you can. Going back and forth to the dealership for a few o-rings really wastes a lot of time.

The manual requires replacement of all oil lines when swapping turbos. These parts are pretty durable and look like they could be cleaned well (with the seals replaced). In my experience, heat soak can build up sludge internal to the turbo and oil lines. I did not see evidence of sludge when I pulled these apart. I have always used the specified Mobil 1 oil. Seems like a reasonable service to replace these given he expense and effort required to get at the turbos. Things look good, but better safe than sorry. These parts are not that expensive. Maybe a few hundred dollars total.

The part numbers below are specific to my 2017 Gen2 Raptor. There may be slight differences year to year, so please check with your dealer when ordering parts. All of the following are consumable and should be replaced when replacing the turbos on a Gen2 Raptor;

Turbo coolant feed line O-rings (8 needed) - FT4Z-6N652-D
Turbo coolant feed line slip fitting (4 needed) - HL3Z-6N652-A
Right turbo oil drain tube (with seals) - HL3Z-9T515-A
Left turbo oil drain tube (with seals) - HL3Z-9T515-B
Right turbo block oil filter - BL3Z-6L625-G
Left turbo block oil filter - BL3Z-6L625-F
Right turbo oil line (with seals) - HL3Z-9T516-A
Left turbo oil line (with seals) - HL3Z-9G440-A
Garret Turbo to manifold gasket (pink circles, 2 needed) - JL3Z-9450-A
Stock Turbo downpipe gasket - (Not needed with Garrett turbos /billet adapter) BL3Z-9450-A
Turbo to manifold mounting bolts - T50 (6) - W715637-S900
Downpipe exhaust flange nut (4) - W52014-S440
Turbo downpipe exhaust studs (4) -
Thermostat seal - HL3Z-8255-A
Intake manifold gaskets (6) - HL3Z-9H486-A

IWE Valve - FL3Z-3A788-B - This is not part of the turbo swap, but if you have 50k or more miles this might be good prophylactic service. I believe this is related to the 4WD setup and causes noise described as throwing gravel, rattle, or grinding. Some have confused this with engine knock.

You will also need these if you are doing fuel system upgrades;
High pressure fuel rail -HL3Z-9J323-C
HPFP seal - HL3Z-9417-A - under the mounting plate
Gasket (2) - BL3Z-9374-A - in the HPFP mounting plate
Fuel pump roller Tappet - AA5Z-9C587-A
HPFP bolts (2) -


Other components I picked up;
SPD 170 degree thermostat - https://www.spdperformance.com/170-degree-performance-thermostat-gen2

XDI-HPFP-35 (EVO) -

ID1050 Injectors - https://www.summitracing.com/parts/ijd-10503414146/make/ford/model/f-150/year/2017

Garrett Power Max Turbos - https://www.garrettmotion.com/racin...or-f150-3-5l-ecoboost-powermax-turbo-upgrade/

Full-Race downpipe adapters - https://www.full-race.com/store/eco...1-f150-3-5l-ecoboost-billet-turbo-adapter-kit

Turbosmart e-BOV - https://www.turbosmart.com/news/f150-vee-port-em/

AMS charge pipes -

Silicone 2.75” 45 degree elbows (2) - I picked up generic parts from Amazon

COBB CAI -

Wagner Tuning competition intercooler -

UPR catch can (PCV) -

CCV catch can -
Radium sells a dual unit (PCV / CCV) for about the same cost as the UPR unit. It has smaller capacity, but avoids having to run long lines across the front of the engine bay. These units mount on the firewall and have an integral dipstick.

MSD Blaster Ignition Coils -
Nobody really needs more ignition power, but I have never been steered wrong with robust spark. Higher spark energy helps with higher boost levels, possible fouling of plugs, and just makes sure you don’t have problems here.

NGK 6510 spark plugs - These are the lower heat range plugs that are most commonly recommended.

Ford Performance spark plugs - M-12405-35T (gapped to 0.026")
 
OP
OP
G

Graybeard

Active Member
Joined
Apr 15, 2021
Posts
56
Reaction score
210
Location
Detroit
Fuel System
You really only need to upgrade the fuel system if you want to run E85. If you have easy access to E85, it is super cheap right now and makes excellent power. Maybe too much. I enjoy a lot of power, but I can honestly say that my E85 tune is so incredibly fast that I worry I may break things. Worried mostly about the transmission. But WOW.

I won’t get into the specifics, but these engines love ethanol. It seems that many people are doing their own blend of E50 at the pump and enjoying their experience. I decided that I wanted my truck to be E85 compatible. Sure, I wish it had a sensor to automatically switch fuel types, but the big one for me was engine safety. There is a lot of headroom in fueling capability for pump gas. But, from what I understand, above E50 the engine may not have enough fuel flow to meet demand. This could cause a lean situation under high load. Think all the bad things you want to think about that.

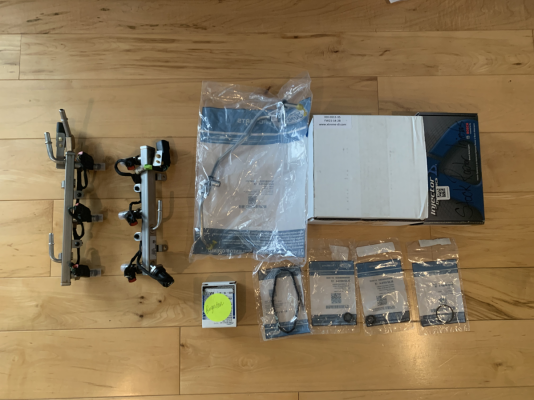
The recommended fix is a HPFP upgrade (EVO) and ID1050 injectors. The “ EVO” is roughly 35% higher flow than stock. The ID1050 replace the supplementary injectors up top, so you don’t have to mess with the direct injectors on this engine. No injector pigtails are needed, these just drop right on in. A little fussing, but nothing big. No in-tank booster seems necessary at this time. After making these modifications to increase overall flow, the engine should now be able to meet the full fuel supply demanded when using E85 at WOT. You still need to switch between 91/93 and E85 tunes…. But that isn’t horrible knowing I won’t hurt the motor by going lean.

I found the Ford manual most helpful regarding the HPFP specific to the Raptor. The torque secs listed online for XDI are way too big for the stock bolts. You do not need an o-ring for the HPFP pump like you do on the stock unit. It seems to have a flat gasket designed into the unit. Most tuners online do not replace the seals underneath the fuel pump mounting plate, however the manual says these should all be replaced.

The XDI pump recommends that you check the roller tappet every oil change. That’s every 5k miles. “Checking” the roller involves depressurizing the fuel and physically removing the high pressure fuel pump which also necessitates replacement of the high pressure fuel rail, seals, and bolts again. I might not check mine every 5k. The manual says that the roller should be lubricated with engine oil. I used assembly lube. Old habits die hard. I like how assembly lube is a bit thicker and sticks to the parts for that initial start up. Mine is purple, so it is a good visual indicator to tell if lube was applied.


Fuel Choice
The factory manual states that all you need is 89 octane. Yes, it runs but I don’t think it likes it. Higher octane is always a good idea with boosted engines. Up here in Michigan, I was surprised to not find 91 octane at my local gas station. We have 87, 89, 93, and E85 readily available locally. I had to hunt down the closest Sunoco to find 91 at the pump. One can easily mix 89/93 at the pump to make 91. You can always run higher octane on a lower octane tune, but you want a “pure” tank of fuel for tuning. I would recommend tuning with the fuel from the gas station you frequent most.

I used an 8 foot length of 1/4” fuel line to connect to the passenger side fuel rail and route to a fuel container. You will likely need to drain your tank a few times in the tuning process.

To depressurize;
Start the truck like normal
Use AccessPORT to turn off the fuel pump
Let the engine die to relieve fuel rail pressure
Remove intake manifold
Remove fuel “jumper” between secondary injector rails
Attach fuel hose to line and route to storage container
Key on (engine off) - use AccessPORT to command fuel pump ON
Watch the milage drop to zero as the tank is drained….
Once fully emptied, put it all back together and fill up with your fuel of choice for tuning

Alternatively to using the AccessPORT, the manual suggest disconnecting the fuel pump module connector (located above the gas tank) to depressurize the system. This does not allow you to enable the pump to assist in draining the tank. It is actually impressive how 0 miles of range was an empty tank. I don’t think I will push this thing close to empty ever again! I was under the impression there would be about a gallon left. Zero range was zero fuel left in the tank. FYI.

Although the manual requires new seals to be used on the intake manifold each time it is removed, it would seem that would be only if the manifold has been installed for a while and has gone through quite a few thermocycles. Pulling the manifold on and off a few times did not seem to damage the new seals. One new fresh set worked well for me. We shall see if I can spot a leak here in the future but all looks good right now


Tuning
Before you start tuning, take the time to set up the Accessport to display some important data. I suggest the following - AFR, Boost, Air charge temp, short term fuel trim. I didn’t get around to figuring out how to do this until the end of tuning and this would have helped me monitor things better. It is not apparent how to modify the AccessPORT display, so find some Youtube videos or forums for support here. I was stuck on the setting to display 1-6 different gages of the same data. The factory setting showed transmission clutch pressure in each and every screen and displayed the same data up to 6 times. It was frustrating because you change the datalog configuration differently than you do the gage display. And if you change the number of gages displayed, you have to set up all the data again. You definitely do not want to be setting this up while rolling down the road. This part could be a lot better. But, once it is set up to your liking it is quite helpful.

Being able to watch AFR means that you can monitor if you ever approach going lean while doing your testing. You can also see when and how your engine is learning when going through different fuels.

I chose COBB and the Accessport product for tuning. There are lots of options here. A good tuner can help walk you through the process. I chose Winfield at Goosetune to help me with my tuning needs. Super responsive. Nice guy. I get the sense that the guy can hardly sleep so many people are bothering him for tunes.

Prior to doing this turbo swap, I was using COBB AccessPORT with their factory tunes, TCM, and the CAI. It worked well for the most part. Definitely improved power and handling over stock, but I am seeing a lot more refinement from custom tuning. It’s just less clunky when everything is dialed in right.

I had four tunes generated for my truck. For basic pump gas I have 91, 93 and a 91 "tow” tune. I also wanted to play with E85. I don’t see much value in E50, given that you have to mix the tank manually at the pump and I made fuel system modifications to support increased E85 flow requirements.

Do you want a top speed limiter? I do! If you were to calculate the centripetal force and rotating inertia on these tires rolling over 100mph it would literally scare you. The speed limit exists on this vehicle to prevent a blowout. I can’t imagine what losing a tire at over 100mph on these things would feel like, but I don’t want to try it. 37’s will be even worse.

These things are great. The control system protects the engine quite well and unless you are running E85 with stock fueling you won’t go lean. This was my first remote “tuning” experience and I have been impressed. I did it with an “e-tune” that was emailed to me. No dyno time slot needed.

To perform the datalogs, I found myself a nice straight stretch of back country road. You need less than a mile. This process is actually quite simple and is nothing to get anxiety about. The trickiest part is pushing a button on the AccessPORT to start and stop your datalog while driving. It is really that simple, although AcessPORT likes to shut down this screen if you don’t use it for a few moments. If you wait too long, it will reinitialize and you will be half way through your pass before the tool can start to datalog. That’s annoying.

To do my pulls, I started out in regular “D” automatic. Once moving, I clicked the trans back into Manual mode. Adjust the gear selection to ensure you are in 4th. Let it settle out around 2,500 rpm (about 35mph) and click the button to start the data log. My tuner wanted 10 seconds at 2,500 rpm before WOT to 5,800rpm. I can tell you that in 4th gear the torque comes on nice and gradual, building up power at higher rpm. Vehicle is not squirrelly, and she takes the load politely on-road. Two pulls for each tuning revision was recommended. I ran the truck in 4A for my pulls to ensure no traction issues. Datalog files show up as a CSV (easy to read if you like) and are easily emailed off to your tuner for iteration of your tune file. Each datalog was approximately 35-50kb in size.

I went through about a dozen versions of my tune before it was dialed in on 91 octane. The vehicle slowly got quicker and quicker doing the pulls. No hard street driving is recommended until the tune is more refined. I’ve been scanning the datalogs, but can’t really tell what is being tuned behind the scenes. As may be expected, I did see the fueling more on the rich side early in the tuning process with AFR down close to 10:1. Once mature, peak AFR was around 10.58 but also spent less time there. That sounds like the right fueling for peak torque to me. Peak boost levels were just over 22psi. While tuning the 91 octane map, I noticed that a good push of the right pedal reduced my expected range by 1-2 miles per push. A few heavy passes only put a handful of miles on the truck, but took off about 20 miles of range. She’s quick. I think I chirped all four tires on dry pavement today. She has never been this fast. If this is the low octane tune, I wonder what E85 is going to feel like.

Sometimes the tuning process felt slow. Most of the time, I heard back within 2-4 hours with the next step, sometimes the next day around lunch. Overall, it took about 5 days to refine the first 91 octane tune. I had assumed I could do all tuning in one week or less, but that was too optimistic. The advantage of a day on a Dyno must be that your vehicle is finished tuning in one day. That, plus you would see actual wheel hp on your truck. No real explanation was given regarding what parameters were being tuned, but the truck ran much better than it ever has. Everything seems to work together much better now. I wasn’t seeking a particular hp figure anyway. Just all day long reliable gluttonous overwhelming power.

I noticed that my idle was very low after reflashing the ECU a few times. Apparently when you reset the adaptive learning, the control system will need to re-learn idle speed and that can take some time. I saw idle as low as about 500 rpm when doing my reflash cycles. She’s a bit shaky at that low of an idle, smoothing out above 600rpm or so. Just be prepared for that. This is not a calibration issue, jut an ECU learning curve thing.
 
OP
OP
G

Graybeard

Active Member
Joined
Apr 15, 2021
Posts
56
Reaction score
210
Location
Detroit
I used a software tool called Accessport Manager to manage the tune files on your physical device via a computer and USB cable. This tool is really easy to use. I was pleasantly surprised that they have both Windows and OSX versions of their app. The OSX version installed and worked without issue. You can then drag and drop tune files into the Accessport just like it was a USB drive. When I plugged in the Accessport to the computer the first time, it backed up the factory tune to the computer. Nice touch. At the end of my tuning process I chose to do some file cleanup. I removed all datalogs to free up space on the device and then removed my test revisions of the tunes. I wanted to make it easy on myself in the future, so I retained only the FINAL versions of my tunes and even removed the original COBB engine tunes from the tool. I was worried that some day someone may accidentally flash a file for the old turbos and fueling system. That may be problematic. So, I backed these up on a computer and removed them from the mobile tool for safety.

So, how do I like it?
I really like the exhaust sound. I have a completely stock cat-back exhaust, but these turbos flow very nicely. She sounds a touch more raspy than I recall before the swap. In park, throttle blips give a little rich pop at the end. It’s not overwhelming, but the exhaust note sounds healthier. On top of this, we have the sounds of the e-BOV which is audible when venting to atmosphere. This really only happens when you lift off throttle when boost is available. Wooossshhhh. Sounds nice to me and a few friends were very interested in the noise. Makes it sounds high performance. Decent conversation starter…

Outward appearance wise, it would be difficult to know what is under the hood versus stock. Yes, I can see the “Garrett” branding if I peer inside the wheel wells. But, other than that, there is little giveaway of what is sitting there. Maybe the slightly deeper tone. Maybe only seeing the taillights. You can drive the truck quite normally and it is well mannered in my experience. Yet when you want to push the right pedal, it is always there.

She runs about 180F at steady state on the highway with the 170 degree thermostat. Stock pretty much always read 212, so this is a big improvement.

Maybe it is my imagination, but I feel like this truck idles everywhere now. It really doesn’t matter what the speed is, boost is usually only a few pounds (less than 5) for normal driving. This turbo is more efficient and initial indication is that highway fuel economy may closely match stock. It seems like you can get the fuel economy you desire if you keep your foot out of it.

Sport mode makes better BOV noises for sure! Since it holds the rpm a bit higher, you get more audible blow off. Normal mode is much quieter for the blow off.

Push the right pedal down and watch your range drop! It’s almost as comical as it is fun. Blips of the throttle take off 1-2 miles of range. WOT to pass may drop 10-20 miles of range. But on the other hand…. You do pass like a bat straight out of hell. Smiles per gallon is high even if economy is not there when in the throttle.

It’s fascinating how much deeper the right pedal is. This thing has always been strong, but it’s totally different now. I feel like the truck is more mine after doing this work myself. I understand the engine, it’s systems, and its function much more after pulling it apart. I can better identify the different noises under the hood. I actually like the truck more now that I am doing all of its maintenance. I feel like at lighter throttle this thing seems very stock-like. This may be the ultimate bolt-on performance upgrade. Can a Raptor be a sleeper? I feel like this would eat most things on the road as long as she gets enough traction. From the outside, one would have a difficult time telling much difference from a stock raptor. All the packaging fits the stock locations. The exhaust note is similar. My truck has few external body modifications. But WOW. She is fast.

It is interesting to experience inertia in this thing. No, not trying to brake! But the acceleration. From 5mph or so, as I push down the right pedal, I am able to modulate the pedal position in which all four tires start to spin. She has so much grunt she may drift well. There is no traction control intervention in this case because all four wheels are spinning at the same rate (all slipping vs one). My point is that there is more than enough power to brake them loose and you literally feel the weight of the truck (inertia) holding you back. The power level obviously makes the truck feel lighter than it really is when it does hook.

I need to test 4A LOCKED. This may be the best combination for straight line work.

Fuel economy? Who needs to measure that? Just fill up with TRX tears. LOL

With my initial shakedown complete, it's time to put on a few miles….
 
Last edited:
Top