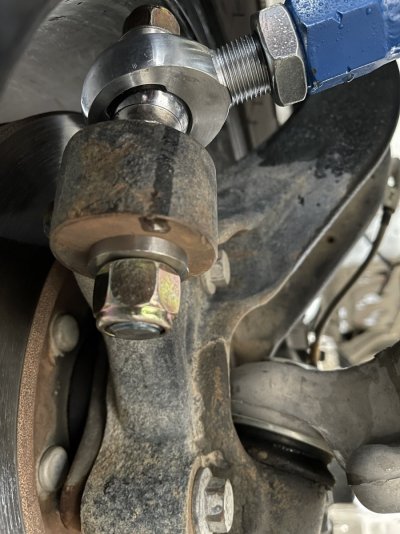
DIY 1/2 heim steering upgrade (part numbers and prices inside)

Disclaimer: Links on this page pointing to Amazon, eBay and other sites may include affiliate code. If you click them and make a purchase, we may earn a small commission.

NateMob

Full Access Member
Joined
Sep 15, 2021
Posts
399
Reaction score
477
Location
SATX
The blue really makes the polished heims pop. Gonna install tomorrow.

The blue turned out great. I know you want to install them already but did you clear them also?

Looks great! Quick stupid question. Does anyone offer those heim ends in female thread? Back in the day (which was a Tuesday), I raced a Banshee in the desert. Yamaha tie rods were hollow tubing with male threaded ends, and that threaded end was always a weak spot. A lot of guys (myself included) upgraded to Honda-style tie rods, which had much heavier-duty female threaded ends and a solid rod. Wondering if a similar setup wouldn't work for us...

These definitely aren't hollow and it's remarkably rare for these rod ends to bend or fail at the shank. You'll taco the stock inners before these give it up.
 
OP
OP
98rangerdave

98rangerdave

Full Access Member
Joined
Nov 27, 2019
Posts
374
Reaction score
538
Location
High Desert 92392
Installed, took a little longer than I thought. I was able to get the toe close enough to drive but my red strip in the steering wheel is at 10pm in order to drive straight.

Steering feels a lot tighter as my OEM bal joint style rod ends were completely loose.

Two things if you plan to do this yourself:

1: you’ll need a step drill bit because the tapered pin from RPG is 7/8” at the bottom, the OEM tie rod taper is 3/4” at the bottom, only had the drill out a tiny bit (1/8” or less) of spindle material in order for the tapered pin to seat correctly.

2: plan for an alignment, it’ll be close but not perfect.
 

Attachments

  • AB207F3A-7D75-4A7C-9722-74B29883FD5E.jpeg
    AB207F3A-7D75-4A7C-9722-74B29883FD5E.jpeg
    156.2 KB · Views: 23
  • 61F0E109-ADF6-4840-9858-87255EB79959.jpeg
    61F0E109-ADF6-4840-9858-87255EB79959.jpeg
    157.1 KB · Views: 23
OP
OP
98rangerdave

98rangerdave

Full Access Member
Joined
Nov 27, 2019
Posts
374
Reaction score
538
Location
High Desert 92392
Nice!! Those came out great, well done!
Thank you. Happy I did it. Fun little project and didn’t break the bank. Hopefully this forum can use the photos/measurements for their own version in the future. Although it’s not a lot of work, I think buying the RPG kit would be considerably easier. Haha.

I scheduled a wheel alignment for 12/30 so it’ll all be corrected and ready to drive then.
 

NateMob

Full Access Member
Joined
Sep 15, 2021
Posts
399
Reaction score
477
Location
SATX
1: you’ll need a step drill bit because the tapered pin from RPG is 7/8” at the bottom, the OEM tie rod taper is 3/4” at the bottom, only had the drill out a tiny bit (1/8” or less) of spindle material in order for the tapered pin to seat correctly.

I've got the standard 7* taper reamer that is needed to run 1 ton TREs on smaller axles, would i be able to use this to keep the full length taper or is the bottom of the hole simply too small while the top is the correct size for the RPG insert? (I can't think of a more clear way to ask that question, sorry for the confusing wording)

Also, are you getting full engagement on that bottom lock nut? Can't tell in the photos.
 
OP
OP
98rangerdave

98rangerdave

Full Access Member
Joined
Nov 27, 2019
Posts
374
Reaction score
538
Location
High Desert 92392
I've got the standard 7* taper reamer that is needed to run 1 ton TREs on smaller axles, would i be able to use this to keep the full length taper or is the bottom of the hole simply too small while the top is the correct size for the RPG insert? (I can't think of a more clear way to ask that question, sorry for the confusing wording)

Also, are you getting full engagement on that bottom lock nut? Can't tell in the photos.

The rest of the tapered pin fits perfectly. The only issue was the lower threaded section on the pin being too large to fit through the spindle hole. The RPG pin has the same taper dimensions otherwise. The lock nut is fully threaded and I used blue thread lock on all hardware. I’ll share another photo of the nut engagement once I get back outside.
 

NateMob

Full Access Member
Joined
Sep 15, 2021
Posts
399
Reaction score
477
Location
SATX
:happy160: 
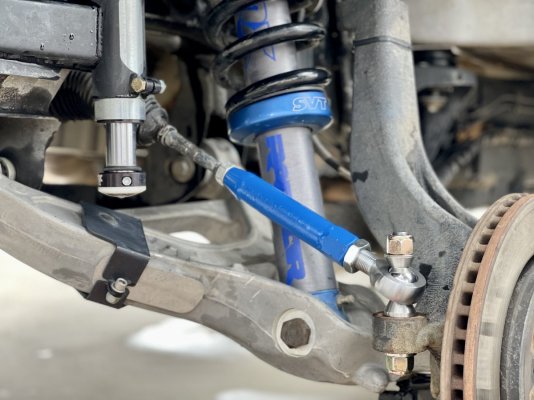
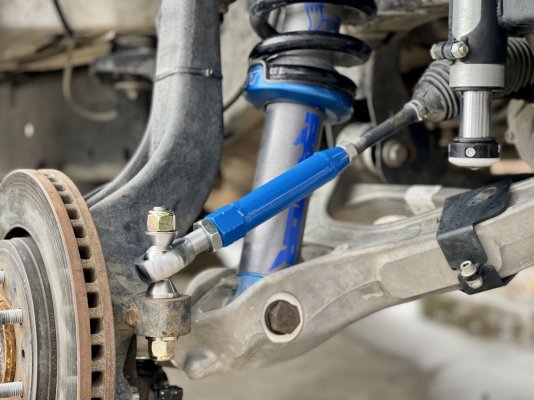
Your description and picture says it all. Thanks again for that and the entire write up, we need more tech on this site. I'm real excited to fire up the welder and fab a little something up for the Raptor. Happy Holidays.
 
Top