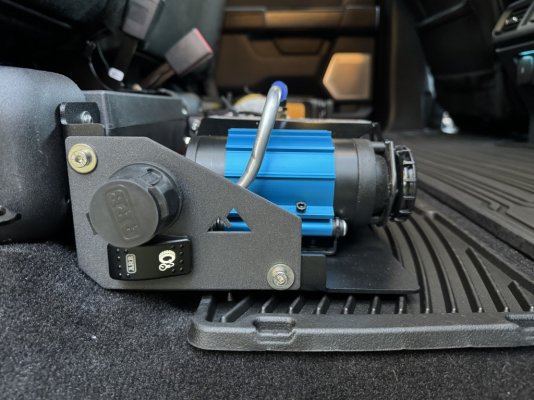
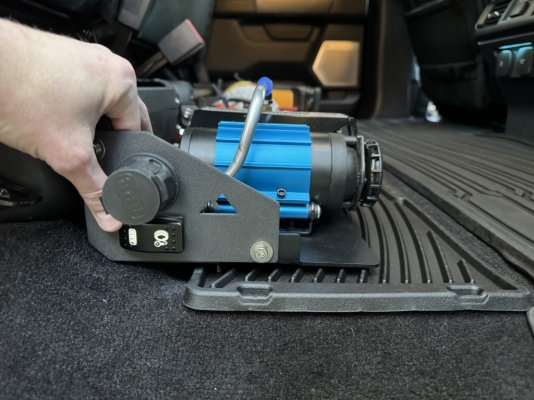
I completed my ARB twin air compressor install this weekend. I looked through countless posts on here to get ideas on where to install it. I was never really happy with the other locations I saw. I didn't want to put it in the engine compartment, I didn't want to drill into the frame, I didn't want it in the truck bed because I have a Retrax Pro and that already takes up a lot of space. I don't plan on having air lockers and will likely not do much off-roading, but I did want the ability to have a general purpose air compressor and inflate the tires if needed. I found this under seat bracket mount on NH overland and ended up going this route: https://www.nhoverland.com/products/15-f150-rear-under-seat-compressor-mount
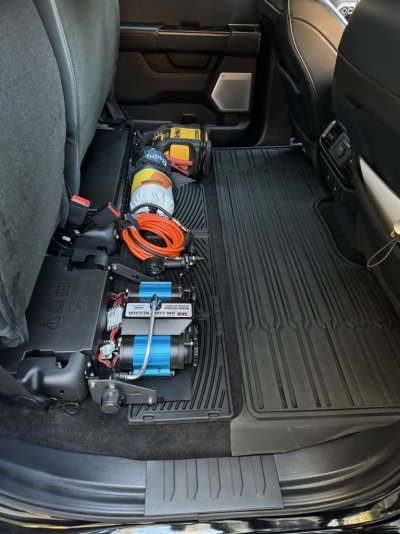
My '22 Raptor came with the foldable lockable storage option when I bought it used. I'm usually running it with two car seats installed so this storage option is essentially useless since I can't fold up the seats. I removed it and now have more usable space and the ability to install the bracket. I bought the WeatherTech 2nd Row Under Seat Cargo Area only mats to cover up the exposed bolts. They aren't a perfect fit with my existing OEM mats but its good enough for me. https://www.weathertech.com/ford/20...-fold-flat-storage/no/?OrderItemId=2160976687
I wanted to be able to control the air compressor at its installed location, but I also wanted a cut off switch so my 5 year old son didn't accidentally start it when he was climbing into his car seat. So my plan was to have the ARB switch on the bracket but also wire it in series to one of the upfitter aux switches. I accomplished this by heavily modifying the wiring harness. The harness comes with the ARB switch close to the battery terminal connectors, but I needed it close to the compressor connectors. I cut off the air locker connectors (Switch 1 and Switch 2 on the wiring diagram) and the ARB switch (Isolation Switch) and used some of the left over air locker wires to reconnect the ARB switch to the other side. It took some planning but it wasn't too bad. I did a lot of testing before I actually installed everything. I also combined the "To Ignition" and "To Dash Illumination" wires which is supposed to go to a live wire after ignition and the dash illumination wires. I then plugged those combined wires into my Aux 5 wire. I didn't really care about the ARB button illumination being controlled by the dash lights, but what is cool about this set up is that the ARB button is only active and lit up if Aux 5 is on, and Aux 5 is only active if there is accessory power. This way I can make the ARB button live by enabling Aux 5, then I can turn on the compressor with the ARB button from the side of the bracket.
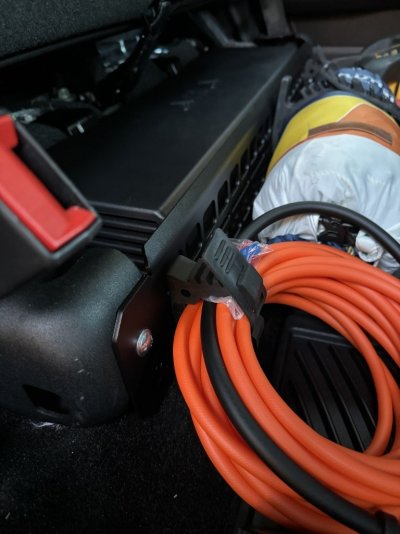
After reworking the wiring harness I wrapped it all up in electrical tape. I also had to buy about 15 ft of 8 gauge wire to run power from the compressor to the battery. Since I had a twin compressor I had to run two red and one black wires. I used solder to connect the wire extensions and then I used heat shrink and more electrical tape. I used wire loom to cover the whole wire set across the run. I ran all the wires from under the rear passenger seat, under the back carpet, along the lower door jam under the kick plate and to the passenger front door jamb. There is a rubber grommet just under the carpet on the passenger front seat that allows you to pass a wire to the under side of the truck. I drilled a small hold in the rubber grommet and shoved all the wires through. I then zip tied them all and ran them to the battery. I had to buy a set of 8 gauge terminal connectors to connect them to the battery which I also soldered.
Installing the bracket was a bit challenging. My Raptor has the 2 kW Pro Power on board so the inverter is right under the passenger rear seat where the bracket goes. The bracket hit the corner edge of the plastic housing, but I was able to file the screw slots just a bit to make it all fit.
While I had the car seats out of the truck, I also installed a BuiltRight Seat Bottom Divider Panel. My subwoofer (I think) is in the storage area behind this panel but I used the Molle pattern to install some Quick Fist mounts to keep some cargo that I have from flying around while driving.
All in all I'm very happy with the set up! Final photos in the next post.
--------
Photos of Install
Modified wiring harness:
.jpg")
Power Wire Extension:
.jpg")
Front Passenger seat grommet location:
.jpg")
My '22 Raptor came with the foldable lockable storage option when I bought it used. I'm usually running it with two car seats installed so this storage option is essentially useless since I can't fold up the seats. I removed it and now have more usable space and the ability to install the bracket. I bought the WeatherTech 2nd Row Under Seat Cargo Area only mats to cover up the exposed bolts. They aren't a perfect fit with my existing OEM mats but its good enough for me. https://www.weathertech.com/ford/20...-fold-flat-storage/no/?OrderItemId=2160976687
I wanted to be able to control the air compressor at its installed location, but I also wanted a cut off switch so my 5 year old son didn't accidentally start it when he was climbing into his car seat. So my plan was to have the ARB switch on the bracket but also wire it in series to one of the upfitter aux switches. I accomplished this by heavily modifying the wiring harness. The harness comes with the ARB switch close to the battery terminal connectors, but I needed it close to the compressor connectors. I cut off the air locker connectors (Switch 1 and Switch 2 on the wiring diagram) and the ARB switch (Isolation Switch) and used some of the left over air locker wires to reconnect the ARB switch to the other side. It took some planning but it wasn't too bad. I did a lot of testing before I actually installed everything. I also combined the "To Ignition" and "To Dash Illumination" wires which is supposed to go to a live wire after ignition and the dash illumination wires. I then plugged those combined wires into my Aux 5 wire. I didn't really care about the ARB button illumination being controlled by the dash lights, but what is cool about this set up is that the ARB button is only active and lit up if Aux 5 is on, and Aux 5 is only active if there is accessory power. This way I can make the ARB button live by enabling Aux 5, then I can turn on the compressor with the ARB button from the side of the bracket.
After reworking the wiring harness I wrapped it all up in electrical tape. I also had to buy about 15 ft of 8 gauge wire to run power from the compressor to the battery. Since I had a twin compressor I had to run two red and one black wires. I used solder to connect the wire extensions and then I used heat shrink and more electrical tape. I used wire loom to cover the whole wire set across the run. I ran all the wires from under the rear passenger seat, under the back carpet, along the lower door jam under the kick plate and to the passenger front door jamb. There is a rubber grommet just under the carpet on the passenger front seat that allows you to pass a wire to the under side of the truck. I drilled a small hold in the rubber grommet and shoved all the wires through. I then zip tied them all and ran them to the battery. I had to buy a set of 8 gauge terminal connectors to connect them to the battery which I also soldered.
Installing the bracket was a bit challenging. My Raptor has the 2 kW Pro Power on board so the inverter is right under the passenger rear seat where the bracket goes. The bracket hit the corner edge of the plastic housing, but I was able to file the screw slots just a bit to make it all fit.
While I had the car seats out of the truck, I also installed a BuiltRight Seat Bottom Divider Panel. My subwoofer (I think) is in the storage area behind this panel but I used the Molle pattern to install some Quick Fist mounts to keep some cargo that I have from flying around while driving.
All in all I'm very happy with the set up! Final photos in the next post.
--------
Photos of Install
Modified wiring harness:
Power Wire Extension:
Front Passenger seat grommet location: