Hood Light Mounts Install Walk Thru (Lots o pics!)

Disclaimer: Links on this page pointing to Amazon, eBay and other sites may include affiliate code. If you click them and make a purchase, we may earn a small commission.

OP
OP
BigJ

BigJ

FRF Addict
Joined
Aug 5, 2010
Posts
5,448
Reaction score
1,559
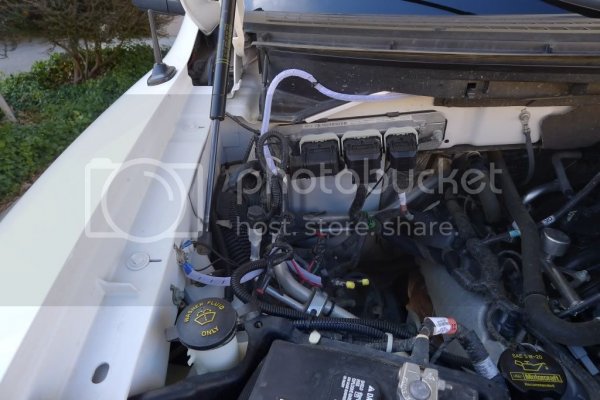
No problem PH. Here's a quick pic; it aint pretty but it gets the job done just fine.
P1000443.jpg

I connected both sides up to upfitter 3. If the mess coming thru the firewall isn't making sense to ya, make sure you read this thread:

http://www.fordraptorforum.com/f12/upfitter-aux-switch-wiring-explained-5418/

this one too:

http://www.fordraptorforum.com/f12/pass-thru-wires-upfitter-switches-explained-video-6501/

The ground you can see on the left hand side there of the pic. From the driver's side I pulled both the power lead and ground wire thru and under the plastic grade/shroud, so that I only needed one grounding spot. And as you can see, that's a factory ground spot that I'm using. I'm going to eventually replace it with a ground block to clean up that mess I created, but for now it works fine.

Hope that helps!
 

puddle hunter

Full Access Member
Joined
Mar 3, 2011
Posts
790
Reaction score
500
Location
Stockton, CA
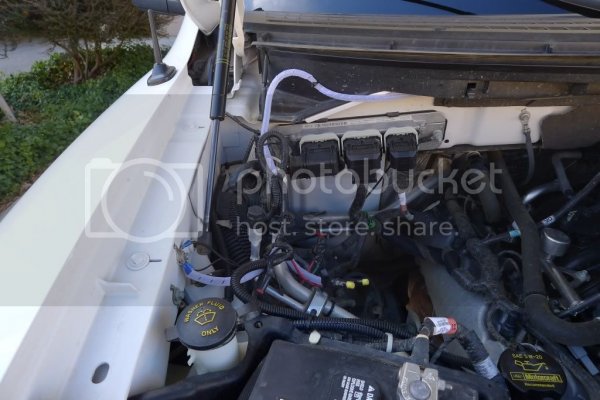
No problem PH. Here's a quick pic; it aint pretty but it gets the job done just fine.

P1000443.jpg

I connected both sides up to upfitter 3. If the mess coming thru the firewall isn't making sense to ya, make sure you read this thread:

http://www.fordraptorforum.com/f12/upfitter-aux-switch-wiring-explained-5418/

this one too:

http://www.fordraptorforum.com/f12/pass-thru-wires-upfitter-switches-explained-video-6501/

The ground you can see on the left hand side there of the pic. From the driver's side I pulled both the power lead and ground wire thru and under the plastic grade/shroud, so that I only needed one grounding spot. And as you can see, that's a factory ground spot that I'm using. I'm going to eventually replace it with a ground block to clean up that mess I created, but for now it works fine.

Hope that helps!
Thanks! I was planning on going the exact same route, just wanted to double check your setup. All I need now is a little extra wire and some fittings from the parts store! :peace: Thanks for the quick response!! :waytogo:
 

puddle hunter

Full Access Member
Joined
Mar 3, 2011
Posts
790
Reaction score
500
Location
Stockton, CA
I've had my mounts and lights on for nearly a week now, sorry no pics yet, and I gotta give a big thanks to BigJ and his diagrams and write ups! With these, and a little beer, you know exactly what you're getting into!

Here are a couple extra suggestions for things I learned while doing the install, that might make it easier for those putting in the mounts.

1: I used tin snips to take the major chunks out of the cowl, then used a diamond tipped, roto-zip style, dremel attachment to enlarge and smooth out the openings. Similar to this. It ate through the plastic like nobody's business, and saved me from marring the paint with a cutting wheel....plus it has a nice smooth finish now.

2: Cutting an extra large hole to get access to the back bolt, like BigJ, does wonders later in the install. :waytogo:

3: BigJ is right about that big ass hole in the fender... plug it with a towel before you get started!

4: We stuffed a moving blanket between the hood in its up position, and the windshield before loosening the bolts. This was to prevent a worst case scenario, of the hood letting go and smashing the windshield. This also helps to support the hood, so your buddy doesn't have to hold it the entire time.

5: The hood struts push the hood brackets back once the bolts are loosened. Rather than going through the arm numbing strain-athon BigJ mentioned for hood alignment, we just popped off the hood struts! They're only held on by a metal clip on both ends. Pry that loose, or off, and pop 'em off the ball pivots! Easy peezy! We kept the bolts loose, closed the hood w/out struts, then tugged and pushed for proper alignment. With the hood still closed and now aligned, we tightened down those back bolts. Then, lift the hood, tighten down front bolts, and pop on the hood struts! Done!

6: The bolts on the HIDX lights I installed, were a little too snug in the pre-drilled Outlaw mounts. So we carefully used a dremel grinding wheel to enlarge the hole, ever so slightly. Most of the clearance gained, was from removing the powder coat.

All in all, its a fairly easy install. From start to finish, including mounts, wiring, aiming lights, beer, dinner, goofing off, and a test drive... roughly 5hrs. We REALLY took our time. A fairly competent person and a friend, w/out any distractions, could knock this out in a couple hours.
 
OP
OP
BigJ

BigJ

FRF Addict
Joined
Aug 5, 2010
Posts
5,448
Reaction score
1,559
Great job PH! And awesome suggestion in #5. Where the hell were you when I was doin this install!?!? ;) :peace:
 
Top