goalieThreeOne
Member
Hello everyone. I wanted to share my audio build, a build I've been planning for over four years, well before I knew I was going to buy an 801a.
Introduction
The bones of this build date back to 2020 when I had just bought a 2017 Explorer Platinum. The goal of that build was something with great quality, a low profile, portable to future vehicles as much as possible, and retaining all cargo space.
At the end of 2023, I had to purchase a new vehicle and ended up with a 2022 801a with 8k miles on it in RRM. The original plan was to keep the factory system, because honestly, it's really, really good for factory. But I could not live with it after a couple months and so I started planning out a build.
Originally, I wanted retain as much of the old system as possible, retain all functionality of the vehicle, and come in under a budget. This build was not completely successful in all three of those goals, but this was the best compromise I felt I could make. All audio comes from the factory Sync 4 unit and volume controlled by the same.
Link to jack relocation project
Build List

1. Pac Audio Amp Pro AP4-FD31 Amplifier Integration Interface
2. Audison Primo Forza AP F8.9 Bit 9-channel DSP/8-Channel Amplifier
3. Audison Forza M1D Mono Amplifier
4. Hertz ML 165.3 6.5in Woofers (Part of the MLK 165.3 package, passive crossovers are not used in my build)
5. Hertz MP 70.3 3in Mid Ranges
6. Hertz ML 28.3 1.4in Tweeters
7. Hertz MPX 165.3 6.5in Coaxials
8. Hertz MPS 250 S2 10" Subwoofers
9. MTI Acoustics full length behind-the seat enclosure
10. MTI Acoustics door blank off plates, front and rear
11. MTI Acoustic B&O sub blank off plate
All components were installed and tuned by my trusted local shop.
AmpPro Integration Module

From the outset, I knew I was going to use an AmpPro. I had used one in my previous build, and I was extremely impressed with how elegant their solution is. There's not really any programming you have to do, but if you wanted to, you can go in and adjust tons of setting such as how loud your door chimes and phone audio play. It also allows me to remove the B&O amp completely, which is important for this build due to the space constraints. I had looked at other options, though. Everyone raves about the NAV A2B unit, but it did not seem to offer as much customization as the PacAudio unit, did not offer any additional features or quality improvements, and was about 30% more expensive. I also looked at the Maestro AR since the AP F8.9 Bit is compatible, but at the moment Maestro AR is not compatible with B&O Unleashed systems that I can tell.
It really is the best option for getting clean audio to an amp or DSP. If you're just adding a sub, though, this is not the right choice for you since it disables the factory amp. Not that this build will disable your overhead, headrest, rear door tweeter and dash center channels. None of these mattered to me, since they're kind of gimicky, but theoretically if you wanted to retain these, you could install an 18 channel DSP and replace those speakers yourself. This would be overkill.
As you can see from the photo, the shop was able to mount this behind the trim on the driver's side behind the seat.
Audison AP F8.9 Bit DSP Amp
Like I said my original plan was to retain my old system and that would have meant the DSP and front and rear stages would have been power by a combination of an Audison Bit Nove DSP and a JL Audio XD600/6 amplifier. However, once I had made the decision to go with a full length rear enclosure and a pair of subs, space was now at a premium and we did not think we could fit those two components along with a new 1000W monoblock amp. Turns out, we probably could have and that's because we found an AmpPro mounting spot that didn't require using the floor rack.
This is one of my few regrets in this system. The Prima software that's used with this DSP is really quite poor. It's lacking in some easier tuning features that require some extra time to tune. If your installer is authorized for Audison, they can use the Bit Tune module to do most of the heavy listing but there is no Final EQ function that allows you to adjust the final tune without potentially upsetting the base acoustic correction. If I had known this, I would have gone with one of the new Forza DSP Amps (at double the cost) so I can use Audison's newer Bit Drive tuning software. I don't want to give the impression that this isn't a good DSP. It's actually fantastic. It's just more tedious for me to get in and add my own flavor.
The amp function works perfectly and I'm using it to drive a fully active three-way front stage, a pair of coaxials for the rear, and a pre-amp output to the Audison M1D. I have two tunes on this DSP, because it will only allow two saved tunes (another downside to this DSP), one for driver focus and one for all passengers.
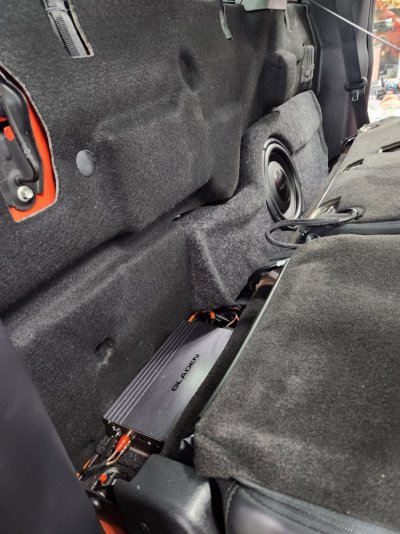
Audison M1D and Amp Rack

There's not much to say about the Audison M1D other than to say it ends up being perfectly matched to the size of the amp rack we built and perfectly sized for my pair of subwoofers.
The rack was custom built by my shop, but it's inspired by the amp rack that MTI Acoustics sells for their full length behind the seat enclosures. It attaches to the seat mounting bolts and should fit 2 or three narrow amplifiers. As you can see, the ports are a little hard to access, so I plugged in a USB cable and leave it in that space so I can adjust the tune whenever I need without messing up the USB port each time.
Front Stage
Like I said earlier, I went with a three-way fully active front stage. This was actually the most difficult decision to make in this build because it made the largest cost impact. It meant abandoning my XD600/6 in search of an 8ch amp, originally an XD800/8 but later the AP F8.9 Bit. My Explorer had a two-way active front stage but that's because the Explorer did not come with a suitable factory location for a mid-range driver. One of the aspects of the factory system I loved most is how well the three dash channels created a really great image even compared to my Explorer's aftermarket setup. I'm really glad I did this because the imaging in this build is SUPERB. Vocals seem to originate from directly in front of you, the singer might as well be sitting on your dash, singing directly to you.
All speakers were installed with adapters, for which I don't have the details. The woofers in the doors have fast rings and every surface they could get to is covered in Mesa sound treatment. I also opted for MTI Acoustics door blank off plates, you can check them out on their website. I don't know if these are marking a huge difference but judging by how much the Bit Tune module had to adjust for the response from these woofers, I'm going to say it's significant. Plus, it gives me tons of overhead on the mid-bass for final EQ'ing. No pictures here because all you can see is the factory speaker grills.
Rear Stage
Nothing too special here, just a pair of Hertz coaxials to give some sense of rear depth and to give the rear passengers something to listen to. I mostly drive by myself, so I did not see any reason to do anything special here. In fact, I'd go so far as to say even if I had more channels to play with, I'd rather wire up the existing center dash and overhead spots with aftermarkets before I went with a two-way rear. If you wanted to, you could probably swap these with another MPK 165.3 kit with passive crossovers installed, but I did not see the point in my case.
Doors are sound treated, and foam rings and MTI blank off plates installed.
Sub Enclosure

When you're making the choice of what sub enclosure to purchase, there is a lot to unpack. I looked at multiple options. I could have gone with an under the seat enclosure like MTI Acoustics makes or even a preloaded JL Stealthbox with two TW3's. But I really wanted to retain my underseat storage box for my PPE and recovery gear and the ability to use the whole floor for sensitive cargo. I accomplished the first goal, but I failed the second goal.
I really looked hard at the SoundsGood preloaded sub solution, but the price is astronomical for a system you have to install yourself and having two 6.5" subs was just not sufficient, I don't care what they say. So I found MTI Acoustics. Their only option for retaining the underseat storage only allowed for either one or two 10" shallow mount subs. The 12" option requires the seat to be moved ahead which will not let you retain the factory storage box. So, I went with the full length behind the seat enclosure, with sound treatment, and upgraded terminals. I also got their B&O sub blank off plate, but my shop could have probably built one to. For those that don't know, the factory sub uses the exterior of the vehicle like a giant infinite port. It's rather effective for what they're trying to do. But if you don't blank off that port, you're exposing the interior to the elements. As you can see, you have no room for an amp rack which is why we went with the setup detailed above. This setup requires you to remove the factory jack mounting provisions behind the seat. You can see a thread with my relocation solution here.
The shop had no trouble installing this. You'll notice that I have the grills for the subs installed. MTI notes on their website that speaker grills are not used in this setup but I retained my. The reason is because, despite what MTI says, the seats will not fold all the way up and latch with these subs installed. I do not know if it's because of the dimensional differences between the MPS 250 and the TW3, but if you don't have the grills installed, folding the bottom of the seat all the way up will cause the back of the seat to press on the surrounds of the MPS 250. So I opted to the keep the grill. I lose some range of motion in the seat bottom, but the grills will protect the surrounds in case someone wants to try and slam the seats up. It lets me lift the bottom up more than enough to get anything out of the box. MTI, if you are reading this, please know that your information is not correct. If you have any ideas to fix this, please contact me.
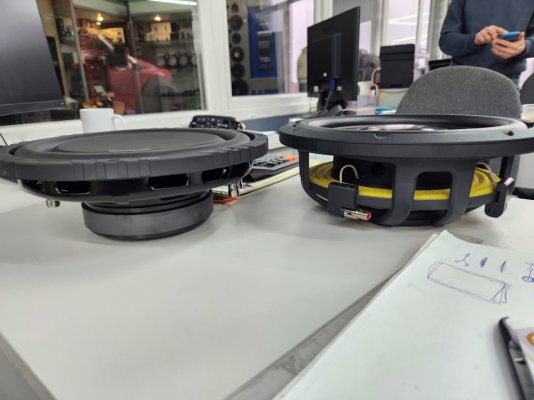
Subwoofers
For subs, I'm using a pair of Hertz MPS 250 S2's. This is a 10" shallow mount single voice coil, 2 ohm sub. They are wired in series producing a total load of 1 ohm, so the M1D is pushing 1200W to these bad boys. This is one of the first builds my shop has made with this sub, and they tell me after hearing it, they are no longer going to be recommending the JL Audio TW3 to their customers. This setup punches so far above its weight class. Now, I don't listen to a lot of punchy music, but I do listen to a lot of technical music, and this setup is tight and precise. It still has some balls, so on the occasion that someone wants to play "Put On" or "Levels", you are going to get a reaction. The way this is tuned gives me a ton of overhead for those types of songs, and it's going to basically be impossible to clip these out. So, other than the latching problem I mentioned above, this is about as perfect as it gets without more extensive modifications. My shop used an entire trunk kit and part of another to line behind the seats because I did not want any rattling. In my testing so far, I have not experienced any rattling from the moon roof, rear window, or seats. If you're going to replicate this setup PLEASE tell your shop to go overkill on the sound treatment. I cannot stress this enough.
DRC/Remote Control

If you're familiar with Audison, you're familiar with their line of DRC remote control products. The newest model is the DRC AC, but unfortunately it is not compatible with the AP F8.9 Bit. You have two options, the DRC MP and the DRC AB. I had a DRC AB in my previous build and it's a fine unit, but the smaller screen and fewer buttons make it kind of clunky to adjust things while driving. Instead, I opted for the DRC MP, which features a fully color changing display and keypad. In my last build, I hid in the storage cubby underneath the center stack, but this is not an option with the MP in the F150, due to the placement of the media bin light and the risk of blocking easy access to the wireless charging pad. I opted to place it underneath the ignition button. You can change the color, so I changed it to Turquoise to better match the ice blue interior lighting just to make it a little more finished looking. You have access to change the master volume (if not retaining factory volume controls), sub out volume, tuner memory, and others. I have it se to auto brightness mode. Only downside is I cannot see the screen when I'm driving since it's behind the steering wheel, but I can find what I need by memory.
Final Thoughts
Other than the few downsides I mentioned, I believe this is the sweet spot for F-150 audio. You can obviously spend as much as you want to on this, but this fit the bill for me. I blew through my budget, unfortunately due to the fact that I retained almost nothing from my previous build. I'd say I'm into this for about $8000 give or take including installation labor and materials.
Thanks for reading!
Introduction
The bones of this build date back to 2020 when I had just bought a 2017 Explorer Platinum. The goal of that build was something with great quality, a low profile, portable to future vehicles as much as possible, and retaining all cargo space.
At the end of 2023, I had to purchase a new vehicle and ended up with a 2022 801a with 8k miles on it in RRM. The original plan was to keep the factory system, because honestly, it's really, really good for factory. But I could not live with it after a couple months and so I started planning out a build.
Originally, I wanted retain as much of the old system as possible, retain all functionality of the vehicle, and come in under a budget. This build was not completely successful in all three of those goals, but this was the best compromise I felt I could make. All audio comes from the factory Sync 4 unit and volume controlled by the same.
Link to jack relocation project
Build List
1. Pac Audio Amp Pro AP4-FD31 Amplifier Integration Interface
2. Audison Primo Forza AP F8.9 Bit 9-channel DSP/8-Channel Amplifier
3. Audison Forza M1D Mono Amplifier
4. Hertz ML 165.3 6.5in Woofers (Part of the MLK 165.3 package, passive crossovers are not used in my build)
5. Hertz MP 70.3 3in Mid Ranges
6. Hertz ML 28.3 1.4in Tweeters
7. Hertz MPX 165.3 6.5in Coaxials
8. Hertz MPS 250 S2 10" Subwoofers
9. MTI Acoustics full length behind-the seat enclosure
10. MTI Acoustics door blank off plates, front and rear
11. MTI Acoustic B&O sub blank off plate
All components were installed and tuned by my trusted local shop.
AmpPro Integration Module
From the outset, I knew I was going to use an AmpPro. I had used one in my previous build, and I was extremely impressed with how elegant their solution is. There's not really any programming you have to do, but if you wanted to, you can go in and adjust tons of setting such as how loud your door chimes and phone audio play. It also allows me to remove the B&O amp completely, which is important for this build due to the space constraints. I had looked at other options, though. Everyone raves about the NAV A2B unit, but it did not seem to offer as much customization as the PacAudio unit, did not offer any additional features or quality improvements, and was about 30% more expensive. I also looked at the Maestro AR since the AP F8.9 Bit is compatible, but at the moment Maestro AR is not compatible with B&O Unleashed systems that I can tell.
It really is the best option for getting clean audio to an amp or DSP. If you're just adding a sub, though, this is not the right choice for you since it disables the factory amp. Not that this build will disable your overhead, headrest, rear door tweeter and dash center channels. None of these mattered to me, since they're kind of gimicky, but theoretically if you wanted to retain these, you could install an 18 channel DSP and replace those speakers yourself. This would be overkill.
As you can see from the photo, the shop was able to mount this behind the trim on the driver's side behind the seat.
Audison AP F8.9 Bit DSP Amp
Like I said my original plan was to retain my old system and that would have meant the DSP and front and rear stages would have been power by a combination of an Audison Bit Nove DSP and a JL Audio XD600/6 amplifier. However, once I had made the decision to go with a full length rear enclosure and a pair of subs, space was now at a premium and we did not think we could fit those two components along with a new 1000W monoblock amp. Turns out, we probably could have and that's because we found an AmpPro mounting spot that didn't require using the floor rack.
This is one of my few regrets in this system. The Prima software that's used with this DSP is really quite poor. It's lacking in some easier tuning features that require some extra time to tune. If your installer is authorized for Audison, they can use the Bit Tune module to do most of the heavy listing but there is no Final EQ function that allows you to adjust the final tune without potentially upsetting the base acoustic correction. If I had known this, I would have gone with one of the new Forza DSP Amps (at double the cost) so I can use Audison's newer Bit Drive tuning software. I don't want to give the impression that this isn't a good DSP. It's actually fantastic. It's just more tedious for me to get in and add my own flavor.
The amp function works perfectly and I'm using it to drive a fully active three-way front stage, a pair of coaxials for the rear, and a pre-amp output to the Audison M1D. I have two tunes on this DSP, because it will only allow two saved tunes (another downside to this DSP), one for driver focus and one for all passengers.
Audison M1D and Amp Rack
There's not much to say about the Audison M1D other than to say it ends up being perfectly matched to the size of the amp rack we built and perfectly sized for my pair of subwoofers.
The rack was custom built by my shop, but it's inspired by the amp rack that MTI Acoustics sells for their full length behind the seat enclosures. It attaches to the seat mounting bolts and should fit 2 or three narrow amplifiers. As you can see, the ports are a little hard to access, so I plugged in a USB cable and leave it in that space so I can adjust the tune whenever I need without messing up the USB port each time.
Front Stage
Like I said earlier, I went with a three-way fully active front stage. This was actually the most difficult decision to make in this build because it made the largest cost impact. It meant abandoning my XD600/6 in search of an 8ch amp, originally an XD800/8 but later the AP F8.9 Bit. My Explorer had a two-way active front stage but that's because the Explorer did not come with a suitable factory location for a mid-range driver. One of the aspects of the factory system I loved most is how well the three dash channels created a really great image even compared to my Explorer's aftermarket setup. I'm really glad I did this because the imaging in this build is SUPERB. Vocals seem to originate from directly in front of you, the singer might as well be sitting on your dash, singing directly to you.
All speakers were installed with adapters, for which I don't have the details. The woofers in the doors have fast rings and every surface they could get to is covered in Mesa sound treatment. I also opted for MTI Acoustics door blank off plates, you can check them out on their website. I don't know if these are marking a huge difference but judging by how much the Bit Tune module had to adjust for the response from these woofers, I'm going to say it's significant. Plus, it gives me tons of overhead on the mid-bass for final EQ'ing. No pictures here because all you can see is the factory speaker grills.
Rear Stage
Nothing too special here, just a pair of Hertz coaxials to give some sense of rear depth and to give the rear passengers something to listen to. I mostly drive by myself, so I did not see any reason to do anything special here. In fact, I'd go so far as to say even if I had more channels to play with, I'd rather wire up the existing center dash and overhead spots with aftermarkets before I went with a two-way rear. If you wanted to, you could probably swap these with another MPK 165.3 kit with passive crossovers installed, but I did not see the point in my case.
Doors are sound treated, and foam rings and MTI blank off plates installed.
Sub Enclosure
When you're making the choice of what sub enclosure to purchase, there is a lot to unpack. I looked at multiple options. I could have gone with an under the seat enclosure like MTI Acoustics makes or even a preloaded JL Stealthbox with two TW3's. But I really wanted to retain my underseat storage box for my PPE and recovery gear and the ability to use the whole floor for sensitive cargo. I accomplished the first goal, but I failed the second goal.
I really looked hard at the SoundsGood preloaded sub solution, but the price is astronomical for a system you have to install yourself and having two 6.5" subs was just not sufficient, I don't care what they say. So I found MTI Acoustics. Their only option for retaining the underseat storage only allowed for either one or two 10" shallow mount subs. The 12" option requires the seat to be moved ahead which will not let you retain the factory storage box. So, I went with the full length behind the seat enclosure, with sound treatment, and upgraded terminals. I also got their B&O sub blank off plate, but my shop could have probably built one to. For those that don't know, the factory sub uses the exterior of the vehicle like a giant infinite port. It's rather effective for what they're trying to do. But if you don't blank off that port, you're exposing the interior to the elements. As you can see, you have no room for an amp rack which is why we went with the setup detailed above. This setup requires you to remove the factory jack mounting provisions behind the seat. You can see a thread with my relocation solution here.
The shop had no trouble installing this. You'll notice that I have the grills for the subs installed. MTI notes on their website that speaker grills are not used in this setup but I retained my. The reason is because, despite what MTI says, the seats will not fold all the way up and latch with these subs installed. I do not know if it's because of the dimensional differences between the MPS 250 and the TW3, but if you don't have the grills installed, folding the bottom of the seat all the way up will cause the back of the seat to press on the surrounds of the MPS 250. So I opted to the keep the grill. I lose some range of motion in the seat bottom, but the grills will protect the surrounds in case someone wants to try and slam the seats up. It lets me lift the bottom up more than enough to get anything out of the box. MTI, if you are reading this, please know that your information is not correct. If you have any ideas to fix this, please contact me.
Subwoofers
For subs, I'm using a pair of Hertz MPS 250 S2's. This is a 10" shallow mount single voice coil, 2 ohm sub. They are wired in series producing a total load of 1 ohm, so the M1D is pushing 1200W to these bad boys. This is one of the first builds my shop has made with this sub, and they tell me after hearing it, they are no longer going to be recommending the JL Audio TW3 to their customers. This setup punches so far above its weight class. Now, I don't listen to a lot of punchy music, but I do listen to a lot of technical music, and this setup is tight and precise. It still has some balls, so on the occasion that someone wants to play "Put On" or "Levels", you are going to get a reaction. The way this is tuned gives me a ton of overhead for those types of songs, and it's going to basically be impossible to clip these out. So, other than the latching problem I mentioned above, this is about as perfect as it gets without more extensive modifications. My shop used an entire trunk kit and part of another to line behind the seats because I did not want any rattling. In my testing so far, I have not experienced any rattling from the moon roof, rear window, or seats. If you're going to replicate this setup PLEASE tell your shop to go overkill on the sound treatment. I cannot stress this enough.
DRC/Remote Control
If you're familiar with Audison, you're familiar with their line of DRC remote control products. The newest model is the DRC AC, but unfortunately it is not compatible with the AP F8.9 Bit. You have two options, the DRC MP and the DRC AB. I had a DRC AB in my previous build and it's a fine unit, but the smaller screen and fewer buttons make it kind of clunky to adjust things while driving. Instead, I opted for the DRC MP, which features a fully color changing display and keypad. In my last build, I hid in the storage cubby underneath the center stack, but this is not an option with the MP in the F150, due to the placement of the media bin light and the risk of blocking easy access to the wireless charging pad. I opted to place it underneath the ignition button. You can change the color, so I changed it to Turquoise to better match the ice blue interior lighting just to make it a little more finished looking. You have access to change the master volume (if not retaining factory volume controls), sub out volume, tuner memory, and others. I have it se to auto brightness mode. Only downside is I cannot see the screen when I'm driving since it's behind the steering wheel, but I can find what I need by memory.
Final Thoughts
Other than the few downsides I mentioned, I believe this is the sweet spot for F-150 audio. You can obviously spend as much as you want to on this, but this fit the bill for me. I blew through my budget, unfortunately due to the fact that I retained almost nothing from my previous build. I'd say I'm into this for about $8000 give or take including installation labor and materials.
Thanks for reading!
")