HID Projector Retrofit

Disclaimer: Links on this page pointing to Amazon, eBay and other sites may include affiliate code. If you click them and make a purchase, we may earn a small commission.

OP
OP
Raptor Retrofit

Raptor Retrofit

HID Specialist
Supporting Vendor
Supporting Member
Joined
Jul 22, 2010
Posts
1,970
Reaction score
1,178
Location
NY
Looks awesome! But, Dude, you destroyed the monogrammed towels!!!! Is the wifey going to be upset?

LOL

:Grenade:


Hahaha, nice catch.

Picked those up at a yard sale for 50 cents, shop towles.
 

Viper

Full Access Member
Joined
Feb 16, 2011
Posts
231
Reaction score
2
Location
Vermont
Hey Duc...

Did you ues the 55w bulb setup or revert back to the 35w?? Thought I saw a thread on smoking 55's....
 
OP
OP
Raptor Retrofit

Raptor Retrofit

HID Specialist
Supporting Vendor
Supporting Member
Joined
Jul 22, 2010
Posts
1,970
Reaction score
1,178
Location
NY
Hey Duc...

Did you ues the 55w bulb setup or revert back to the 35w?? Thought I saw a thread on smoking 55's....

The guy from TRS said the smoking was just some film burning off the cutoff shield. As soon as I saw it I shut them down but after talking to TRS I left them on and after a minute it was gone. Yes Im still running the 55W.

Damn that cutoff is awesome and the high beams are ridiculous!

Yeah, I couldnt be happier. Whats really impressive is how wide the beam is, when you take sharp corners its like you have a separate set of lights shining over there. Ill try and find a long building I can shine on and get a pic.

The High's are insane, its a way better beam pattern then when I had HID in the stock's.
 

bmg50

Member
Joined
Jun 17, 2011
Posts
10
Reaction score
1
Location
motor city
getting the assemblies apart (for me) was the hard part since never done it. 1st side fights hard 2nd went better, make sure every fastener is removed 1st then work it with heat as it reads here.

Then got everything lined up following ducati's build. The recons goin in mine are the all chrome version so i'm gonna try and add painted blackout to match the stock lamps black out w/chrome pattern. Tricky mask and paint work next so will post results hopefully soon, has to look right or its all goin back to stock.
.
 
OP
OP
Raptor Retrofit

Raptor Retrofit

HID Specialist
Supporting Vendor
Supporting Member
Joined
Jul 22, 2010
Posts
1,970
Reaction score
1,178
Location
NY
wow, so you are going to try and make a black bezel like the stock headlights ? If so good luck, that sounds like a tricky one.

If you have issues mounting the projectors hit me up, theres a few things I left out in this thread.
 

bmg50

Member
Joined
Jun 17, 2011
Posts
10
Reaction score
1
Location
motor city
wow, so you are going to try and make a black bezel like the stock headlights ? If so good luck, that sounds like a tricky one.

If you have issues mounting the projectors hit me up, theres a few things I left out in this thread.

thanks - am right at the mounting stage so would be great, once I get the flat mounts made from cutting off the metal recon reflector housing was there any advice or photo showing how you got the mini attached? - any missing tip from there would be a great help.
 
OP
OP
Raptor Retrofit

Raptor Retrofit

HID Specialist
Supporting Vendor
Supporting Member
Joined
Jul 22, 2010
Posts
1,970
Reaction score
1,178
Location
NY
thanks - am right at the mounting stage so would be great, once I get the flat mounts made from cutting off the metal recon reflector housing was there any advice or photo showing how you got the mini attached? - any missing tip from there would be a great help.


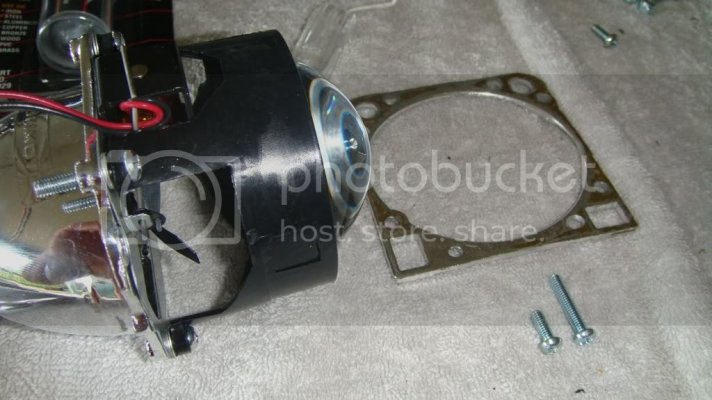
for mounting the mini to the old plate I went to the hardware store and got the same screw that the mini uses - it connects the black lens mount to the reflector dish - but a little longer and self locking nuts. the stock ones are 1/2 inch, the ones I bought were 3/4 inch. you can see them in this pic and one of the 3/4" is in the projector.
11-12.jpg

I replaced 3 or the 1/2" with the 3/4" and drilled new holes on the old mounting plate. If you drill the holes a little bigger then the screw it will be easier to align the mini onto the old plate. I just kept the top of the mini mounting plate parallel with the top of the old plate. It helps keep the projector clocked correctly.

Also get some JB Kwik Weld, I used it a lot, I cracked one of the mounting plates when trying to drill the new holes in it.

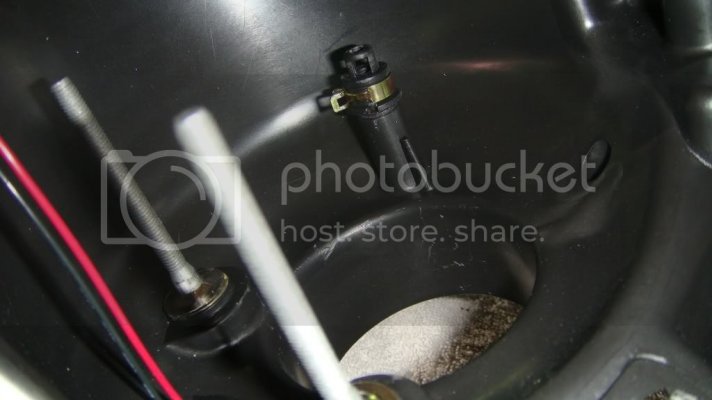
Another key piece is the 3rd mounting point, the one that swivels. The Mini is slightly longer then the old projector so you will need to fab a new mount for the swivel. I didnt get any pics of it besides this one of it finished -
22-6.jpg

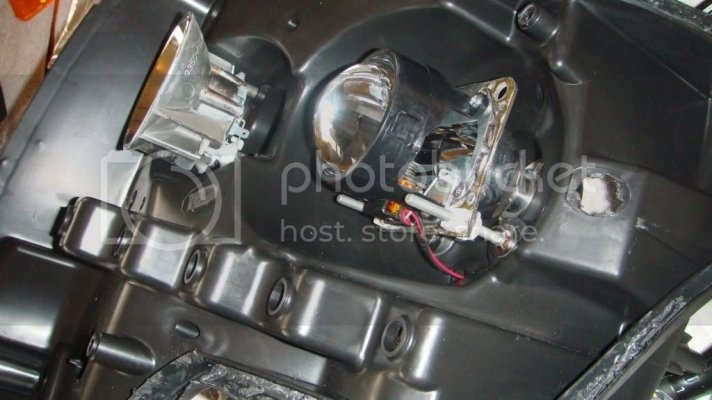
What I did was take a left over 3/4" screw and thread a self locking nut all the way down it. That now becomes the ball for the socket on the black piece, you can discard the old silver ball mount thats threaded on the other end. I then put jb kwik on the 3/4" screw with the black piece mounted on top and mounted it in the threaded spot where the old one was. leave it out just far enough for the swivel to function and it will put the projector in the perfect spot, if its too far out the projector will hit the black faceplate when you reassemble. Heres it finished -
33-6.jpg

That was confusing as hell, lol. I should have just made a video. Fell free to ask more if all I did was confuse you.

The other thing I cant stress enough is when your projectors are mounted up install the base in the truck before sealing it up. Go for a drive to make sure the lights are aimed high enough in low beams. you can make adjustments by grabbing the threaded mount points with needle nose and turning them.
 
Top