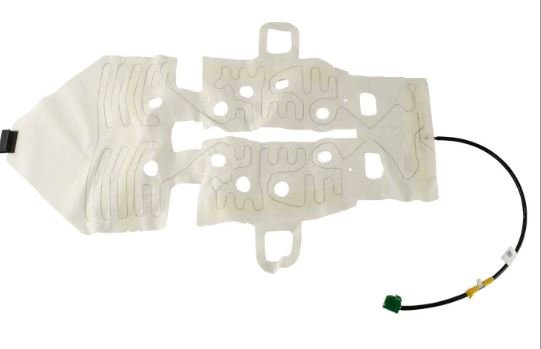
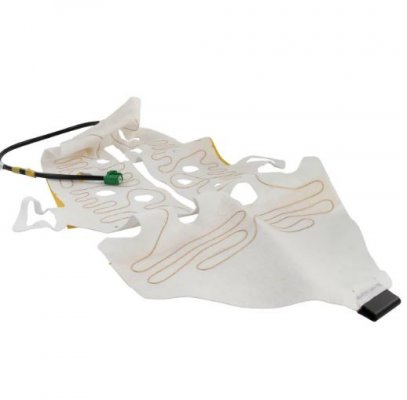
Drivers Side Heated Seat fixed with pictures

Disclaimer: Links on this page pointing to Amazon, eBay and other sites may include affiliate code. If you click them and make a purchase, we may earn a small commission.

hunter031789

Member
Joined
Sep 20, 2023
Posts
21
Reaction score
7
Location
Kansas City
Upon further examination of pictures of the two parts, you can see a distinct difference in particular in the number of "loops" at the clip-end of the element before the cloth reaches the first two vent holes.
See below, the H part has 3.5 or 4 loops before the first holes.

Capture1.JPG


The J part number only has 2.5 or 3 loops:

Capture2.JPG

The J part number is for whatever "Interior Trim Accent Pack F" is, which I assume is the upgraded leather. Most people with the standard seats should be good to use the "H" part number.
 

Silverburst

Member
Joined
Jul 1, 2023
Posts
13
Reaction score
8
Location
PNW
Yep I had the same issues tracking down correct part numbers. I used this website https://parts.ford.com/ as they allowed me to enter my VIN number and had diagrams that appeared to be as correct as I could hope for. Even searching there for "seat heater pad" or "heating element" you get two part numbers as options. One is for "less appearance group" and one is for "Interior Trim Accent Pack F". My assumption is that "Interior Trim Accent Pack F" is perhaps for the Recaro leather or maybe if you get the carbon fiber package or the special accent colors on the seats? I'm really not sure what the heating element differences are but mine appeared identical and works perfectly.

My seats are the standard black/ash as seen below.View attachment 429882

JL3Z-14D696-J is the second part number, maybe you have one of these additional trim packages that makes a change to the heating element?
I have those exact seats as well. Just the standard leather seats. When I enter my VIN into the parts.Ford.com, there are 2 different heating element parts that come up that say BOTH fit my vehicle.

1. Part #: JL3Z14D696J
2. Part #: JL3Z14D696H

It's odd because when I enter those into a local Ford dealer website it states these parts don't fit my vehicle.

Another oddity, the seat diagram on parts.Ford.com, show the heating element being two separate pieces..

One for the seat cushion and another for the upper back side. But the photo image displayed and everyone here show using one, single heating element for the entire seat.. is that correct?
 
Last edited:

hunter031789

Member
Joined
Sep 20, 2023
Posts
21
Reaction score
7
Location
Kansas City
I have those exact seats as well. Just the standard leather seats. When I enter my VIN into the parts.Ford.com, there are 2 different heating element parts that come up that say BOTH fit my vehicle.

1. Part #: JL3Z14D696J
2. Part #: JL3Z14D696H

It's odd because when I enter those into a local Ford dealer website it states these parts don't fit my vehicle.

Another oddity, the seat diagram on parts.Ford.com, show the heating element being two separate pieces..

One for the seat cushion and another for the upper back side. But the photo image displayed and everyone here show using one, single heating element for the entire seat.. is that correct?
Yeah nailing down the part numbers for these is really difficult online. I found the part number myself from the website I sent earlier and then just went ahead and took a chance on it. I purchased the part from Tasca as it was much cheaper than the OEM type sites. https://www.tascaparts.com/oem-parts/ford-seat-cushion-heater-jl3z14d696h ... be aware it says it does not fit my 2018, but I just ignore that because all of the websites are conflicting and I can confirm it is an exact match for your seat as it is identical to mine.

As for the element appearance. There are two of them, one for the bottom seat cushion and one for the back seat cushion. The part I sent pictures of is only the bottom portion but it definitely appears like it is for both the bottom and the back but it is not. I have found no one who has had the back one fail, though I have heard one person replaced it when they did the bottom part, but I have never seen evidence that the back one fails so I would avoid messing with it. Each heater has its own cord. The bottom heater has a green connector on the end of its cord. I believe the top one is a yellow connector. To firmly answer your question, the photos are only for the bottom element, and only APPEAR that they fit the whole seat, the scale of it is deceiving.

Side note, I found that a set of metal picks are massively helpful in quickly disassembling and reassembling all of the plastic snaps and hooks that hold the cover to the cushion and the cover to the frame. Using a straight pick allowed me to easily separate the orange cushion clips from the blue plastic cover rail without damage to anything. Here is a link to the Harbor Freight pick set I have that I used.
 

Silverburst

Member
Joined
Jul 1, 2023
Posts
13
Reaction score
8
Location
PNW
Yeah nailing down the part numbers for these is really difficult online. I found the part number myself from the website I sent earlier and then just went ahead and took a chance on it. I purchased the part from Tasca as it was much cheaper than the OEM type sites. https://www.tascaparts.com/oem-parts/ford-seat-cushion-heater-jl3z14d696h ... be aware it says it does not fit my 2018, but I just ignore that because all of the websites are conflicting and I can confirm it is an exact match for your seat as it is identical to mine.

As for the element appearance. There are two of them, one for the bottom seat cushion and one for the back seat cushion. The part I sent pictures of is only the bottom portion but it definitely appears like it is for both the bottom and the back but it is not. I have found no one who has had the back one fail, though I have heard one person replaced it when they did the bottom part, but I have never seen evidence that the back one fails so I would avoid messing with it. Each heater has its own cord. The bottom heater has a green connector on the end of its cord. I believe the top one is a yellow connector. To firmly answer your question, the photos are only for the bottom element, and only APPEAR that they fit the whole seat, the scale of it is deceiving.

Side note, I found that a set of metal picks are massively helpful in quickly disassembling and reassembling all of the plastic snaps and hooks that hold the cover to the cushion and the cover to the frame. Using a straight pick allowed me to easily separate the orange cushion clips from the blue plastic cover rail without damage to anything. Here is a link to the Harbor Freight pick set I have that I used.
Thanks for the clarification about the seat cushion and the back seat cushion. Neither work on mine right now so hopefully just replacing the seat cushion element fixes it. And thanks for the tip about the mini pick and hook set. I'll make sure to grab a set before I tackle this job.

I did notice that some of the parts sites refer to the element as a "passenger" heated pad. I have not been able to find a "drivers" side pad part anywhere so I assume the passenger is universal for both drivers and passenger side?
 

hunter031789

Member
Joined
Sep 20, 2023
Posts
21
Reaction score
7
Location
Kansas City
Thanks for the clarification about the seat cushion and the back seat cushion. Neither work on mine right now so hopefully just replacing the seat cushion element fixes it. And thanks for the tip about the mini pick and hook set. I'll make sure to grab a set before I tackle this job.

I did notice that some of the parts sites refer to the element as a "passenger" heated pad. I have not been able to find a "drivers" side pad part anywhere so I assume the passenger is universal for both drivers and passenger side?
Yeah both heaters are in series so when the bottom one quits, neither works. It's like a 90% chance it is only the bottom heater.

I can't speak to what sites you have read say but yes the part is identical for both sides. Tasca has the best prices I've seen ($31 when I bought it two weeks ago). Use the Tasca link I sent and you'll have the right part. It took me about 2 hours from door open to door closed, it's significantly easier than it probably seems in your head, I was pretty nervous as I've never pulled a seat before but I didn't need to be. I probably spent an hour being extra careful and understanding how everything went together.

I did learn a couple of things:
1. The main wiring harness connector has a big gray bar on it and it took me a while to figure out you have to press it like a normal connector and then the gray bar swings down and sort of ejects the connector. The press point is kind of hidden on the bottom.
2. Raise the seat all the way up and about half way forward to ensure you can get a socket on each of the 4 bolts.
3. Unclip the leather cover and then the whole cushion will come off, including the cover, and then you can work on those orange cups in the cushion easier.
 
Top