Donk74
Full Access Member
Haven’t seen a post on installation of the RPG power steering reservoir yet so I though I’d give this a shot.
Step 1 try and get as much of the old power steering fluid out of the reservoir and hoses as possible. I was able to put a old plastic cup under the reservoir and carefully remove the lower smaller hose (this is the return hose) and allow the hose and the tank to drain. Once most of the fluid is out, disconnect the larger supply hose and unbolt the reservoir and get it out of the way. At this point do your best to drain more fluid out of the hoses and out of the stock reservoir, do your best but if you don’t get ATF on the floor your better than I am, that shit hides till it’s over a clean spot on your garage floor.
At this point you can test fit the RPG reservoir. On my 2012 I had to do a bit of trimming on the plastic. The threaded fitting for the supply AN fitting comes out the passenger side so you have to clearance the plastic so the reservoir fits like its supposed to.
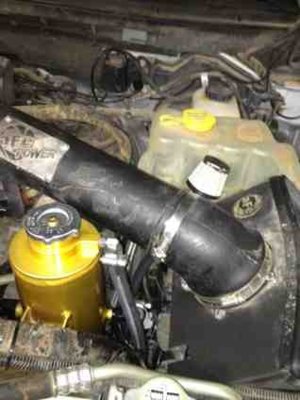
Now remove the supply hose from the power steering pump and flip it end for end. Again not sure if this is required for all years but on my 12 the supply hose connects to the stock reservoir on the drivers side and the RPG reservoir connects on the passenger side. If you try and just bend the preformed hose and connect it to the supplied AN fitting the hose kinks. Don’t fret however, if you connect what was the reservoir end to the pump the formed hose routs nicely, pic attached.
On a related note, be couscous of what type of clamp you use to connect the supply hose to the barbed end of the AN fitting. The stock hose is metric; AN fittings aren’t, so the hose is a bit lose on the fitting. I planed on using the slick Gates PowerGrip heat shrink hose clamps anyway and because they clamp very uniformly the lose hose doesn’t appear to have cause any issue (I tried my damndest to pull it apart and couldn’t). Not sure a traditional spring hose clamp will keep things together.
Bolt in the RPG reservoir, make your connections and fill things up. I opted to flush out the stock fluid and refill with Royal Purple ATF (no particular reason as I don’t even have 10K on the truck yet but…). If you’re going to do a flush and refill just stick the small hose in a catch bottle and a plug in the RPG reservoir. Fill the reservoir run engine for a few second and repeat several times. The pump pulls the fluid in fast so keep an eye on the level and try not to run things dry. If your better half or other helper is un available (mine was getting her hair done, women!!!) and you happen to have remote start you can cheat. Just tape the hood switch down (mines on the driver side about mid hood) and use the remote start to start and stop the motor while you watch the level in the reservoir. I used about 3 quarts of fluid for the flush then toped things off with the forth after assembling things for the last (I hope) time.
The RPG tanks has an overflow all I did for this was run a tube strait down so if it pukes it’ll be below the engine.
One other tip; If you a poor deprived guy like me and don’t have a set of Aluminum AN wrenches you can wrap the nuts with electrical tape and then use an adjustable wrench to tighten the fittings down.
That’s it, trucks good to go
Over all impression is that this is a nice solid piece put together by RGP. Installation is not to bad just a few tricky parts. One question for the pre 2012 Raptor owners, do your stock reservoirs have any baffling in them? The stock one I took out has a fair amount of baffling in it. Not sure if Ford changed the reservoir to fix the issue or not. I did this as a preemptive improvement and I have not had mine puke out fluid and now hopefully never will. Regardless I think the larger Aluminum RGP reservoir is an improvement.
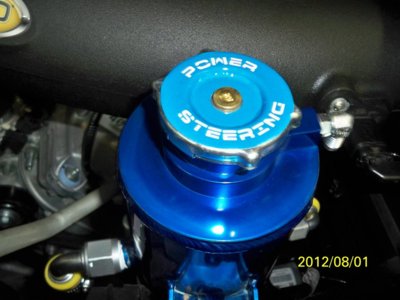
I really only have one complaint, when installed no one can see that sexy RPG logo! WTF!!! Corry get that shit fixed!


Step 1 try and get as much of the old power steering fluid out of the reservoir and hoses as possible. I was able to put a old plastic cup under the reservoir and carefully remove the lower smaller hose (this is the return hose) and allow the hose and the tank to drain. Once most of the fluid is out, disconnect the larger supply hose and unbolt the reservoir and get it out of the way. At this point do your best to drain more fluid out of the hoses and out of the stock reservoir, do your best but if you don’t get ATF on the floor your better than I am, that shit hides till it’s over a clean spot on your garage floor.
At this point you can test fit the RPG reservoir. On my 2012 I had to do a bit of trimming on the plastic. The threaded fitting for the supply AN fitting comes out the passenger side so you have to clearance the plastic so the reservoir fits like its supposed to.
Now remove the supply hose from the power steering pump and flip it end for end. Again not sure if this is required for all years but on my 12 the supply hose connects to the stock reservoir on the drivers side and the RPG reservoir connects on the passenger side. If you try and just bend the preformed hose and connect it to the supplied AN fitting the hose kinks. Don’t fret however, if you connect what was the reservoir end to the pump the formed hose routs nicely, pic attached.
On a related note, be couscous of what type of clamp you use to connect the supply hose to the barbed end of the AN fitting. The stock hose is metric; AN fittings aren’t, so the hose is a bit lose on the fitting. I planed on using the slick Gates PowerGrip heat shrink hose clamps anyway and because they clamp very uniformly the lose hose doesn’t appear to have cause any issue (I tried my damndest to pull it apart and couldn’t). Not sure a traditional spring hose clamp will keep things together.
Bolt in the RPG reservoir, make your connections and fill things up. I opted to flush out the stock fluid and refill with Royal Purple ATF (no particular reason as I don’t even have 10K on the truck yet but…). If you’re going to do a flush and refill just stick the small hose in a catch bottle and a plug in the RPG reservoir. Fill the reservoir run engine for a few second and repeat several times. The pump pulls the fluid in fast so keep an eye on the level and try not to run things dry. If your better half or other helper is un available (mine was getting her hair done, women!!!) and you happen to have remote start you can cheat. Just tape the hood switch down (mines on the driver side about mid hood) and use the remote start to start and stop the motor while you watch the level in the reservoir. I used about 3 quarts of fluid for the flush then toped things off with the forth after assembling things for the last (I hope) time.
The RPG tanks has an overflow all I did for this was run a tube strait down so if it pukes it’ll be below the engine.
One other tip; If you a poor deprived guy like me and don’t have a set of Aluminum AN wrenches you can wrap the nuts with electrical tape and then use an adjustable wrench to tighten the fittings down.
That’s it, trucks good to go
Over all impression is that this is a nice solid piece put together by RGP. Installation is not to bad just a few tricky parts. One question for the pre 2012 Raptor owners, do your stock reservoirs have any baffling in them? The stock one I took out has a fair amount of baffling in it. Not sure if Ford changed the reservoir to fix the issue or not. I did this as a preemptive improvement and I have not had mine puke out fluid and now hopefully never will. Regardless I think the larger Aluminum RGP reservoir is an improvement.
I really only have one complaint, when installed no one can see that sexy RPG logo! WTF!!! Corry get that shit fixed!