Rigid 20" Lightbar & Duallys - Installation Instructions

Disclaimer: Links on this page pointing to Amazon, eBay and other sites may include affiliate code. If you click them and make a purchase, we may earn a small commission.

KaiserM715

Kaiser Söze
Joined
Aug 5, 2010
Posts
8,571
Reaction score
3,116
Location
Houston, TX
I installed my 20" Rigid this past weekend. I will only cover the things that I did a little bit differently.

I purchased the generic Rigid that comes with the generic, non-Raptor specific wiring harness. Rather than hack up the included harness, I made my own. I bought the wire (14 gauge with nice, thick insulation), 1/4" split loom and Deutsch connector from Jegs. I bought ring terminals from a local electronics store. I measured everything out, cut the wires and built the male side of the connector. Next I installed the ring connector (for the ground) with solder and heatshring, installed split loom and then zip tied it every 6"-8". Then I installed the harness and zip tied it to the other harnesses under the hood on the passenger side.

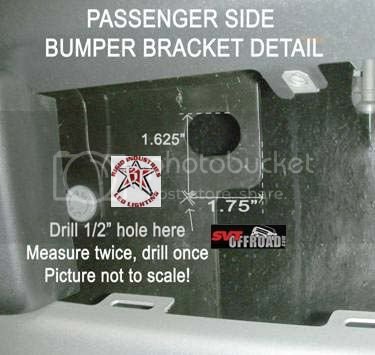
I mocked up the mount and compared it to the pics Dan posted.
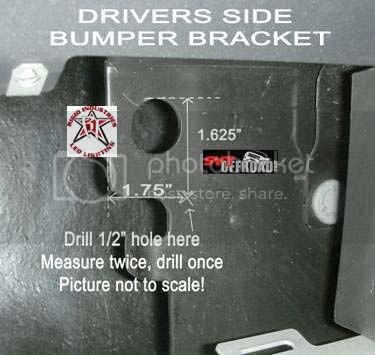
10-DriversSideBumperBracketcopy.jpg

09-PassengerSideBumperBracketDet-1.jpg

I noticed that there was more room to move the holes further away from the edge. Instead of using the 1.75" lateral dimensions shown above, I used 2". In addition, I ditched the included carriage bolts and used grade 8 3/8" bolt and washers. This also allowed me to drill a 3/8" hole instead of a 1/2" hole. I did use the include nyloc nuts. I like this setup much better.

The last thing I did differently, I think some others have mentioned as well. I temp installed the bracket and then marked the location for my clearance holes on the bump pads. Instead of slotting as recommended, I drilled a 1/2" hole with a unibit. I assembled the light with the light to mount nuts loose. Next, I inserted the driver's side light bolt into the clearance hole, pushed it all of the way in and the inserted the passenger side. I did not tighten these until I adjusted the light.
 

iSurvive

FRF Addict
Joined
Feb 26, 2012
Posts
1,272
Reaction score
780
Location
Highlands Ranch, CO
The last thing I did differently, I think some others have mentioned as well. I temp installed the bracket and then marked the location for my clearance holes on the bump pads. Instead of slotting as recommended, I drilled a 1/2" hole with a unibit. I assembled the light with the light to mount nuts loose. Next, I inserted the driver's side light bolt into the clearance hole, pushed it all of the way in and the inserted the passenger side. I did not tighten these until I adjusted the light.

This method works very well and makes the install quicker and cleaner looking. No other lower grill kit looks so nice and fits as well. It's still one of my favorite mods to the the Raptor.

I don't understand the wire harness mods you made, as I just cut off the excess wires, switch, and relay and used the red and black wire to complete the install.

I say do it any way you want, as long as it works! Congrats on your new install.
 

KaiserM715

Kaiser Söze
Joined
Aug 5, 2010
Posts
8,571
Reaction score
3,116
Location
Houston, TX
I don't understand the wire harness mods you made, as I just cut off the excess wires, switch, and relay and used the red and black wire to complete the install.

I made a completely new harness, which I did for several reasons. The harness I made used heavier wire (14 vs 16), I think the split loom matches the stock under-hood wiring better, I thought it would be fun to make and it let me save the original harness if I ever decide to sell the light. That being said, modifying the supplied harness would have been cheaper.

I say do it any way you want, as long as it works! Congrats on your new install.
Agreed!! :peace:
 

iSurvive

FRF Addict
Joined
Feb 26, 2012
Posts
1,272
Reaction score
780
Location
Highlands Ranch, CO
I made a completely new harness, which I did for several reasons. The harness I made used heavier wire (14 vs 16), I think the split loom matches the stock under-hood wiring better, I thought it would be fun to make and it let me save the original harness if I ever decide to sell the light. That being said, modifying the supplied harness would have been cheaper.

What did you do about the waterproof connectors that attach to the lights? Did you cut the connector off the light and just splice the new 16 gauge directly to the lights? Or did you find matching connectors for your homemade harness? Or did you actually make the new harness by cutting the connector off of the OEM harness?
 

KaiserM715

Kaiser Söze
Joined
Aug 5, 2010
Posts
8,571
Reaction score
3,116
Location
Houston, TX
What did you do about the waterproof connectors that attach to the lights? Did you cut the connector off the light and just splice the new 16 gauge directly to the lights? Or did you find matching connectors for your homemade harness? Or did you actually make the new harness by cutting the connector off of the OEM harness?
I bought a matching connector. After some digging to find the make and model, I found that several places sell them.
 

Gunner75

Full Access Member
Joined
Jun 3, 2012
Posts
186
Reaction score
47
Location
SW KS
Out of curiosity, Why does the D2 set up come with an additional harness, but the 20" does not.
Thanks,
Wade
 

iSurvive

FRF Addict
Joined
Feb 26, 2012
Posts
1,272
Reaction score
780
Location
Highlands Ranch, CO
Out of curiosity, Why does the D2 set up come with an additional harness, but the 20" does not.
Thanks,
Wade

It's been a while since I did that install. Can you clarify your question? Did you buy a set of D2's and each light came with a harness?

My Dually's were bought as a set of four and included the Raptor brackets. The wires were already spliced and ready for the install.

The 20" and other brighter lights have included a wiring harness with a relay and a switch. I think some people install these lights with the relay, even though the upfitter switches are fused relay switches. Others have cut off the relay and just used the red and black wires to connect to the upfitter switch (which is what I did).
 

Gunner75

Full Access Member
Joined
Jun 3, 2012
Posts
186
Reaction score
47
Location
SW KS
I bought the D2 Kit that had the extra loomed harnes, no fuse, no relay. These included a factory harness for each light kit that could be wired on anything with a 12v battery. Kit also included the brackets.

The 20" kit I just received includes the 20" light with smooth sheathed (switch, fuse and relay) wire set up along with a couple bracket tabs.
In a separate box was the 20" Raptor bracket.
I guess I thought this would include a handy little harness that was wire loomed no extras to go to the upfitter leads such as the D2 kit did.

Not a big deal, just curious. Wiring is not an issue and I can mod the harness as I wish to clean it up.
 
Last edited:

iSurvive

FRF Addict
Joined
Feb 26, 2012
Posts
1,272
Reaction score
780
Location
Highlands Ranch, CO
Yeah, looking back that's exactly how my Dually's came wired.

My 20" also arrived in two separate boxes and the wiring harness was the same as you describe. I actually had to hit the forum to understand if I needed the relay, and why the 20" came with one and the Dually's did not.

When my 40" arrived it was the same as the 20", but at least this time I knew what to do.
 
Top