M&R Fog Kit

Disclaimer: Links on this page pointing to Amazon, eBay and other sites may include affiliate code. If you click them and make a purchase, we may earn a small commission.

OP
OP
R

Reagansa

Full Access Member
Joined
Sep 18, 2012
Posts
249
Reaction score
76
Location
Denver, CO
Sorry guys. No night pics yet. Ran into a couple issues last night. I'll try tonight.

The 8 pack install also on hold. That will have to be next Saturday now. Everything is pre-wired and ready to bolt in. I did mange that today. I'll include some pictures and a description of install once complete.
 
OP
OP
R

Reagansa

Full Access Member
Joined
Sep 18, 2012
Posts
249
Reaction score
76
Location
Denver, CO
OK, I fell of the face of the earth for a week or two with work and other things. Still no pics of the lights in action at night but I will.

I also now have the 8 pack lights. They are strung and ready to bolt in. Thinking I'll have time Saturday. Not sure what they'll do on the truck but they are pretty darn bright on the bench.
 
OP
OP
R

Reagansa

Full Access Member
Joined
Sep 18, 2012
Posts
249
Reaction score
76
Location
Denver, CO
No, I put the 2 spots on #4 switch and mounted them on the inside of the slot in the bumper. The four fogs are on the #3 switch and mounted to the outside.

I've attached some pictures but now realize they suck. The first is headlights, the second is heads with spot, the third is heads, spots, and the four floods. The pics are not really showing how much light it throws. I'll take some more. I'll get some without the headlight so you really see what the lights are doing.

I mounted the 8 pack last night. No pics of the lights turn on yet. The 8 pack now shares the #3 switch with the floods. That means new pics will be 4 floods and the 8 pack. Might try to cover the floods and then the 8 pack to really show what each does by themselves. I'll also throw up a few pics of the 8 pack install. I had intended to take pics all along and share but for many reasons I failed to capture the pics.

I will say the one bolt brackets from M&R made install a simple issue of bolt and wire. Since I already had the floods wired I just spliced into that lead and all was good. I cheated by pre-wiring the lights together last weekend while it was too cold to work. That took about 30 minutes or so. Actual install was less than 30 since that chore was out of the way. It could have been done quicker but I did solder and heat shrink everything.
 

Attachments

  • DSC02357.jpg
    DSC02357.jpg
    45 KB · Views: 38
  • DSC02358.jpg
    DSC02358.jpg
    48.5 KB · Views: 38
  • DSC02360.jpg
    DSC02360.jpg
    49.7 KB · Views: 42
OP
OP
R

Reagansa

Full Access Member
Joined
Sep 18, 2012
Posts
249
Reaction score
76
Location
Denver, CO
OK, so I do have a few pics of the 8 pack install. This has taken a lot longer than desired for two reasons. I've been traveling way too much and, well, I'll get to the second reason in a minute.

I'll go back and grab a few of the wiring later. My wife has the truck today so I can fix her car.

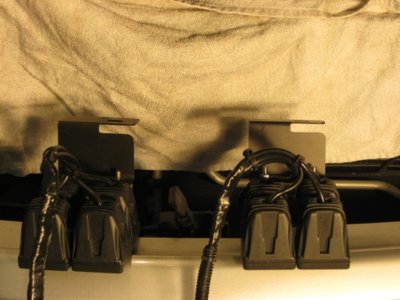
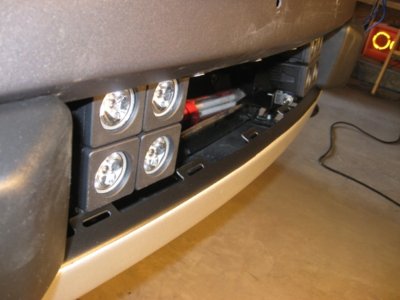
This first pic is of the pre-wired lights ready to drop in. (Sorry Mike, I had to show this one but it gives me a good reason to sing your praises on customer service.) Anyone notice something wrong with the brackets? They are the same. As is two right shoes. I sent Mike at M&R a quick email, he responded within minutes, literally. We discussed and I had two new brackets in my hands within a couple days. That was two weeks and three trips ago but speaks the wonderful support Mike has provided. He has be more responsive to emails and questions than I could have asked for. Great Customer Services. and I like the lights too.

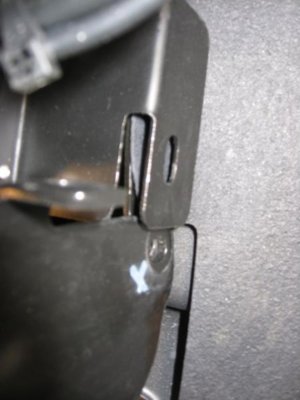
The second pic shows the bracket ready to slide into place. The M&R supplied bracket makes this really easy. Pull the bolt, slide bracket toward outside to align the holes, re-install bolt. Repeat on the other side and all that's left is wiring.

The pic is from between the grill and the radiator. Once you get it opened up it is obvious which bolt.

To remove the lower grill piece just loosen four screws on the top, rotate forward from the top, and then lift out. The bottom is held in by four tabs. I must not be smart enough to figure out the remove grill without removing license plate process. I had to break the rivets and pull the plate off to get the grill out. A couple nuts and bolts, four washers and two lock nuts put it right back on when it was all done.

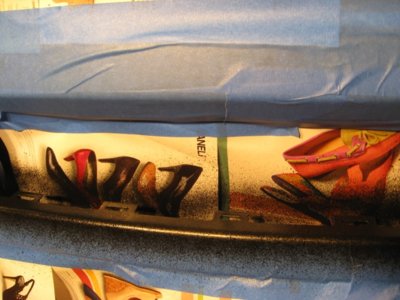
Those four tabs on the lower edge of the grill opening really bothered me. I didn't want to cut them off but they really stood out. I grabbed the plast-dip spray can, some tape, and blacked it out again. Much better. The two outside tabs are somewhat in the way of the lights though. I may go back and cut them off or bend them out of the way.

Couple comments on the pasti-dip spray. It is super easy to use, very forgiving, and very easy to remove if you do screw it up. If anyone has a good way to pull the tape without ******** up the edge, or all, of the new plasti-dip paint job I'm all ears. I ended up redoing it once cause first time I wasn't thinking, ripped off the tape and most of the dip. Second time I used a razor and cut along the tape edge first. Still might give it one more try to clean it up a bit but...

Second to last pic is of my overkill tape off job. Two reasons to share. One, notice the paper used is a catalog of high priced shoes. I just paid for the whole mod by removing this temptation from my wife. LOL Second, its overkill but I'm the guy that gets paint between his toes even when I wear shoes. Easier to use too much than spend the time peeling off over spray.

I'll grab some pics of the wiring but they may not show much at this point. I did solder and shrink wrap every connection except one. The 8 pack is spliced into the hot wire for the four floods in the bumper. It was just far easier and I wanted the 8 pack and floods all on #3 switch anyway.

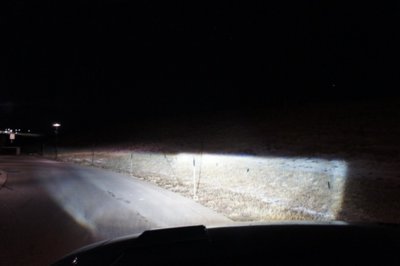
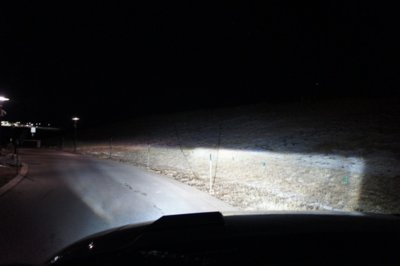
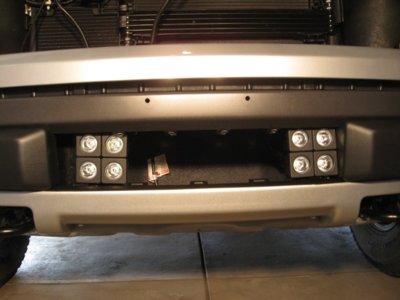
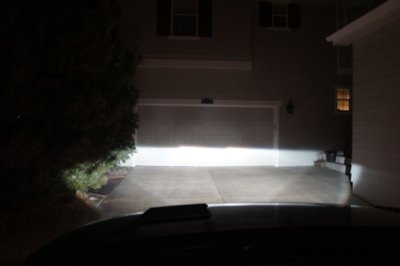
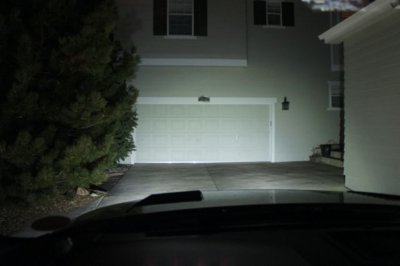
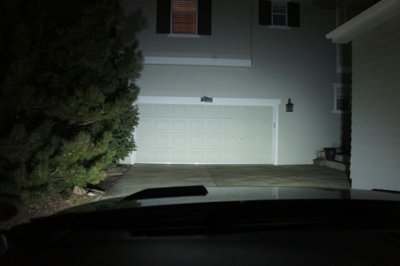
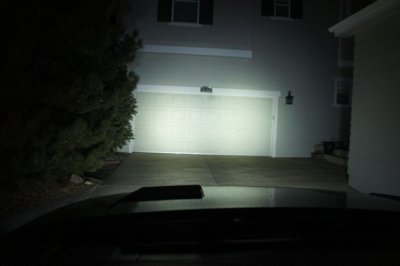
Last pic is lights in place but not bolted in yet. I'll add a good after pic and get those night shots with lights on soon.
 

Attachments

  • IMG_0004.jpg
    IMG_0004.jpg
    102.7 KB · Views: 49
  • IMG_0006.jpg
    IMG_0006.jpg
    27.9 KB · Views: 44
  • IMG_0010.jpg
    IMG_0010.jpg
    79.4 KB · Views: 41
  • IMG_0015.jpg
    IMG_0015.jpg
    107.3 KB · Views: 40
  • IMG_0009.jpg
    IMG_0009.jpg
    75.7 KB · Views: 42
OP
OP
R

Reagansa

Full Access Member
Joined
Sep 18, 2012
Posts
249
Reaction score
76
Location
Denver, CO
OK, finally had a chance to grab some shots of the lights.

First pic = headlights
Second pic = spots only - might need to aim those down a bit
Third pic = 4 floods in bumper
Fourth pic = 8 pack only
fifth pic = 8 pack and 4 floods
 

Attachments

  • DSC02371.jpg
    DSC02371.jpg
    23.1 KB · Views: 42
  • DSC02372.jpg
    DSC02372.jpg
    28.5 KB · Views: 35
  • DSC02373.jpg
    DSC02373.jpg
    29.8 KB · Views: 33
  • DSC02374.jpg
    DSC02374.jpg
    21.6 KB · Views: 39
  • DSC02375.jpg
    DSC02375.jpg
    24.5 KB · Views: 38
Top