Installed My Ford Performance Catch Can

Disclaimer: Links on this page pointing to Amazon, eBay and other sites may include affiliate code. If you click them and make a purchase, we may earn a small commission.

Oldfart

FRF Addict
Joined
Oct 21, 2017
Posts
5,785
Reaction score
14,003
Location
Saggy Balls Division of Trump Army
I did the Ford Performance catch can install today. The mechanical part was very straight forward. You replace one of the valve cover bolts with a special longer one that attaches the bracket for the can, and you reuse the other bolt for a second attachment point on the bracket. All the under hood pictures are taken from the right fender. Here's a link to the Ford install instructions. They are pretty good, except for totally leaving you on your own to clearance the engine cover. The Ford pictures are also from the vantage point of the right fender.


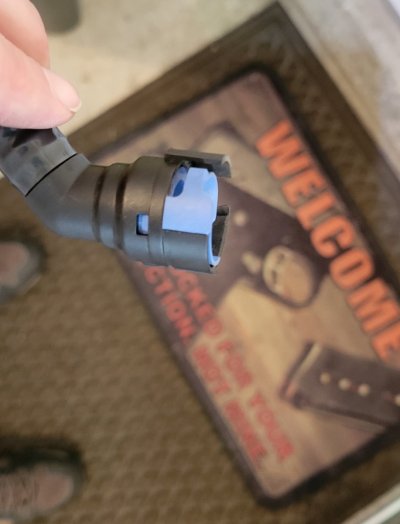
I was a little stumped on how exactly the PCV hoses unclip. There is a little tooth that you simply push to the side, it doesn't take much force at all. It goes in the clockwise direction, looking at it from the hose end. It opens a ring that lets it slip right off. When you remove them, leave the oil film on there, it's makes the hoses go back on easier. Put a little oil on the nipples on the can, for the same reason.

1687041004257.jpeg

I saw some guys had trouble getting that bolt out of the valve cover. It's just a pressure fit sleeve, use a plastic interior tool and it will pop right out.

1687040529332.jpeg

1687040476466.jpeg
 

Attachments

  • 1687040894445.jpeg
    1687040894445.jpeg
    88.4 KB · Views: 16
  • 1687040967025.jpeg
    1687040967025.jpeg
    115.8 KB · Views: 17
Last edited:
OP
OP
Oldfart

Oldfart

FRF Addict
Joined
Oct 21, 2017
Posts
5,785
Reaction score
14,003
Location
Saggy Balls Division of Trump Army
You can see the sleeve on the valve cover bolt now that I popped it loose.

1687041250252.jpeg

You just reuse the lower bolt. It goes into the lower bracket hole, and goes back in just like it came out

1687041331625.jpeg

This is the new bolt that goes in the valve cover. The larger threaded part goes into the valve cover with the new sleeve. You use the fixed nut in the picture to turn the stud in. After it's installed the bracket goes on the stud and they give you a second nut that attaches the bracket.
1687041394140.jpeg


You remove one hose, and the kit comes with 2 hoses you attach to the same points you removed the original one, so you are simply putting the can in the middle of the 2 new hoses. The hoses just slide on and the connector snaps closed. Make sure it snaps closed. Don't forget to check the tightness of the screws on the lid for the catch can, mine were only about 3/4 tightened.

1687041585778.jpeg


1687041679652.jpeg

That's it for the mechanical part. It took me about 1/2 hour, taking my time and double checking everything.

It says in the directions that with a Raptor you may have to create clearance underneath the foam engine cover. On my '20, I think you are asking for trouble down the road if you don't clearance the cover. it puts a fair amount of pressure on the PCV tubes if left stock. Maybe it would be ok, but I don't like doing 1/2 assed work, especially when I plan on keeping my truck a long time.
 
Last edited:
OP
OP
Oldfart

Oldfart

FRF Addict
Joined
Oct 21, 2017
Posts
5,785
Reaction score
14,003
Location
Saggy Balls Division of Trump Army
You need a pretty good slot on the front edge of the engine cover for the tube. Angle up pretty hard from the bottom of your cut to hog out the foam on the back side where you can't see it, to maintain clearance. That pipe has a pretty good upwards angle to it.

I used both a razor knife and a Dremel. It's just foam, so it's super easy to work on, just be careful because it easy to overdo it with the Dremel if you're not.

I would guess that you might be able to just install the cover without modifying it. If you push down on the cover moderately hard, you can force it to line up, and put the nuts on. It is definitely pressing fairly hard on the pipe at that point, though. Maybe with the engine heat, it might kind of reshape itself, but I won't do work like that. Especially when the PCV pipes are plastic. There is definitely pressure against the front pipe, if you don't modify it. You can see how much I cut away, and it is still close to the pipe. It probably took me an hour to shape it how I wanted, but at least that's easy work, just a little time consuming.

1687042461244.jpeg

There's 2 spots I also clearanced for the rear pipe.

1687042529493.jpeg

1687042565226.jpeg
1687042615806.jpeg
 
Last edited:
OP
OP
Oldfart

Oldfart

FRF Addict
Joined
Oct 21, 2017
Posts
5,785
Reaction score
14,003
Location
Saggy Balls Division of Trump Army
Super clean install, and perfect fitment. It's very obvious this is a Ford part.

The performance improvement after the install is HUGE!! It finally sounds like a V8, it's way faster, better gas mileage, has a smoother ride, my ball sag has been reduced by almost 1/4", my roids are 38% less swollen, my penor has gained almost 1/16", and my goats seem to think I'm very handsome now! WINNING!!!!

1687044314138.jpeg
 
Last edited:
Top