KaiserM715
Kaiser Söze
After having a couple of off-road events under my belt and hearing the power steering pump whine after being worked hard (as well as seeing the issues others have had), I decided it was time to beef up the setup on my truck. I chose the PSS version as it included an additional cooler with the upgraded reservoir. I would consider this kit “Stage 2” (addition of a cooler) of what I have seen offered for our trucks, with “Stage 1” being an upgraded reservoir and “Stage 3” adding a spin on filter, with other upgrades available beyond that. An online description of the kit can be found here: PSS Ford Raptor Power Steering Reservoir w/ Cooler
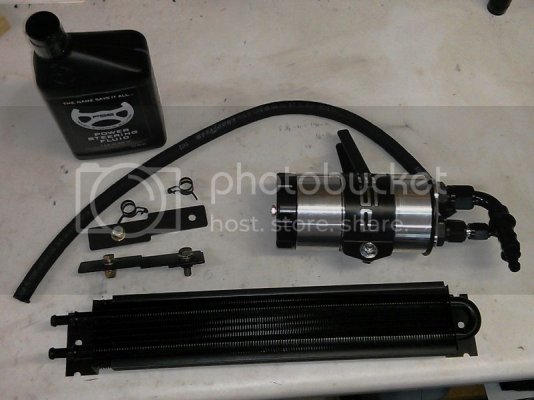
This is what comes in the kit:
Here are the tools that I used:
Cooler installation
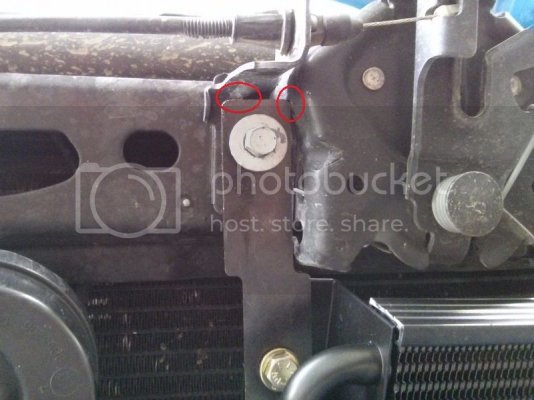
I installed the cooler first, starting with a test fit. One of the brackets attaches to the hood latch and the other clamshells an opening in the radiator support. During the test fit, I noticed the bracket on the latch did not sit flush as it was making contact in two places (red circles):
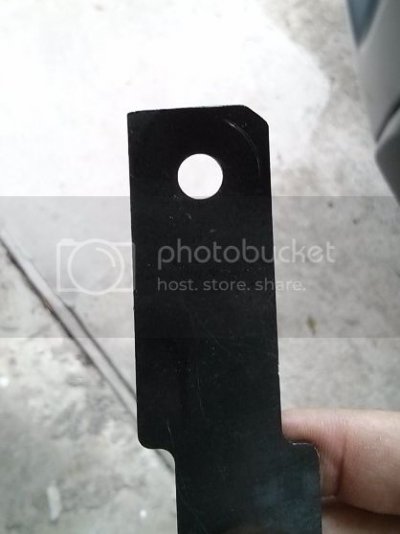
A couple of zips with the Dremel tool with a cut off wheel fixed the issue, followed by a couple of passes with a can of spray paint:
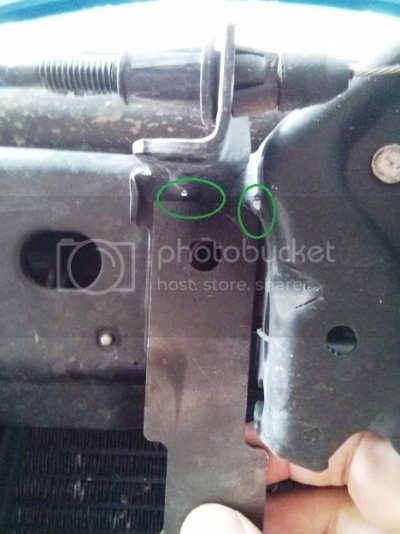
The green circles show the clearance:
Once I had the cooler positioned where I wanted it, I tightened all of the bolts. All of the fasteners included with the kit used either nylock nuts or a star washer as a secondary locking feature – vital for off-road use.
Factory reservoir removal
The first thing I did was remove the lid to the air box and the intake tube to give me some more room to work. Next, I pumped out all of the ATF in the stock reservoir. The next few steps are where the blue towels come in. Disconnect the return and pressure hoses from the bottom of the reservoir. I disconnected them one at a time and tried to drain as much as I could into the funnel in the bottle. Then I stuffed shop towels in the ports in the reservoir and into the ends of the hoses. Use the rest of the blue towels to clean up the ATF spills. I forgot to take a pic of the next step, so I will use one from farther in the process. Using a small prybar or screwdriver, pry the mount for the wiring harness off of the stud. The harness is stiff, tight and hard to move to get access to the stud. Using your 11mm deep-well, remove the stud and the reservoir.
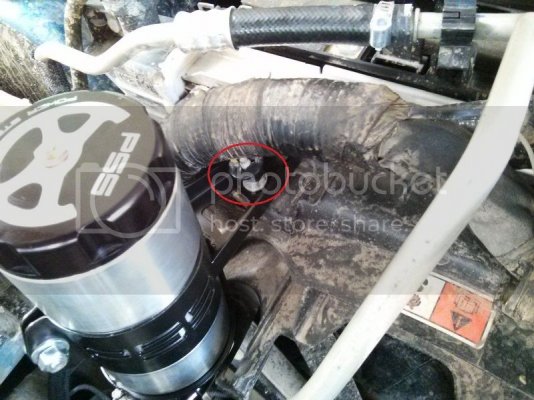
Using the Phillips screw driver, remove the plastic screw from the rubber shroud on the driver’s side of the radiator. Pull the shroud back to get access to route hoses through. Route the smaller hose that was previously attached to the factory reservoir out through the radiator support, towards the cooler.
PSS reservoir installation
The first thing I did was install the supplied hose onto the new reservoir. It took a little bit of work as the hose was a tight fit. This was a lot easier than trying to install it while in the engine bay. Note: The kit assumes that you will reuse the factory spring clamps – of which I am not a big fan. I used worm style hose clamps for the hose on the PSS reservoir. Install the PSS reservoir with the removed stud, reinstalling in its original location. The instructions from PSS highlight to not over-tighten the stud. Reinstall the wiring harness mount. Route the new hose out through the radiator support. In order to reinstall the large hose, it must be cut for the routing to work out. I double checked the length before I cut (this is a bent / formed hose – I am guessing it would be $25+ to replace). Again, I used a worm clamp.
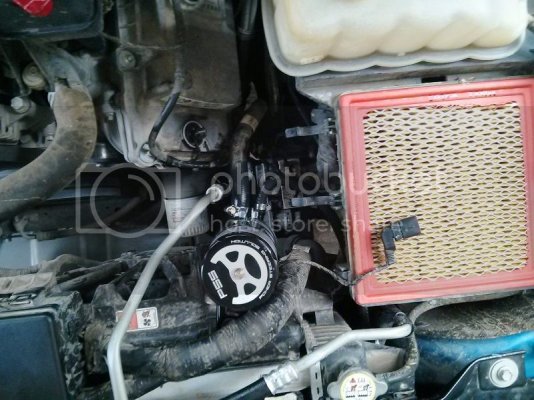
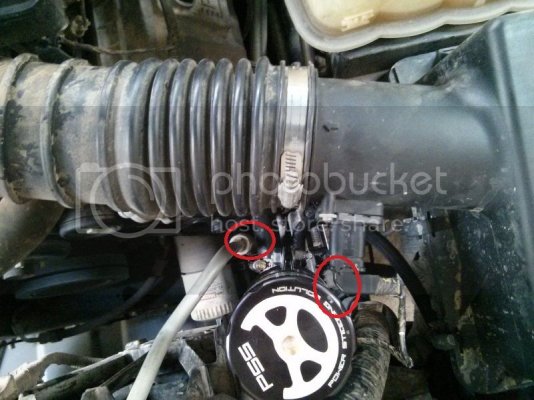
I reinstalled the intake plumbing and made sure that there was clearance to the MAF connector and the power steering hard line. I rotated the reservoir a little to equalize the clearance.
Cooler connection
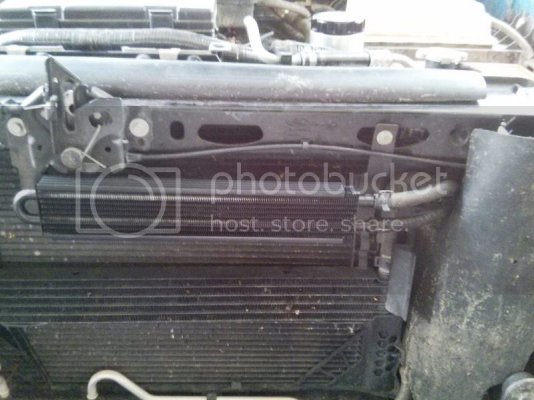
The OEM hose has to be cut to length to connect to the cooler (same situation as with the larger hose on the reservoir). I connected the OEM hose to the upper connection and the new cloth braid hose on the lower connection. I didn’t mind using the spring clamps here as they were new. I used a couple of zip ties to locate the hoses where I wanted them.
Hardline / hose connection
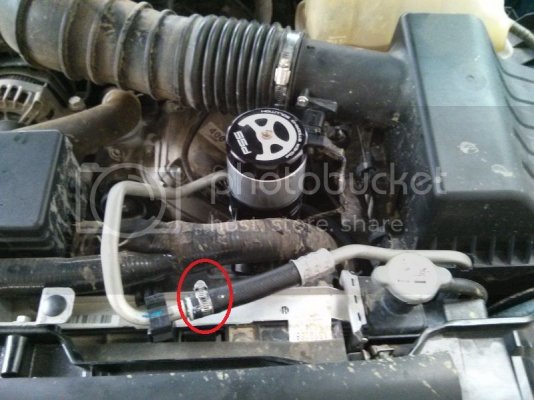
Before the system is bled, there is another area that needs attention. The power steering hard line to hose connection that runs over the top of the radiator uses a spring clamp and has been known to come loose under hard use. I know a couple of trucks at TRR lost power steering when the hose popped and sprayed ATF everywhere under the hood. The hose on my truck has *almost* come off a couple of times and I have reseated it. I have since removed the spring clamp and installed a worm clamp for a more secure connection.
Bleeding the system
As per the included instructions --> Fill the reservoir up to the internal fill line (a quart of ATF is included). Start the truck. Check the level. Cycle the steering 3-5 times, check the level. Turn off the truck and check for leaks. Drive 25-50 miles, check the level while hot and check for leaks.
Overall impressions
This kit comes with everything, including ATF. No need to run to the parts store to finish the install. The billet reservoir and mount are very well made with the mount being powder coated and the cap to the reservoir having two o-rings for sealing. The contrasting anodize on the cap is a nice touch. The cooler fits the location perfectly. The need to trim the bracket was a minor thing to me. The mounting arm could be a little shorter to nest the reservoir into the original location a little better, also a minor thing.
General notes
The old fluid was pretty dark and I noticed some sediment in the bottom of the reservoir.
System Performance
During daily driving, the only difference I noticed was a slightly more pronounced "hiss" from the pump as I turned the wheel. It could have always been there and I just didn't notice it before because I wasn't listening for it.
I was able to put this system through its paces during Raptoberfest. During the event, I never heard a peep out of my steering pump. I rode in and drove a couple of different trucks during the event and some of those pumps were screaming for mercy. The only thing I noticed was a little bit of ATF burped out of the pressure valve, a small amount that was able to be wiped up off of the cap with a rag. Overall, I was impressed by the performance.
This is what comes in the kit:
- Reservoir with fittings
- In-line tube and fin cooler (with hose clamps)
- Brackets for the cooler (with fasteners)
- Goodyear cloth over-braid hose (rated for 300 psi – it goes in between the cooler and the reservoir)
- 1 quart of ATF
- Note: Dirty workbench, under-hood dirt and radiator bug carcasses not included

Here are the tools that I used:
- 10mm socket for one of the hood latch bolts
- 11mm deep-well socket for the stud for the reservoir
- 1/2 and 7/16 sockets and wrenches for the cooler brackets
- #2 Phillips screw driver
- Flat head screw driver or a small prybar
- A pump to drain the fluid from the factory reservoir
- Funnel with bottle
- Plenty of shop towels (disassembly for this installation is a messy job)
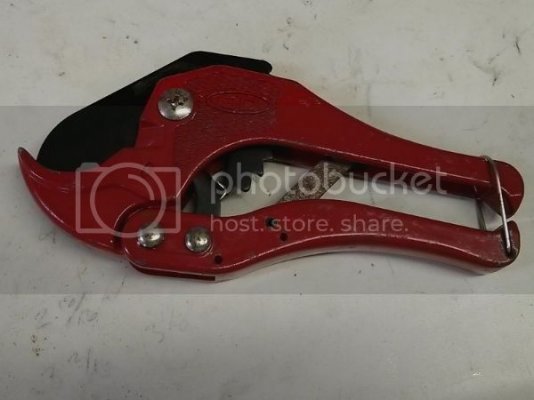
- PVC pipe / rubber hose cutter like this (the install can be done without this, but it makes the job easier):

Cooler installation
I installed the cooler first, starting with a test fit. One of the brackets attaches to the hood latch and the other clamshells an opening in the radiator support. During the test fit, I noticed the bracket on the latch did not sit flush as it was making contact in two places (red circles):

A couple of zips with the Dremel tool with a cut off wheel fixed the issue, followed by a couple of passes with a can of spray paint:

The green circles show the clearance:

Once I had the cooler positioned where I wanted it, I tightened all of the bolts. All of the fasteners included with the kit used either nylock nuts or a star washer as a secondary locking feature – vital for off-road use.
Factory reservoir removal
The first thing I did was remove the lid to the air box and the intake tube to give me some more room to work. Next, I pumped out all of the ATF in the stock reservoir. The next few steps are where the blue towels come in. Disconnect the return and pressure hoses from the bottom of the reservoir. I disconnected them one at a time and tried to drain as much as I could into the funnel in the bottle. Then I stuffed shop towels in the ports in the reservoir and into the ends of the hoses. Use the rest of the blue towels to clean up the ATF spills. I forgot to take a pic of the next step, so I will use one from farther in the process. Using a small prybar or screwdriver, pry the mount for the wiring harness off of the stud. The harness is stiff, tight and hard to move to get access to the stud. Using your 11mm deep-well, remove the stud and the reservoir.

Using the Phillips screw driver, remove the plastic screw from the rubber shroud on the driver’s side of the radiator. Pull the shroud back to get access to route hoses through. Route the smaller hose that was previously attached to the factory reservoir out through the radiator support, towards the cooler.
PSS reservoir installation
The first thing I did was install the supplied hose onto the new reservoir. It took a little bit of work as the hose was a tight fit. This was a lot easier than trying to install it while in the engine bay. Note: The kit assumes that you will reuse the factory spring clamps – of which I am not a big fan. I used worm style hose clamps for the hose on the PSS reservoir. Install the PSS reservoir with the removed stud, reinstalling in its original location. The instructions from PSS highlight to not over-tighten the stud. Reinstall the wiring harness mount. Route the new hose out through the radiator support. In order to reinstall the large hose, it must be cut for the routing to work out. I double checked the length before I cut (this is a bent / formed hose – I am guessing it would be $25+ to replace). Again, I used a worm clamp.

I reinstalled the intake plumbing and made sure that there was clearance to the MAF connector and the power steering hard line. I rotated the reservoir a little to equalize the clearance.

Cooler connection
The OEM hose has to be cut to length to connect to the cooler (same situation as with the larger hose on the reservoir). I connected the OEM hose to the upper connection and the new cloth braid hose on the lower connection. I didn’t mind using the spring clamps here as they were new. I used a couple of zip ties to locate the hoses where I wanted them.

Hardline / hose connection
Before the system is bled, there is another area that needs attention. The power steering hard line to hose connection that runs over the top of the radiator uses a spring clamp and has been known to come loose under hard use. I know a couple of trucks at TRR lost power steering when the hose popped and sprayed ATF everywhere under the hood. The hose on my truck has *almost* come off a couple of times and I have reseated it. I have since removed the spring clamp and installed a worm clamp for a more secure connection.

Bleeding the system
As per the included instructions --> Fill the reservoir up to the internal fill line (a quart of ATF is included). Start the truck. Check the level. Cycle the steering 3-5 times, check the level. Turn off the truck and check for leaks. Drive 25-50 miles, check the level while hot and check for leaks.
Overall impressions
This kit comes with everything, including ATF. No need to run to the parts store to finish the install. The billet reservoir and mount are very well made with the mount being powder coated and the cap to the reservoir having two o-rings for sealing. The contrasting anodize on the cap is a nice touch. The cooler fits the location perfectly. The need to trim the bracket was a minor thing to me. The mounting arm could be a little shorter to nest the reservoir into the original location a little better, also a minor thing.
General notes
The old fluid was pretty dark and I noticed some sediment in the bottom of the reservoir.
System Performance
During daily driving, the only difference I noticed was a slightly more pronounced "hiss" from the pump as I turned the wheel. It could have always been there and I just didn't notice it before because I wasn't listening for it.
I was able to put this system through its paces during Raptoberfest. During the event, I never heard a peep out of my steering pump. I rode in and drove a couple of different trucks during the event and some of those pumps were screaming for mercy. The only thing I noticed was a little bit of ATF burped out of the pressure valve, a small amount that was able to be wiped up off of the cap with a rag. Overall, I was impressed by the performance.
Last edited:

