

You are using an out of date browser. It may not display this or other websites correctly.
You should upgrade or use an alternative browser.
You should upgrade or use an alternative browser.
Moroso Air/Oil Separator
- Thread starter R1jamn
- Start date
Disclaimer: Links on this page pointing to Amazon, eBay and other sites may include affiliate code. If you click them and make a purchase, we may earn a small commission.
OP
OP
R1jamn
Full Access Member
- Joined
- Jun 18, 2011
- Posts
- 401
- Reaction score
- 299
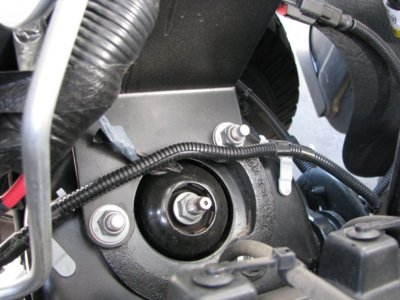
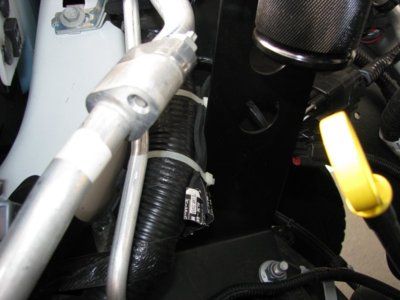
Do you have pictures of where your bracket bolts to your shock tower.
A couple more pics.
It looks as though a piece of factory tape has lost its grip.
Attachments
MagicMtnDan
FRF Addict
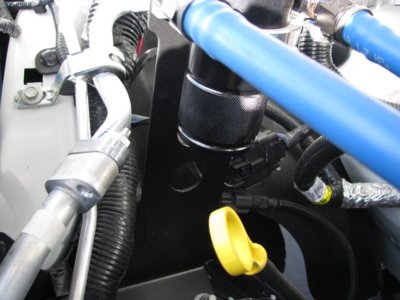
I installed the Moroso catch can on my '14 scab while it was still on the dealer lot.
I changed some of the components of the kit using different hoses, connectors, O-rings, retaining screen and installed more of the mesh screen material and some other details were changed too.
My Raptor has 2000 miles on the clock and I performed it's first oil change today.
I also opened up the Moroso catch can to dump it out for the first time.
There was a significant amount of oil in it. I'm happy with the Moroso and it's ability to keep the oil out of the intake.
Here is a description of the kit and what I improvised on.
Moroso Air/Oil Catch Can Kit #85607 – small body (black anodize).
I had the stainless steel bracket powder coated (black) (compound TGIC Polyester) (JR Powder Coating) The Moroso bracket is made from series 409 stainless steel (crap stainless steel).
I buffed down all the edges on the bracket because it had sharp edges and corners everywhere. I used a Norton Bear Tex wheel for this process. Then I had it powder coated. ($40)
I fitted the Moroso catch can with XRP barbed 90 deg aluminum fittings (black anodize) (size -8 AN) (it screws into the catch can with 3/8-18 NPT)
I used teflon tape on the NPT threads of the fittings and copper anti-seize grease on the straight thread for the hose fittings.
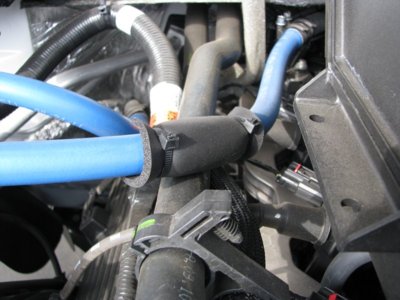
I fitted the Russell Performance hose with XRP straight barbed aluminum fittings (black anodized)(size -8 AN)
I used Russell Performance Twist-Lok hose (color is Blue). It’s a push-on hose with a CPE synthetic rubber liner (chlorinated polyethylene) with a reinforced fabric braid (size -8 AN/.500” I.D.)
(lengths 13.” and 20.”) (rated for 250 psi) (temp range -40 to +350 F). I ordered it from Summit Racing (10 ft. length)
I bought an extra pcv to induction hose with the fittings from FordParts.com and removed the hose from fittings with a heat gun.
I kept the original one from the Raptor just in case the Moroso leaks (I'm sure it won't though)
I used Norma Torro hose clamps (German Style) to secure the hose to the barbs (material is W4 which is a great 300 series SS)
Installed a Fluorocarbon (FKM) 75-durometer (black) o-ring (size -135) for the catch can. Installed a Viton Fluorocarbon o-ring for the Ford nipples.
I bought “Super Lube” a silicon o-ring grease to lube the o-rings with. (made for Fluorocarbon o-rings)
I purchased an extra Moroso mesh screen for the catch can (part #85472060/4ft.) thru Lethal Performance. I had to cut it in half and then roll it up with the ones in the catch can for each chamber.
I purchased 3/8 inch and 1/4 inch washers for the 1/4-20 bracket bolts and 10mm strut tower studs.
I purchased new Ford Nylock nuts for the tower bracket hold down studs, as per Ford service manual. Tighten new Nylock nuts down to 30 lb-ft.
I purchased the XRP fittings from TMR in Orange, California, 714-771-1348
I improvised the retainer plate for the mesh screen. It is cheap cast aluminum .030 thick. I made my own retaining plate made out of 6061-T6 that is .125 thick.
Seeing how much oil was trapped in this kit, I should have purchased the large Moroso catch can.
The Moroso captured 60 ml of oil (2.0 fl oz).
I'm really impressed with all the time and work you put into this. I assume you have some experience with the air/oil separator and I'm guessing you've got some mechanical engineering and/or machinist experience. How did you know what do to to upgrade and improve the product?
MTF
FRF Addict
Looks good R1jamn,
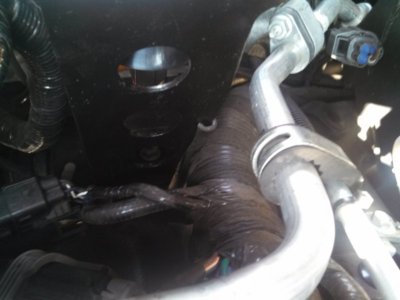
How tight was the bracket against the large main wire loom on your Raptor.
I had to take out my grinder and shave a good 1/2 in. of the side of the bracket.
I then split a hose open and cover the edge of the bracket to further protect the wire harness from vibrations.
It might be that it's the large can that may have a bigger bracket that's why I'm asking.
That's a lot of oil, it must be since it's still the break-in oil and the rings are not quite fully set yet that you have caught so much.
And no water or the that funny milky brown crap that everyone else is getting.
You do not need one on the the drivers side, this is fresh air intake. But having said that, I do see some folks that are pulling some oil up from the drivers side.
I have talk to countless techs about this they all say the same thing and even Whipple confirms this.
I have no hint of oil coming into the tube on the drivers side.
Attachments

Last edited:
OP
OP
R1jamn
Full Access Member
- Joined
- Jun 18, 2011
- Posts
- 401
- Reaction score
- 299
I'm really impressed with all the time and work you put into this. I assume you have some experience with the air/oil separator and I'm guessing you've got some mechanical engineering and/or machinist experience. How did you know what do to to upgrade and improve the product?
Thanks Magic. You assume correctly.
I've been a prototype/job shop machinist for 29 yrs now.
OP
OP
R1jamn
Full Access Member
- Joined
- Jun 18, 2011
- Posts
- 401
- Reaction score
- 299
Looks good R1jamn,
How tight was the bracket against the large main wire loom on your Raptor.
I had to take out my grinder and shave a good 1/2 in. of the side of the bracket.
I then split a hose open and cover the edge of the bracket to further protect the wire harness from vibrations.
It might be that it's the large can that may have a bigger bracket that's why I'm asking.
That's a lot of oil, it must be since it's still the break-in oil and the rings are not quite fully set yet that you have caught so much.
And no water or the that funny milky brown crap that everyone else is getting.
You do not need one on the one the drivers side, this is fresh air intake.
I have talk to countless techs about this they all say the same thing and even Whipple confirms this.
I have no hint of oil coming into the tube on the drivers side.
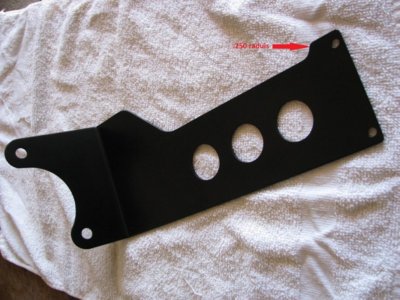
I ground a .250 raduis into the bracket only becuase it had a sharp corner where the wire loom was. Then I softened up all the edges and corners with a Bear Tex wheel.
The bracket had clearance. It is still close to the wire loom but nothing that showed immidiate concern.
The Moroso I have is actually the small can. It did collect quite a bit of oil.
Nearly all of the miles were from traveling on the highway. So it may very well be blow by from the rings not seating all the way yet.
Thanks for the info. I'll skip on the install of the drivers side catch can.
Attachments
Boss Hoss
FRF Addict
Good Lord people this is not new. I have 2 of the RX catch cans one on the truck the other on the jeep. You will not believe what comes out! A lot of it is water from condensation --think about it! Very little oil.
It is best to mount the tank close to the outside wall as far forward as possible to the coolest part of the bay. The unit the OP used is a little on the small side and is a pain to work with.

Good narrative from Tracy who I have spoken to several times.
Home » News » Tracy's Tech Tips » Understanding the Need for a Proper PCV Oil Separating Catch Can
Understanding the Need for a Proper PCV Oil Separating Catch Can
13:28:18 - 06/21/2012
Any engine driven hard will ingest a certain amount of oil into the intake air system resulting in loss of power, detonation, and long term carbon buildup on the pistons and valves reducing the velocity and flow through the engine.
Understanding the Need for a Proper PCV Oil Separating Catch Can
Preventing this on a street driven car subject to emissions requires some simple modifications to the closed OEM PCV system.
On all our race applications where emission rules do not apply, this is accomplished in different ways, but proper crankcase ventilation is a must! The crankcase gets filled with harmful combustion byproducts that if not evacuated will cause internal damage to your engine and shorten the usable life. These byproducts include: Sulfuric acids, abrasive carbon particles, un-burnt fuel, water, and more. If you do not have a proper crankcase evacuation system these compounds will condense inside the engine and mix with the oil as well as begin corroding internal parts. It is NOT enough to just vent the crankcase pressure through a breather, but it must be flushed with a filtered fresh air source to carry these out and away. In an OEM system, these are burnt in the combustion chamber and further in the catalytic converters.
In an off-road or race application, the engine is normally not used to burn them off.
At the very least drag only motors have a scavenge evac system in the header collectors to pull vac, and anyone that's serious has a belt driven vac pump.....especially the Alky motors due to the amount of moisture the alcohol introduces to the crankcase.
Want to see what’s in your oil? A simple oil analysis will show you how much harmful stuff ends up in it.
The oil analysis will show the acid build up....and no, it takes a year or two before you would see any substantial damage to your internal engine parts.....but an easy way is after 6 months or so of running like you describe pull a valve cover and look and the corrosion from the vapors on your rocker arms. This is the first place it is visible.
Bottom line is, w/out a proper evac system you WILL sustain long term engine damage. It may take a few years to notice, but I build motors 6 days a week when not racing and see the results first hand.
There are several other ways for oil mist to enter the intake manifold, the PCV system is the most common with the fresh air make up source (the fitting on the top rear of your throttle body) being the second most common. To eliminate that you need to cap the TB fitting and run a valve cover breather (installed as far from the crankcase vent as possible...ideally you want to pull filtered fresh air in one valve cover and evac it out the other or the LS6/LS2 style valley cover is second best) Then if it is excess crankcase pressure pushing oil vapor/mist out faster than the PCV can evac it you will see it pushed back through the line from the pass valve cover front to the TB and it is ingested from there. Want to see what’s in your intake manifold? Simply remove the 4 10mm bolts that hold the TB to the intake manifold. Take a white paper towel and reach into the intake manifold snout, rub it around, and pull it out. V6 LLT owners...just inside the intake opening you will see a deep collection well that accumulates oil. The 3rd point of ingestion is from reversion. This of course needs at least one piston/ring/bore/valveguide or seal issue that is allowing oil to be pulled into that one or more intake port and at high RPM's the reversion pulse will "push" that oil throughout the entire intake manifold. It will appear to have entered from the vac fitting that the PCV system uses but is really from one of the cylinders (reversion is a whole different process that is not widely understood but do a Google search and you can actually find some super high speed video of engines on dyno's where at high RPM's...9-10-12K plus the reversion cloud of A/F mixture is actually rising out of the intake runners or carb on a non-fuel injected motor). To test for that just place a clean clear fuel filter inline between the catch can outlet and the vac fitting. If it gets oil on the can side, oil is coming through the can. If it first appears on the intake vacuum side, then it is reversion so you have a deeper issue.
Here is direct from GM on a service procedure:
Throttle body service is the throttle body cleaning and wiping of the bore and throttle blade. The service is important in order to keep the automobile running smoothly, efficiently, and safely.
There is carbon and sludge that the PCV system deposits into the throttle body as the engine operates. This carbon and sludge is cleaned out during the throttle body service. How well the engine operates about a year after service is determined by the way the automobile starts, how well it idles when it’s cold or warm, and when accessories such air conditioning and heat are operating. The carbon and sludge will also affect the way the car starts from a total stop. A service such as this will keep the idle valve, which is computer controlled, clean. If it is left dirty and covered with carbon, it will have to be replaced and such a replacement can be costly.
An important part of the engine is the throttle body, which is part of the air intake system. The air intake system increases the amount of oxygen used for combustion with fuel. You can either gain or lose power with the air intake system depending on the vehicle’s ram. The throttle body is a part of this air intake system. Keeping the throttle body in good operating condition will keep the car running without costly occurrences.
Importance of the Throttle Body Service
Careful and regular throttle body service will keep the emissions from the engine’s exhaust system in check. There is also increased sound when the throttle is applied by way of the accelerator. If the vehicle is operated at lower speeds, there is less noise coming from the engine. However, at higher speeds, the engine tends to become very noisy. These two statements make the throttle body service important in itself, as it makes the automobile more environmentally friendly. A complete throttle body service is recommended every 15,000, 40,000, and 75,000 miles to be sure that the automobile is functioning properly.
It is most important to have the throttle body serviced regularly to avoid the high cost of replacement. The cost of throttle body service or replacing the throttle body varies with the year, make, and model of the car. But, no matter what that year, model, or make may be, replacement is not inexpensive. Excluding the cost of replacing the throttle body for the moment, what is perhaps even more important, is to have the throttle body serviced regularly to keep your car running smoothly and efficiently.
Having engine smoke or excess crankcase pressure? There may be a deeper issue. On the LS motors we pull apart it is usually # 7 ringland broken between the compression and middle ring, or the land itself broke off at the top. We also find the top ringland pinched or crushed down on the top ring (comp. ring) and metal transfer along the piston side has caused the oil and scraper ring to stick allowing oil and blow-by. Also, try this: at idle (vac is at its greatest when at idle or when the throttle blade closes from high RPM's) remove the oil fill cap and hold your hand over it. Does it pull a slight suction? If so, all is good with most of the system and I doubt you have a damaged piston/ring/bore. But if there is ANY pressure pushing back you have a deeper issue and that is the cause of the oil problem.
Now on big cam/stroker builds a can inline on the dirty side, and a can inline from the fresh air source may be needed (the bigger the bore and longer the stroke, the more crankcase pressure is built up) If it is forced induction, then you have a whole new process to deal with......and that is the PCV system works properly when at idle and non-boost, but when you start making boost you have switched from the intake manifold being negative atmosphere to a pressurized component and the PCV system is rendered useless and pressure escapes wherever it can. The solution then is to have one way check valves inline so the vacuum need for proper evacuation comes from in front of the compressor (head unit) through a line run to the air filter.
This is getting a bit long and I hope all can follow this, but if not ask me specific questions for clarification so this helps all. I'll go over every type of solution and the pros and cons of each....and remember, this problem is NOT just in the GM LS based engines, but is an issue with ALL modern closed systems. We just tear into our cars where as the Mercedes or Lincoln owner never even realizes there is an issue.
I also wanted to address the water in the oil. You will NOT fill your crankcase up in short order with just breathers. What happens is each time your engine reaches operating temp the un-burnt fuel, water vapor, combustion by-products will gas or "flash-off" as vapor. But only the excess crankcase pressure being relieved through the breather will carry any of that out....and without a proper evac system, a good amount remains in the crankcase and re-condenses back to droplets that coat the internal engine parts as your motor cools down and it contaminates the oil. Every time you heat cycle you are adding more contamination and it is not very visible to just "look" at your oil....you need a professional analysis to see just what is accumulating in your oil and how it is breaking down its ability to protect...but the corrosion from the sulfuric acid is also very damaging over time. Just pull the dipstick on a diesel 20 miles after an oil change...it already "looks" black and dirty, but is still new and providing the proper protection. Sight is deceiving. Oil might look pretty clean or dirty but an analysis report will show destructive levels of contaminants.
And finally, some have gone so far as to cap off the entire system and run an open hose from each valve cover to near the ground. While this will eliminate all oil getting into the intake via the PCV system, the damage done by the hose with the least amount of air moving past it while at speed will suck dirt/sand/dust/water/and who knows what else directly into the motor via that valve cover. It may take some time (depending on how clean the roads you drive on are) but will result in premature engine wear and failure.
The solution for the street crowd is a properly designed, good functioning oil separating catch can. Many are available on the market, but ONLY ones designed with internal baffling and a good distance separating the inlet from the outlet. Many of the cans seen for low prices on EBay, etc. are great looking, but are nothing but empty cans with two fittings attached. Do your homework and get a full understanding before you make your selection.
You can check out our full line of RX catch cans here. If you have questions, or if you need a catch can for a specific application not listed on our site, contact us at [email protected].
Tags: RX, Tracy's Tech Tips, Catch Can,
It is best to mount the tank close to the outside wall as far forward as possible to the coolest part of the bay. The unit the OP used is a little on the small side and is a pain to work with.
Good narrative from Tracy who I have spoken to several times.
Home » News » Tracy's Tech Tips » Understanding the Need for a Proper PCV Oil Separating Catch Can
Understanding the Need for a Proper PCV Oil Separating Catch Can
13:28:18 - 06/21/2012
Any engine driven hard will ingest a certain amount of oil into the intake air system resulting in loss of power, detonation, and long term carbon buildup on the pistons and valves reducing the velocity and flow through the engine.
Understanding the Need for a Proper PCV Oil Separating Catch Can
Preventing this on a street driven car subject to emissions requires some simple modifications to the closed OEM PCV system.
On all our race applications where emission rules do not apply, this is accomplished in different ways, but proper crankcase ventilation is a must! The crankcase gets filled with harmful combustion byproducts that if not evacuated will cause internal damage to your engine and shorten the usable life. These byproducts include: Sulfuric acids, abrasive carbon particles, un-burnt fuel, water, and more. If you do not have a proper crankcase evacuation system these compounds will condense inside the engine and mix with the oil as well as begin corroding internal parts. It is NOT enough to just vent the crankcase pressure through a breather, but it must be flushed with a filtered fresh air source to carry these out and away. In an OEM system, these are burnt in the combustion chamber and further in the catalytic converters.
In an off-road or race application, the engine is normally not used to burn them off.
At the very least drag only motors have a scavenge evac system in the header collectors to pull vac, and anyone that's serious has a belt driven vac pump.....especially the Alky motors due to the amount of moisture the alcohol introduces to the crankcase.
Want to see what’s in your oil? A simple oil analysis will show you how much harmful stuff ends up in it.
The oil analysis will show the acid build up....and no, it takes a year or two before you would see any substantial damage to your internal engine parts.....but an easy way is after 6 months or so of running like you describe pull a valve cover and look and the corrosion from the vapors on your rocker arms. This is the first place it is visible.
Bottom line is, w/out a proper evac system you WILL sustain long term engine damage. It may take a few years to notice, but I build motors 6 days a week when not racing and see the results first hand.
There are several other ways for oil mist to enter the intake manifold, the PCV system is the most common with the fresh air make up source (the fitting on the top rear of your throttle body) being the second most common. To eliminate that you need to cap the TB fitting and run a valve cover breather (installed as far from the crankcase vent as possible...ideally you want to pull filtered fresh air in one valve cover and evac it out the other or the LS6/LS2 style valley cover is second best) Then if it is excess crankcase pressure pushing oil vapor/mist out faster than the PCV can evac it you will see it pushed back through the line from the pass valve cover front to the TB and it is ingested from there. Want to see what’s in your intake manifold? Simply remove the 4 10mm bolts that hold the TB to the intake manifold. Take a white paper towel and reach into the intake manifold snout, rub it around, and pull it out. V6 LLT owners...just inside the intake opening you will see a deep collection well that accumulates oil. The 3rd point of ingestion is from reversion. This of course needs at least one piston/ring/bore/valveguide or seal issue that is allowing oil to be pulled into that one or more intake port and at high RPM's the reversion pulse will "push" that oil throughout the entire intake manifold. It will appear to have entered from the vac fitting that the PCV system uses but is really from one of the cylinders (reversion is a whole different process that is not widely understood but do a Google search and you can actually find some super high speed video of engines on dyno's where at high RPM's...9-10-12K plus the reversion cloud of A/F mixture is actually rising out of the intake runners or carb on a non-fuel injected motor). To test for that just place a clean clear fuel filter inline between the catch can outlet and the vac fitting. If it gets oil on the can side, oil is coming through the can. If it first appears on the intake vacuum side, then it is reversion so you have a deeper issue.
Here is direct from GM on a service procedure:
Throttle body service is the throttle body cleaning and wiping of the bore and throttle blade. The service is important in order to keep the automobile running smoothly, efficiently, and safely.
There is carbon and sludge that the PCV system deposits into the throttle body as the engine operates. This carbon and sludge is cleaned out during the throttle body service. How well the engine operates about a year after service is determined by the way the automobile starts, how well it idles when it’s cold or warm, and when accessories such air conditioning and heat are operating. The carbon and sludge will also affect the way the car starts from a total stop. A service such as this will keep the idle valve, which is computer controlled, clean. If it is left dirty and covered with carbon, it will have to be replaced and such a replacement can be costly.
An important part of the engine is the throttle body, which is part of the air intake system. The air intake system increases the amount of oxygen used for combustion with fuel. You can either gain or lose power with the air intake system depending on the vehicle’s ram. The throttle body is a part of this air intake system. Keeping the throttle body in good operating condition will keep the car running without costly occurrences.
Importance of the Throttle Body Service
Careful and regular throttle body service will keep the emissions from the engine’s exhaust system in check. There is also increased sound when the throttle is applied by way of the accelerator. If the vehicle is operated at lower speeds, there is less noise coming from the engine. However, at higher speeds, the engine tends to become very noisy. These two statements make the throttle body service important in itself, as it makes the automobile more environmentally friendly. A complete throttle body service is recommended every 15,000, 40,000, and 75,000 miles to be sure that the automobile is functioning properly.
It is most important to have the throttle body serviced regularly to avoid the high cost of replacement. The cost of throttle body service or replacing the throttle body varies with the year, make, and model of the car. But, no matter what that year, model, or make may be, replacement is not inexpensive. Excluding the cost of replacing the throttle body for the moment, what is perhaps even more important, is to have the throttle body serviced regularly to keep your car running smoothly and efficiently.
Having engine smoke or excess crankcase pressure? There may be a deeper issue. On the LS motors we pull apart it is usually # 7 ringland broken between the compression and middle ring, or the land itself broke off at the top. We also find the top ringland pinched or crushed down on the top ring (comp. ring) and metal transfer along the piston side has caused the oil and scraper ring to stick allowing oil and blow-by. Also, try this: at idle (vac is at its greatest when at idle or when the throttle blade closes from high RPM's) remove the oil fill cap and hold your hand over it. Does it pull a slight suction? If so, all is good with most of the system and I doubt you have a damaged piston/ring/bore. But if there is ANY pressure pushing back you have a deeper issue and that is the cause of the oil problem.
Now on big cam/stroker builds a can inline on the dirty side, and a can inline from the fresh air source may be needed (the bigger the bore and longer the stroke, the more crankcase pressure is built up) If it is forced induction, then you have a whole new process to deal with......and that is the PCV system works properly when at idle and non-boost, but when you start making boost you have switched from the intake manifold being negative atmosphere to a pressurized component and the PCV system is rendered useless and pressure escapes wherever it can. The solution then is to have one way check valves inline so the vacuum need for proper evacuation comes from in front of the compressor (head unit) through a line run to the air filter.
This is getting a bit long and I hope all can follow this, but if not ask me specific questions for clarification so this helps all. I'll go over every type of solution and the pros and cons of each....and remember, this problem is NOT just in the GM LS based engines, but is an issue with ALL modern closed systems. We just tear into our cars where as the Mercedes or Lincoln owner never even realizes there is an issue.
I also wanted to address the water in the oil. You will NOT fill your crankcase up in short order with just breathers. What happens is each time your engine reaches operating temp the un-burnt fuel, water vapor, combustion by-products will gas or "flash-off" as vapor. But only the excess crankcase pressure being relieved through the breather will carry any of that out....and without a proper evac system, a good amount remains in the crankcase and re-condenses back to droplets that coat the internal engine parts as your motor cools down and it contaminates the oil. Every time you heat cycle you are adding more contamination and it is not very visible to just "look" at your oil....you need a professional analysis to see just what is accumulating in your oil and how it is breaking down its ability to protect...but the corrosion from the sulfuric acid is also very damaging over time. Just pull the dipstick on a diesel 20 miles after an oil change...it already "looks" black and dirty, but is still new and providing the proper protection. Sight is deceiving. Oil might look pretty clean or dirty but an analysis report will show destructive levels of contaminants.
And finally, some have gone so far as to cap off the entire system and run an open hose from each valve cover to near the ground. While this will eliminate all oil getting into the intake via the PCV system, the damage done by the hose with the least amount of air moving past it while at speed will suck dirt/sand/dust/water/and who knows what else directly into the motor via that valve cover. It may take some time (depending on how clean the roads you drive on are) but will result in premature engine wear and failure.
The solution for the street crowd is a properly designed, good functioning oil separating catch can. Many are available on the market, but ONLY ones designed with internal baffling and a good distance separating the inlet from the outlet. Many of the cans seen for low prices on EBay, etc. are great looking, but are nothing but empty cans with two fittings attached. Do your homework and get a full understanding before you make your selection.
You can check out our full line of RX catch cans here. If you have questions, or if you need a catch can for a specific application not listed on our site, contact us at [email protected].
Tags: RX, Tracy's Tech Tips, Catch Can,
Last edited:
Sandman1911
Member
First post here, been following the site for a while. Just installed the Moroso air oil can and it looks like a quality product. I used a couple of R1's tips (thanks for the info man), namely painting the bracket and padding it. I used the factory insulation with three black zip ties to hold it over the edge that rides agains the wire loom. We'll see how much oil this thing catches.
OP
OP
R1jamn
Full Access Member
- Joined
- Jun 18, 2011
- Posts
- 401
- Reaction score
- 299
^^^
I wrapped the loom with the insulation from the stock hose also.
Acutally, I placed two layers around the loom then zip tied it.
I had a small piece left over and wrapped one of the hoses with it.
Keep an eye on the catch can. It will collect quite a bit.
Check it after 1K miles then monitor accordingly.
Attachments

fordraptorfans
Full Access Member
- Joined
- Nov 21, 2014
- Posts
- 196
- Reaction score
- 95
What is the fittings on the other side of the hose that goes to the motor
Similar threads
- Replies
- 28
- Views
- 4K
- Replies
- 6
- Views
- 189
- Replies
- 4
- Views
- 284
- Replies
- 1
- Views
- 1K
Members online
- scroper
- raptorgroyper
- RapsterJimmy
- kem12993
- zachery55
- GregFoutz
- DLarrabee99
- nikhsub1
- taquitos
- SoCalDawg
- GCATX
- jcollier_91
- summands
- ksgries
- icecoldak
- sonicboom254
- Swifty
- mario500
- AndrewJ
- vill
- firemanjoe
- elpechedepeche
- bellnghmrider
- furioussphinx
- HighwaySentinel
- MSP
- MetalDaze
- 3Dog
- BigTaco
- k3k0a808
- Butterz
- Comish
- yoxxi
- murffly
- Azurebeast
- Raptor_NV
- xturdfergusonx
Total: 1,442 (members: 39, guests: 1,403)
Forum statistics
Latest posts
-
-
-
-
 801A package can you fit a 37" spare under the bed?
- Latest: skillathon2002