Need mounts/brackets for 40" Lightbar behind grille

Disclaimer: Links on this page pointing to Amazon, eBay and other sites may include affiliate code. If you click them and make a purchase, we may earn a small commission.

ZBoater

FRF Addict
Joined
Mar 9, 2014
Posts
1,980
Reaction score
865
mine doesn't fit. using those brackets. What do I need to do to make it fit?

You mean the bar doesn't fit? It's a 40" bar?

Leave the brackets a bit loose while you're fitting the bar. They have about 1" play on each end. If your not fitting by more than that, you have the wrong size light bar my friend. :)

---------- Post added at 08:19 PM ---------- Previous post was at 08:14 PM ----------

I should also mention that it's a tight fit with the fins in the back. I had to kinda jam it in there. While keeping the bottom of the brackets loose I tightened the bolts going into the sides of the light bar. Once those were tight, i tightened down the bottom ones that go into the car. Careful not to over tighten those, they could strip. And the fins on the back of the light will definitely be touching the radiator.
 
OP
OP
bakkbakk

bakkbakk

Full Access Member
Joined
Nov 23, 2013
Posts
638
Reaction score
204
Location
House
You mean the bar doesn't fit? It's a 40" bar?

Leave the brackets a bit loose while you're fitting the bar. They have about 1" play on each end. If your not fitting by more than that, you have the wrong size light bar my friend. :)

---------- Post added at 08:19 PM ---------- Previous post was at 08:14 PM ----------

I should also mention that it's a tight fit with the fins in the back. I had to kinda jam it in there. While keeping the bottom of the brackets loose I tightened the bolts going into the sides of the light bar. Once those were tight, i tightened down the bottom ones that go into the car. Careful not to over tighten those, they could strip. And the fins on the back of the light will definitely be touching the radiator.


um ok it "fits"

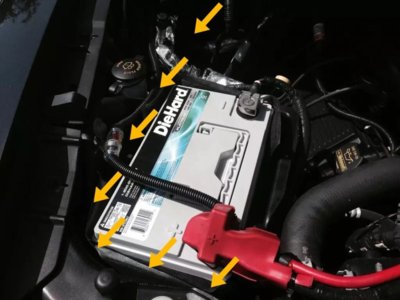
which way do I run the wire?

---------- Post added at 07:29 PM ---------- Previous post was at 07:28 PM ----------

and thanks for being in the same place I am in mods and being addicted to this site. It seems im following you

---------- Post added at 07:29 PM ---------- Previous post was at 07:29 PM ----------

on the right side or the left side of the battery? Im thinking right?
 

ZBoater

FRF Addict
Joined
Mar 9, 2014
Posts
1,980
Reaction score
865
um ok it "fits"

which way do I run the wire?

---------- Post added at 07:29 PM ---------- Previous post was at 07:28 PM ----------

and thanks for being in the same place I am in mods and being addicted to this site. It seems im following you

I ran my left (towards the battery) since the pass through wires from the upfitter switches are on that side. I ran the wire up the front left around the battery and along the side where the AC lines are. Covered all wires in plastic conduit to protect them, and used shrink wrap tubing on the connections to seal them. Also used weather proof butt connectors. I'm not into soldering.

Edit; I ran mine towards the left of the battery (while facing the car), farthest away from the engine, closest to the outside edge of the engine bay.
 

Attachments

  • image.jpg
    image.jpg
    74.4 KB · Views: 44
Last edited:

Yukon Joe

FRF Addict
Joined
Nov 16, 2011
Posts
18,378
Reaction score
11,619
Location
Russellville, AR
Ok. I just followed the Rigid instructions. I would have hoped they would mention something. Those didn't look like regular nuts, more like square clips that fit only in cars. Any recommendations? I'm thinking brand new bolt and nut with a washer, but for the life of me I can't see how I would tighten that with so little space to work with.

I think I used stainless steel 3/8" carriage bolts. They fit into the square factor hole perfectly. Add lock nut and you're goood to off-road!

Yukon Joe
www.RUNRAPTORRUN.com
 

dark1024

Member
Joined
Jul 4, 2014
Posts
39
Reaction score
9
Location
Cupertino, CA
I used different ones, but had to remove the rubber things
maqyhyhu.jpg
nyqara2y.jpg
 
Top