Baja Designs: General Discussion Thread

Disclaimer: Links on this page pointing to Amazon, eBay and other sites may include affiliate code. If you click them and make a purchase, we may earn a small commission.

OP
OP
Baja Designs

Baja Designs

Supporting Vendor
Supporting Vendor
Joined
Apr 12, 2012
Posts
1,748
Reaction score
1,217
Will do! Here's the bulk of the parts—wide cornering lights on the outside, driving lights on the inside. Not shown are the wire harnesses, extra mating connectors, stickers, and instructions. It’s not readily apparent to me which bracket goes on the left or the right side but I’m assuming it will be once I get under the truck.

Being somewhat newish (again) to the forum, is it better to post my install in this thread or create a new thread for it?

Glen,
Thank you for posting up!
Feel free to post up any product pictures, install information, likes vs. dislikes.
This thread is a good place to put all of that

Thank You,
Bailey, Baja Designs

---------- Post added at 08:51 AM ---------- Previous post was at 08:41 AM ----------

I am interested in putting some squadron's in my bumper. I'm thinking two cornering pattern and two driving pattern and the bracket yall have. If possible please pm me for a quote or email me at [email protected]. Do you offer any discounts or package deals?

I went ahead and sent you an email tuesday.
PM sent this morning in regards to full kit pricing.

We do offer a Ford Raptor Forum discount.
Let me know if you have any questions!

Thank You,
Bailey, Baja Designs
 

bikerglen

Member
Joined
Oct 1, 2012
Posts
34
Reaction score
20
Location
Fort Collins, CO
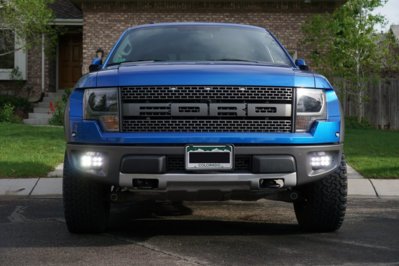
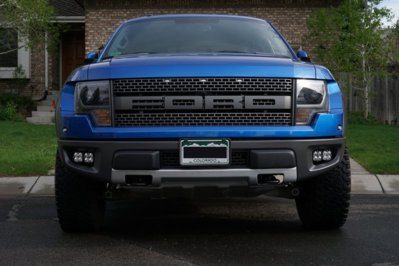
Squadron Pros Installed!

I installed my Baja Designs mounting bracket and Squadron Pros over the weekend. The mechanical part of the installation went very smoothly. The electrical part would have been simple if not for Ford’s confounded upfitter switch wiring design. Hopefully Ford will at least install connectors on the bare wires for 2017. Without further ado, here's my notes on the installation process and some photos.

Mechanical Install: 1.5 hours / zero bandaids / zero ibuprofen.
Electrical Install: 3 hours / one bandaid / get the chewable ibuprofen and make a meal out of it — completely Ford’s fault.
Results: awesome and bright

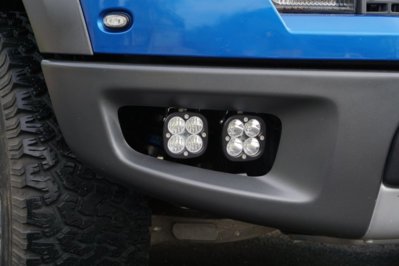
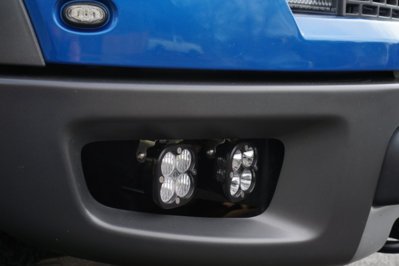
The mechanical install of the lights was dead simple using a few simple hand tools and the included instructions. Unfortunately, Ford was brain dead when they designed the upfitter switch wiring harnesses so the electrical part of the job was tedious, frustrating, and took at least an hour longer than it should have.

Some notes on tools used and the installation:

• For removing the existing screws, you'll need a 10mm socket wrench and a 10mm combination wrench. The innermost screws are easily accessible with a socket wrench but the outermost screws are easier to access with a combination wrench or a ratcheting combination wrench.
• For installing the new screws provided with the brackets, you'll need a 6mm hex key and a 6mm hex socket driver. I used the key to get the screws started then finished the job with the socket wrench.
• For installing and aiming the lights, you'll need a pair of 9/16" combination wrenches and a 4mm hex key.
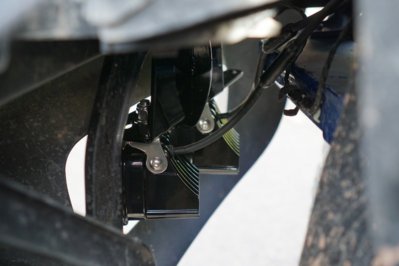
• I found it easier to mount the hanging brackets from the lights on the fog light bracket before installing the fog light bracket on the vehicle.
• Once the brackets are mounted on the truck, install and aim the innermost lights first. The outermost lights block access to the hex screws on one side of the inside lights.
• I cut the cables with the connectors off the wiring harnesses provided with the lights and used those to connect the lights to the upfitter switch wiring. The relays and switches ended up in the spare parts bin.
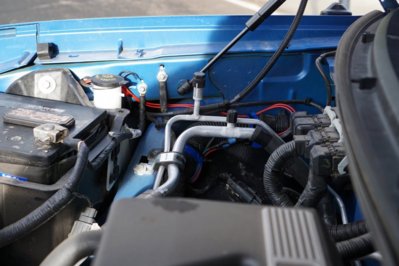
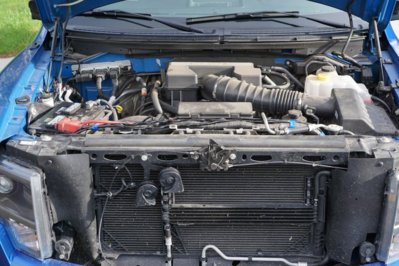
• I started routing the wires at the main chassis ground next to the battery then between the side of the truck and the washer fluid container. From there, the passenger side wires dropped directly down to the lights. I routed the drivers side wires across the wiring harness on top of the radiator and dropped down to the lights once the wires were at the drivers side of the vehicle.
• The shorter wires were long enough to easily reach from the ground screw to the passenger-side lights. The longer wires could have been a foot or two longer but they did make it.
• I connected all the (-) wires to the main chassis ground lug.
• I cut two two-foot long wires to go from the under-hood firewall passthrough wires to the (+) wires for the lights.
• I used crimped-on quick disconnect terminals and heat shrink tubing for almost all the connections.

And thanks again to Bailey at Baja Designs for the forum discount and the follow up call a few weeks ago!

-Glen
 

Attachments

  • raptor-baja-designs-01.jpg
    raptor-baja-designs-01.jpg
    96.1 KB · Views: 144
  • raptor-baja-designs-02.jpg
    raptor-baja-designs-02.jpg
    90.1 KB · Views: 182
  • raptor-baja-designs-03.jpg
    raptor-baja-designs-03.jpg
    58.5 KB · Views: 138
  • raptor-baja-designs-04.jpg
    raptor-baja-designs-04.jpg
    48.2 KB · Views: 132
  • raptor-baja-designs-05.jpg
    raptor-baja-designs-05.jpg
    51.6 KB · Views: 147
  • raptor-baja-designs-06.jpg
    raptor-baja-designs-06.jpg
    83.3 KB · Views: 154
  • raptor-baja-designs-07.jpg
    raptor-baja-designs-07.jpg
    125.7 KB · Views: 167

BMart

FRF Resident Artist
Joined
Jan 28, 2011
Posts
546
Reaction score
83
Location
Perterter Tern
Hey Bailey,

On the first page of this thread there are some complaints about a wiring harness being too short for the fog light kit. I'm assuming the problematic wiring harness mentioned was the included one. I noticed BD separately sells Ford Upfitter Wiring Harnesses as accessories. Are these purpose-built wiring harnesses made with the fog light location distances in mind, or will they have the same length as the regular included harness?

Also, I'm doing a bit of planning and hope you can help me out. I purchased the Ford Racing bumper bar in preparation of installing an OnX6 30" light bar on it:

M-15266-F15RBAR.jpg


The 30" OnX6 mounting bracket holes are 30.27" apart, based on your website. I don't yet have the Ford bumper bar, but I've been told that the mounting holes on the bumper bar are 9" apart from center to center, which puts the first and fourth holes at exactly 27" apart. Obviously the OnX6 brackets are a little wider than the bumper bar mounting holes. Is there an OEM solution to decrease the mounting bracket distance?

Thanks! I'm looking forward to getting lit.
 
Last edited:
OP
OP
Baja Designs

Baja Designs

Supporting Vendor
Supporting Vendor
Joined
Apr 12, 2012
Posts
1,748
Reaction score
1,217
Hey Bailey,

On the first page of this thread there are some complaints about a wiring harness being too short for the fog light kit. I'm assuming the problematic wiring harness mentioned was the included one. I noticed BD separately sells Ford Upfitter Wiring Harnesses as accessories. Are these purpose-built wiring harnesses made with the fog light location distances in mind, or will they have the same length as the regular included harness?

Also, I'm doing a bit of planning and hope you can help me out. I purchased the Ford Racing bumper bar in preparation of installing an OnX6 30" light bar on it:

The 30" OnX6 mounting bracket holes are 30.27" apart, based on your website. I don't yet have the Ford bumper bar, but I've been told that the mounting holes on the bumper bar are 9" apart from center to center, which puts the first and fourth holes at exactly 27" apart. Obviously the OnX6 brackets are a little wider than the bumper bar mounting holes. Is there an OEM solution to decrease the mounting bracket distance?

Thanks! I'm looking forward to getting lit.


The upfitter wiring harness is a bit short to reach the fog locations.
The distance is about two-three feet from the upfitter location on the firewall.

As far as the OnX6 30" goes, you will need to either;
- use tube clamp mounts with tabs, and bolt the light to that.
- Or, have a small thick gauge metal bracket that bolts into the factory tabs and extends out about 1.5" on each side.

Happy to help you find the right solution!
Thank You,
Bailey, Baja Designs
 

BMart

FRF Resident Artist
Joined
Jan 28, 2011
Posts
546
Reaction score
83
Location
Perterter Tern
The upfitter wiring harness is a bit short to reach the fog locations.
The distance is about two-three feet from the upfitter location on the firewall.

As far as the OnX6 30" goes, you will need to either;
- use tube clamp mounts with tabs, and bolt the light to that.
- Or, have a small thick gauge metal bracket that bolts into the factory tabs and extends out about 1.5" on each side.

Happy to help you find the right solution!
Thank You,
Bailey, Baja Designs

Thanks for the reply. So, for the fog light kit you sell, you recommend not buying the BD Ford Upfitter wiring harness? Is that purpose built harness intentionally short for a different application?

Sorry for the confusion, I just assumed the Ford upfitter harness was intended to be used on light installs like the one I described, and if it's not I'm trying to work out what it's for.
 
OP
OP
Baja Designs

Baja Designs

Supporting Vendor
Supporting Vendor
Joined
Apr 12, 2012
Posts
1,748
Reaction score
1,217
Thanks for the reply. So, for the fog light kit you sell, you recommend not buying the BD Ford Upfitter wiring harness? Is that purpose built harness intentionally short for a different application?

Sorry for the confusion, I just assumed the Ford upfitter harness was intended to be used on light installs like the one I described, and if it's not I'm trying to work out what it's for.

Because of the nature of the Install on the fog light kit (2 Lights per circuit),
It does require a little bit of modification to get the upfitter to work on the supplied harness.

The upfitter is designed for customers looking to use the factory lighting switches.
IT does work great with LED Light Bars behind the grille or Lights mounted on the bumper.


Thank You,
Bailey, Baja Designs
 

CP RAPTOR

Full Access Member
Joined
Apr 10, 2013
Posts
767
Reaction score
425
Location
Nova Scotia, Canada
I suggest getting the raptor harness then extending it or two. I got it to clean up the install and then it's plug and play if you decide to change it up. I also like to unplug the lights when at a dealer. Really it just cleans up the wiring.

The splitter harness is not nearly long enough. It would be nice if BD made a raptor specific setup with a little extra length giggity for a kit like yours or mine. HINT BAILEY. I think it would sell well.

So bailey, I am awaiting my 60" arc bar. You have my shipping address lol.

In all honesty I must say Bailey gave me a mega hook up with a warranty issue. Very pleased with the service and I will post pics of the amber cover/rock guards when I get home in about two weeks.

Thank you bailey !

Ps on my 60 I'd like to have it controlled by two switches, some amber and some racer spot. Thanks. Wink and gun.
 

stewwalker

Full Access Member
Joined
Oct 23, 2013
Posts
241
Reaction score
59
Location
Kingsville/Houston
Ordered 2 Squadron Pro driving and 2 Squadron Pro cornering as well as the bumper bracket last night. Everything was under $800. The spring sale with 15% off and $5 shipping is a great deal. I hope they get here in time for the 500.
 
Top