What did u do to your raptor today?

Disclaimer: Links on this page pointing to Amazon, eBay and other sites may include affiliate code. If you click them and make a purchase, we may earn a small commission.

TAC71

Full Access Member
Joined
Jan 4, 2021
Posts
158
Reaction score
465
Location
Osoyoos BC Canada
Got to work on the maintenance and modification list on my Raptor today. Spent most of the day installing and tying rebar for my driveway until my back was to sore to tie anymore.
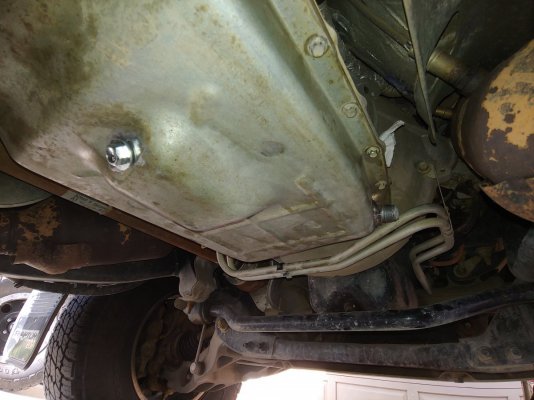
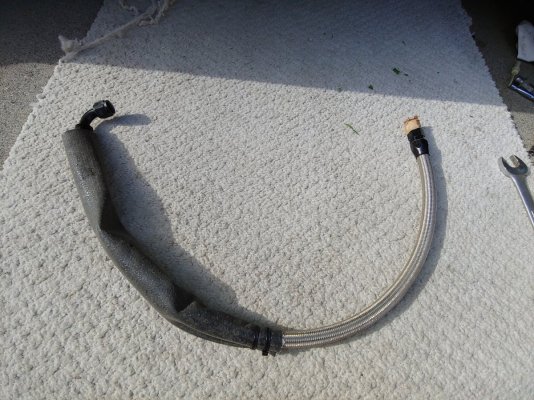
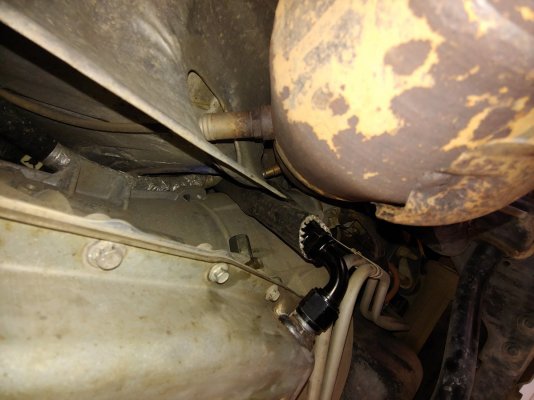
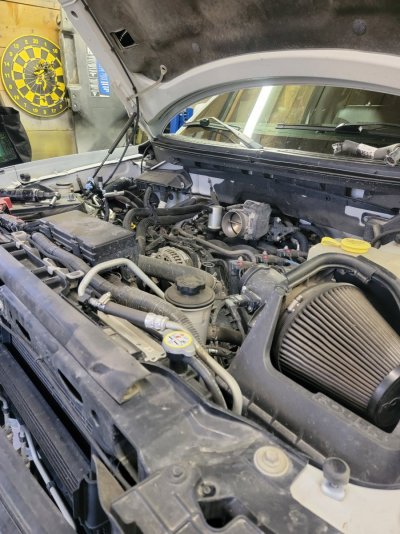
Spent the late afternoon doing the trans service, oil change and T case fluid change. Welded in a drain **** and a -10 nipple to run a dipstick for the trans. Fabbed the dipstick tube out of -10 hose with firebraid cover for the bottom near the cat. Covered the top with heatshrink to prevent the steel braid from rubbing on anything. To drain the trans I drilled a hole where the drain plug would go. I was very careful to catch all the fluid so I could measure it for easier refill. Was so easy to fill it up in the engine compartment. I have to do the warm up to check the level on the factory dipstick then I can calibrate the length of the new dipstick tube to work with new F350 dipstick. The top of the new dipstick tube -10 hose will go onto about an eight inch piece of steel tubing which will mounted above the passenger cam cover.
Next will be the new PS system, AF change with new thermostat and both diff oils. Then on to the fun stuff , lights , compressor, new wheels and custom decals.
 

Attachments

  • 20210508_171825_HDR.jpg
    20210508_171825_HDR.jpg
    167.9 KB · Views: 16
  • 20210508_171852.jpg
    20210508_171852.jpg
    302.3 KB · Views: 16
  • 20210508_180120.jpg
    20210508_180120.jpg
    145.8 KB · Views: 16

TAC71

Full Access Member
Joined
Jan 4, 2021
Posts
158
Reaction score
465
Location
Osoyoos BC Canada
Yeah I’m really happy with the ride, I thought the TSW Bravo valving might be a bit harsh especially on mid perch but it’s way nice and I love how much it lifted. Next purchase is either 35”s or a different bumper
T3amfish, how was your experience with TSW. I'm up in Canada and I'm debating just sending mine out or rebuilding them myself.
 

T3amfish

Your mom goes to college
Joined
May 8, 2020
Posts
102
Reaction score
132
Location
Utah
They were great, emails came immediately after the order, then follow up emails when they shipped with tracking. Each rebuild is custom, mine were ready to be shipped after 4days.. they provide a return lable and all you do is put your old ones back into the box abs out the new return lable on and drop them off at fedex
 

Pyro3601

FRF Supporting Member
Supporting Member
Joined
May 13, 2015
Posts
647
Reaction score
799
Location
Lethbridge Alberta Canada
Not all today more the last couple. Ither way so the Ole girl had a timing cover leak. Been sweating for a while. Just been keeping and eye on it. While it started to drip. So I get it all changed out. Not terrible job. Not the most fun tho. Get to torquing up the valve covers to finish the job everything started and run down by hand to start. Nice and easy.. We'll low and behold the very last bolt I touch at the back of the left head right next to the fire wall breaks off at around 60 in/lbs.... f**k...... so get the cover back off. There's decent nub. Should be able to grab it with some vice grips. Naw friends there's zero room. So pull the intake. Perfect loads of room now. You think that son of a B will turn? Well no it wouldn't. So out comes the welder. Get a nut zapped onto the nub. Real nice fill. Good and sturdy. Give it a easy twist. Breaks we off clean with the head. We'll there's no getting a drill in there to extract. So off with the timing cover again, manifolds out already exhaust manifold off the left side. Pull the head...... wow nice and clean inside the engine for 190k kms. Get the head on the bench grind the bolt nice and flat center punch and drill. Nice and centered perfect. Install the extractor. Well holy snapping ******** that c**t is in there extractor breaks of. Well shit. So manage to get the extractor through. Drill out the bolt a little bigger. Manage to get a nice perfect center. Use a pick and pull the threads out of the hole. Run a tap down into the head clean up the threads. Test fit a new valve cover bolt. And reassemble the whole thing. GREAT NEWS! fixed my timing cover leak! Time to assult a bottle of honey jack as a celebration! By the way a over the top creeper is a real body saver for engine work on these tall girls! Sorry for the lack of pictures. I tend to forget to get shots when I'm working away.
 

Attachments

  • 20210429_193504.jpg
    20210429_193504.jpg
    240.2 KB · Views: 36
  • 20210507_184343.jpg
    20210507_184343.jpg
    230.5 KB · Views: 35
  • 20210507_183120.jpg
    20210507_183120.jpg
    202.7 KB · Views: 35
  • 20210508_124946.jpg
    20210508_124946.jpg
    234.8 KB · Views: 34
Last edited:

Bozz

Royal Smart A$$
Joined
Aug 24, 2020
Posts
5,737
Reaction score
23,188
Location
Nashville, TN
Not all today more the last couple. Ither way so the Ole girl had a timing cover leak. Been sweating for a while. Just been keeping and eye on it. While it started to drip. So I get it all changed out. Not terrible job. Not the most fun tho. Get to torquing up the valve covers to finish the job everything started and run down by hand to start. Nice and easy.. We'll low and behold the very last bolt I touch at the back of the left head right next to the fire wall breaks off at around 60 in/lbs.... f**k...... so get the cover back off. There's decent nub. Should be able to grab it with some vice grips. Naw friends there's zero room. So pull the intake. Perfect loads of room now. You think that son of a B will turn? Well no it wouldn't. So out comes the welder. Get a nut zapped onto the nub. Real nice fill. Good and sturdy. Give it a easy twist. Breaks we off clean with the head. We'll there's no getting a drill in there to extract. So off with the timing cover again, manifolds out already exhaust manifold off the left side. Pull the head...... wow nice and clean inside the engine for 190k kms. Get the head on the bench grind the bolt nice and flat center punch and drill. Nice and centered perfect. Install the extractor. Well he snapping ******** that c**t is in there extractor breaks of. Well shit. So manage to get the extractor through. Drill out the bolt a little bigger. Manager to get a nice perfect center. Use a pick and pull the threads out of the hole. Run a tap down into the head clean up the threads. Test fit a new valve cover bolt. And reassemble the whole thing. GREAT NEWS! fixed my timing cover leak! Tome to assult a bottle oh honey jack as a celebration! By the way a over the top creeper is a real body saver for engine work on these tall girls! Sorry for the lack of pictures. I tend to forget to get shots when I'm working away.
Wow! I feel ya brother. Seems like a lot of my jobs go like that. It's funny....20 years later when telling the story.... just not while it's happening.
 

Jonny V

FRF Supporting Member
Supporting Member
Joined
Mar 22, 2019
Posts
712
Reaction score
668
Location
Carnation, WA
Got my shocks installed yesterday (Shocks by Hammer and Eibachs)....super happy! More details in the Shocks by Hammer thread.....

I do plan to upgrade to the 3.0's (the ones engineered for an OG Raptor, not the Gen 2), but for now, I needed to get the 94K mile shocks off the truck and replaced. This did that nicely and for an awesome price.


IMG_8056.jpg

64212611316__8191FFF3-C693-490D-B733-5E3DE4545651.jpg

IMG_8058.jpg
 

CoronaRaptor

FRF Addict
Joined
Dec 17, 2012
Posts
28,961
Reaction score
31,173
Location
CANADA
Not all today more the last couple. Ither way so the Ole girl had a timing cover leak. Been sweating for a while. Just been keeping and eye on it. While it started to drip. So I get it all changed out. Not terrible job. Not the most fun tho. Get to torquing up the valve covers to finish the job everything started and run down by hand to start. Nice and easy.. We'll low and behold the very last bolt I touch at the back of the left head right next to the fire wall breaks off at around 60 in/lbs.... f**k...... so get the cover back off. There's decent nub. Should be able to grab it with some vice grips. Naw friends there's zero room. So pull the intake. Perfect loads of room now. You think that son of a B will turn? Well no it wouldn't. So out comes the welder. Get a nut zapped onto the nub. Real nice fill. Good and sturdy. Give it a easy twist. Breaks we off clean with the head. We'll there's no getting a drill in there to extract. So off with the timing cover again, manifolds out already exhaust manifold off the left side. Pull the head...... wow nice and clean inside the engine for 190k kms. Get the head on the bench grind the bolt nice and flat center punch and drill. Nice and centered perfect. Install the extractor. Well he snapping ******** that c**t is in there extractor breaks of. Well shit. So manage to get the extractor through. Drill out the bolt a little bigger. Manager to get a nice perfect center. Use a pick and pull the threads out of the hole. Run a tap down into the head clean up the threads. Test fit a new valve cover bolt. And reassemble the whole thing. GREAT NEWS! fixed my timing cover leak! Tome to assult a bottle oh honey jack as a celebration! By the way a over the top creeper is a real body saver for engine work on these tall girls! Sorry for the lack of pictures. I tend to forget to get shots when I'm working away.
Damn bro, that's a pain in the ass for sure. Should of bolted a whipple on there while she was apart, lol.
 
Top