- Forums
- GEN 2 (2017-2020) Ford F-150 Raptor Forums
- Ford Raptor Engine Discussion and Performance Mods
You are using an out of date browser. It may not display this or other websites correctly.
You should upgrade or use an alternative browser.
You should upgrade or use an alternative browser.
Vent to atmosphere stock BOV
- Thread starter TxCOR
- Start date
Disclaimer: Links on this page pointing to Amazon, eBay and other sites may include affiliate code. If you click them and make a purchase, we may earn a small commission.
TXRaptor
FRF Addict
- Joined
- Sep 15, 2010
- Posts
- 1,851
- Reaction score
- 1,044
I did the chair leg cover as someone mentioned. Cost $2 have had it for 8 months, no issues and sounds great.
Do you have a URL and pictures of what the $2 chair leg cover looks like? Mine is vented to atmosphere due to my relocated FullRace IC, so I might be interested in giving your idea a try.
Unplug the tube from the bottom of the airbox. You have to remove the access panel on the skid plate. Plug the tube with this and you are good to go. There are a number of DIYs on youtube showing it.
https://www.homedepot.com/p/Everbilt-1-in-Black-Rubber-Leg-Tips-4-per-Pack-49128/203661031
https://www.homedepot.com/p/Everbilt-1-in-Black-Rubber-Leg-Tips-4-per-Pack-49128/203661031
Thanks for all the replies guys.
So after you plug the hose, you do not need to put a screen or anything on the BOV portion that is open? Its in a good enough spot to protect from crap getting in there?
Everytime it vents, it blows air our. There is never air going in, it is always coming out, so self cleaning so to speak.
mixmaven
Member
- Joined
- Feb 7, 2014
- Posts
- 16
- Reaction score
- 12
I found the factory BOV did not seal well, I removed the valve and the surface of the seat was not smooth, appears to be a production issue. I used super fine sandpaper (3500) and worked down the ridge left by the mold. Sealed much better, but still not perfect. More of an fyi if you are in there.
91Eunos
Full Access Member
What an incredibly easy fix to eliminate one more potential source of oil in the intake!
Did it in about 5 minutes laying on the ground in my garage. No tools required except for a ratchet and T-30 torx bit to remove the skid plate access port.
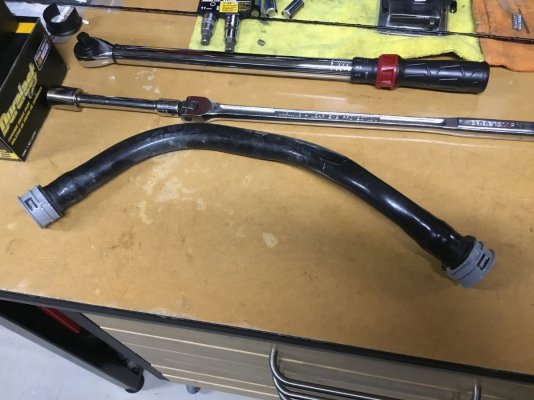
I simply removed the entire bov pipe ... disconnected it from the back of the intake piping after popping it off of the bov via the skid plate access panel:

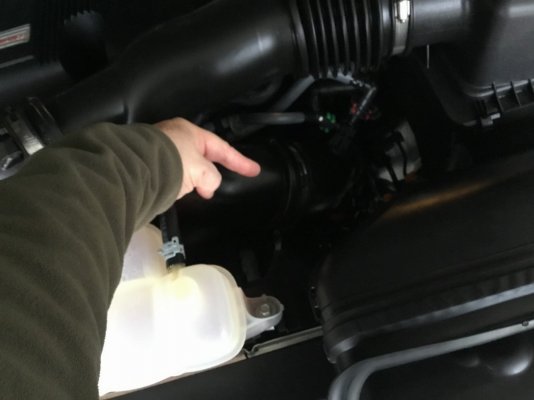
...can’t photograph it without removing the intake, but the “nipple” where the bov pipe plugs into the intake is on the bottom/back side of this pipe:

I looked for a 1” or slightly larger vacuum plug/cap but no luck, even with a quick search online. I could probably use some 1”-1-1/4” vacuum hose with a screw in the end, but as others have pointed out, there’s a simpler solution.
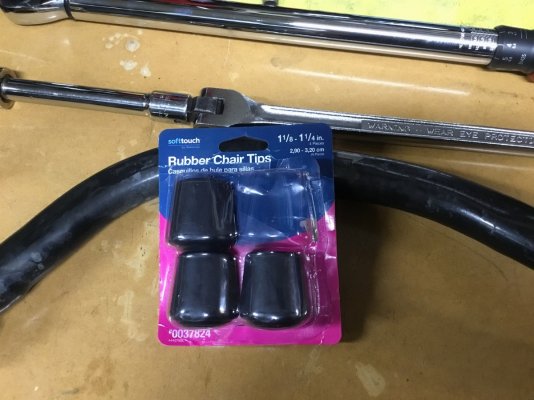
Tried a 1” chair leg tip, but it was too tight of a fit. A 1-1/8” rubber chair leg tip was perfect for my truck. Very snug fit and it covered almost the entire plastic “nipple” where the bov pipe clips on to the intake pipe:

Less than $3 from my local hardware store for all 4 rubber tips. The neat plug sold by vendors here would work just fine, and look cool too, but this is literally a 5-minute job with a less than $5 solution.
Looked for some aerosol hairspray to do the old trick for putting rubber grips on a motorcycle or bicycle hndlebar (acts as a lube while installing, then turns to a glue-like substance when dry), but no luck. So I put a thin film of Locktite blue on the inside of the rubber tip to effect the same result. Will test it like this for a few days, but likely to throw a hose clamp on too, especially if there are any indications of slippage.
Did it in about 5 minutes laying on the ground in my garage. No tools required except for a ratchet and T-30 torx bit to remove the skid plate access port.
I simply removed the entire bov pipe ... disconnected it from the back of the intake piping after popping it off of the bov via the skid plate access panel:

...can’t photograph it without removing the intake, but the “nipple” where the bov pipe plugs into the intake is on the bottom/back side of this pipe:

I looked for a 1” or slightly larger vacuum plug/cap but no luck, even with a quick search online. I could probably use some 1”-1-1/4” vacuum hose with a screw in the end, but as others have pointed out, there’s a simpler solution.
Tried a 1” chair leg tip, but it was too tight of a fit. A 1-1/8” rubber chair leg tip was perfect for my truck. Very snug fit and it covered almost the entire plastic “nipple” where the bov pipe clips on to the intake pipe:

Less than $3 from my local hardware store for all 4 rubber tips. The neat plug sold by vendors here would work just fine, and look cool too, but this is literally a 5-minute job with a less than $5 solution.
Looked for some aerosol hairspray to do the old trick for putting rubber grips on a motorcycle or bicycle hndlebar (acts as a lube while installing, then turns to a glue-like substance when dry), but no luck. So I put a thin film of Locktite blue on the inside of the rubber tip to effect the same result. Will test it like this for a few days, but likely to throw a hose clamp on too, especially if there are any indications of slippage.
Last edited:
TXRaptor
FRF Addict
- Joined
- Sep 15, 2010
- Posts
- 1,851
- Reaction score
- 1,044
Thanks for the clear photos and instructions. I will give it a try this weekend.
Similar threads
- Replies
- 8
- Views
- 2K
- Replies
- 4
- Views
- 279
- Replies
- 10
- Views
- 2K
- Replies
- 25
- Views
- 2K
- Replies
- 22
- Views
- 4K
Staff online
-
GriffinAdministrator
Members online
- BadWRP
- uncboysetsfire
- Digipax
- wazatataza
- HAP
- alphablue
- kandewinn
- Gumby
- madru17
- Sever18
- 2slo4u
- tcm glx
- MagnusVerMagnusson
- fordfreek
- thechamp408
- Griffin
- Powerlies
- dirtslinger
- DFS
- nltruck
- Doubleeaz
- csixer66
- PK37
- HighwaySentinel
- jm77
- Turning Blue
- Bozz
- Spike Spiegel
- cgriffin602
- MurderedOutSVT
- c0b2a
- riv
- sct
- Raptor_NV
- Stonehide
- DavidL
- Notn41
- alockbox
- Old-Raptor-guy
- njhummer18
- My2004evo8
- Johnny@Apollo-Optics
- tabvette
- vill
- 62crew
- HKX_ORANGECHICKEN
- JDMCTR00
- Hagdio72
- Rekkr
- Raptor28
Total: 1,876 (members: 98, guests: 1,778)
Forum statistics
Latest posts
-
-
Any aftermarket exhaust available for the R?
- Latest: cr23raptor1983
-
-

