Rigid Flush-Mount LEDs in Rear Bumper! Pics & How-To

Disclaimer: Links on this page pointing to Amazon, eBay and other sites may include affiliate code. If you click them and make a purchase, we may earn a small commission.

Reptar

FRF Addict
Joined
Aug 24, 2010
Posts
2,454
Reaction score
619
Location
Jersey
Santa left me these goodies under the tree this year, along with some brand new titanium drill bits, so I couldn't help but install them yesterday despite the cold. Good thing he also left me a pair of Gorilla Gloves, those things are hands down the best mechanics gloves I've ever used. I can't stand wearing gloves, but sometimes I need to, and these are ultra thin, so you still have more dexterity than mechanix gloves, but your hands dont sweat like thicker rubber latex gloves, they can still breath, but they keep them warm enough in the freezing cold. More pricey than latex gloves, but cheaper than mechanix gloves, more than single use, not as long term use, so the price matches the use accordingly...I'm stocking up.

Okay I digress lol. Amazing how the simple gifts are sometimes the best lol.

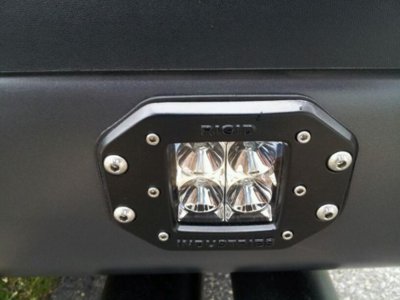
Pic 1: Rigid Flush Mount LED Kit - Flood Pattern - White LEDs

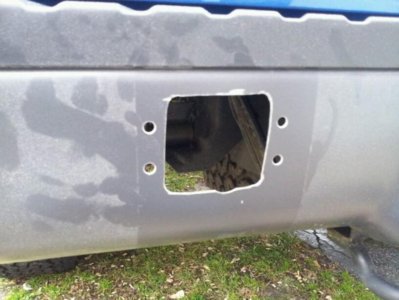
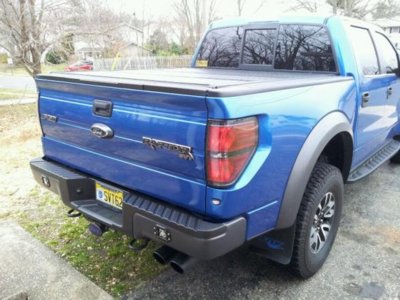
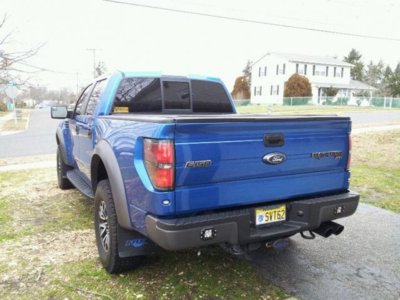
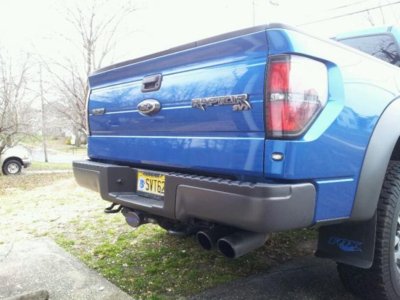
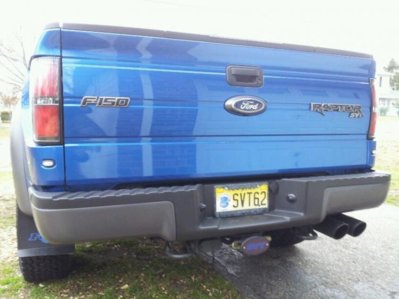
Pic 2-3: Stock rear bumper

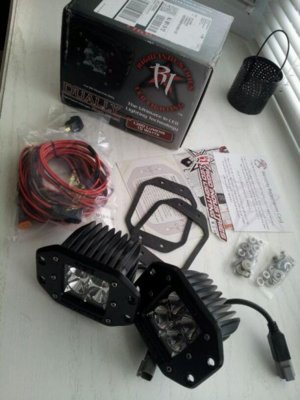
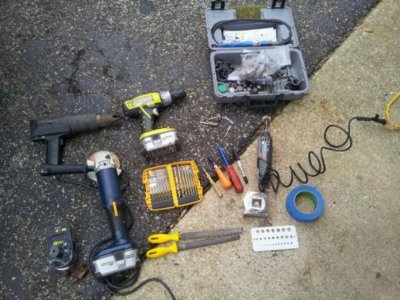
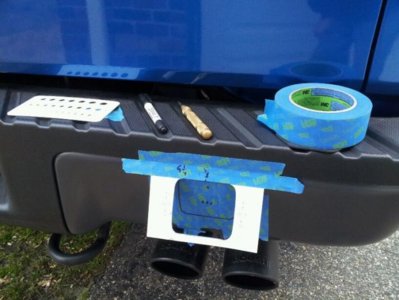
Pic 4: Tools required for install (dremel with sanding/grinding wheels, drill, heat gun (to dry the paint in the cold), angle grinder or cutoff wheel, files, GOOD drill bits (1/8", 5/16", 1/2"), Center punch, debur tools, marker, tape, hole size guide, blue tape)

Pic 5: Rigid gives you a cardboard template. The rubber gaskets can distort easy, so it's great they give you a thick card stock template so you know the location is perfect.

I've often seen guys put the lights close to the center bumper step on either side of the plate area. That's where most aftermarket ones stick lights, and it does look great there, but it doesn't make sense functionally to stick the lights in the center and overlap beams, especially for reverse lights where I need to not only see in the backup camera, but also in the side view mirrors.

I photoshopped a truck to put the lights on the very outside edges of the bumper, almost under the taillights, but it didn't look right visually. This would be the most ideal location, spreading the rearward light to the maximum area, but I couldn't dig the looks. Looked as if something was missing between the reverse lights and the tags with a big blank gray area in between.

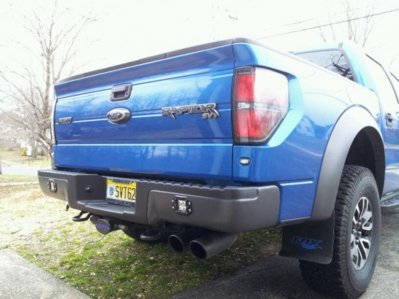
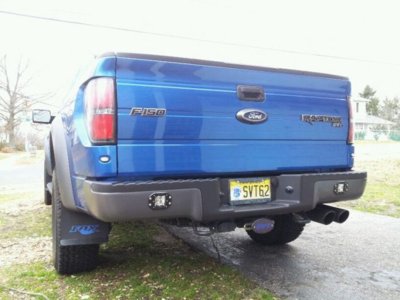
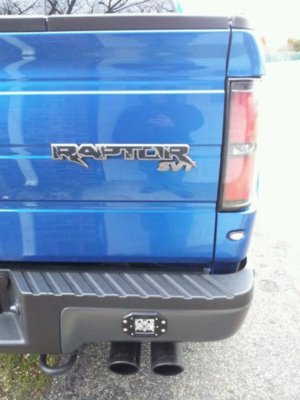
COMPROMISE! Smack in the middle, split the difference. I centered the lights on the gray area of each side of the rear bumper. It also put the passenger side LED right above the exhaust tips which are centered in that area too (Roush), so it has rear-end fung-shwei :tongue: Now nothing looks like its missing from the bumper, it's a good balance of visual appearance, and functionality IMO.

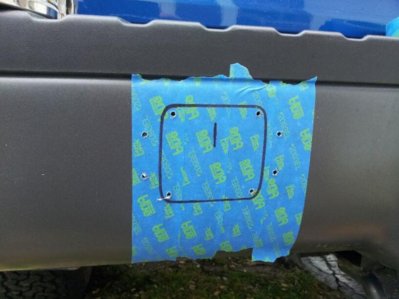
Step 1, tape up your bumper in the area you're working.

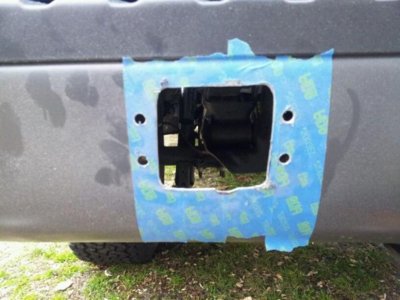
Step 2, Tape on the Rigid template. I put the top of the light 3/4" down from the plastic bumper cap, and 9-1/4" from the plastic by the center of the bumper to the centerline of the LED.

Step 3, Use the marker to draw the outline.

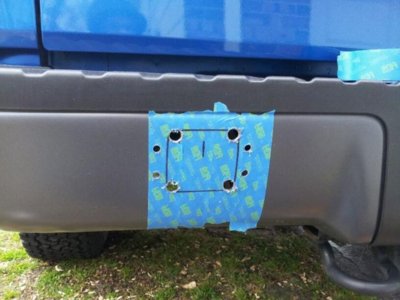
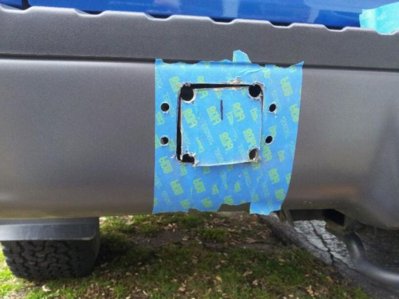
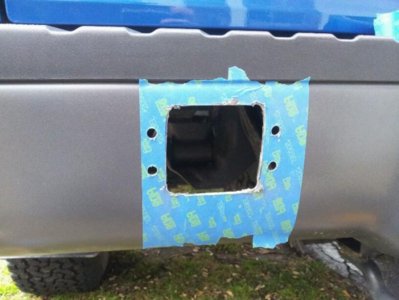
Step 4, Use a spring loaded center punch to punch EIGHT marks. 1 for each bolting hole, and 1 for each corner of the square you'll be cutting out. Mark it 1/4" in from the outside edge, so when you drill with a 1/2" drill bit, you get a radiused corner. This is where I used the white hole template, I lined up the 1/2" hole on each corner of the template, to center punch the center of the 1/2" hole to get my mark.


14624d1356617768-rigid-flush-mount-leds-rear-bumper-pics-how-rigid-01.jpg


14625d1356617777-rigid-flush-mount-leds-rear-bumper-pics-how-rigid-02.jpg


14626d1356617789-rigid-flush-mount-leds-rear-bumper-pics-how-rigid-03.jpg


14627d1356617801-rigid-flush-mount-leds-rear-bumper-pics-how-rigid-04.jpg


14628d1356617812-rigid-flush-mount-leds-rear-bumper-pics-how-rigid-05.jpg
 

Attachments

  • Rigid-01.jpg
    Rigid-01.jpg
    41.7 KB · Views: 9,324
  • Rigid-02.jpg
    Rigid-02.jpg
    52 KB · Views: 9,386
  • Rigid-03.jpg
    Rigid-03.jpg
    50.8 KB · Views: 9,219
  • Rigid-04.jpg
    Rigid-04.jpg
    51.6 KB · Views: 9,217
  • Rigid-05.jpg
    Rigid-05.jpg
    50.5 KB · Views: 11,322
Last edited:
OP
OP
Reptar

Reptar

FRF Addict
Joined
Aug 24, 2010
Posts
2,454
Reaction score
619
Location
Jersey
Pic 1: Drill 1/8" hole at each point you center punched.

Pic 2: Drill out the mounting holes to 5/16", and the center holes to 1/2" which will be the radius of your corners

Pic 3: Using an angle grinder you can carefully cut between your 1/2" holes. You can also use a cutoff wheel with a dremel but it will take forever with the 1/8" thick steel bumper. The 4" cutoff wheel in the angle grinder made it quick work, but you have to be careful! A jigsaw may also work but it will be NOISY echo'ing off the bumper lol

Pic 4: Raw hole. Don't worry if it's not perfect, there's a good amount of coverage from the light flange

Pic 5: Clean up the edges with a debur tool and the dremel. Also debur the mounting holes. The slight notch/dip you see at the bottom isn't a goof-up. The bottom of the rigid light bulges for the wire. You can either make the entire square larger, or just mark it once the rigid light fits 1/2 way in, then with a dremel sanding wheel, make that little clearance notch for the light to fit in fully.

14629d1356618200-rigid-flush-mount-leds-rear-bumper-pics-how-rigid-06.jpg


14630d1356618210-rigid-flush-mount-leds-rear-bumper-pics-how-rigid-07.jpg


14631d1356618219-rigid-flush-mount-leds-rear-bumper-pics-how-rigid-08.jpg


14632d1356618229-rigid-flush-mount-leds-rear-bumper-pics-how-rigid-09.jpg


14633d1356618238-rigid-flush-mount-leds-rear-bumper-pics-how-rigid-10.jpg
 

Attachments

  • Rigid-06.jpg
    Rigid-06.jpg
    49.5 KB · Views: 9,147
  • Rigid-07.jpg
    Rigid-07.jpg
    50.1 KB · Views: 13,356
  • Rigid-08.jpg
    Rigid-08.jpg
    49.4 KB · Views: 17,236
  • Rigid-09.jpg
    Rigid-09.jpg
    49.8 KB · Views: 10,121
  • Rigid-10.jpg
    Rigid-10.jpg
    52 KB · Views: 9,333
Last edited:
OP
OP
Reptar

Reptar

FRF Addict
Joined
Aug 24, 2010
Posts
2,454
Reaction score
619
Location
Jersey
Pic 1: Test fit to make sure fitment is good and everything lines up.

Pic 2: Remove the tape.

Pic 3: You don't want to leave the bare metal, it will rust up, especially with snow and salt getting flung into the rear bumper cavity. I had leftover touchup from my 2003 Dark Shadow Gray lightning and it's a 95% match to the bumper color. You don't see anything once it's installed so you really can use any color, you just want to make sure no metal is left exposed.

Pic 4-5: INSTALLED!


14634d1356618438-rigid-flush-mount-leds-rear-bumper-pics-how-rigid-11.jpg


14635d1356618447-rigid-flush-mount-leds-rear-bumper-pics-how-rigid-12.jpg


14636d1356618457-rigid-flush-mount-leds-rear-bumper-pics-how-rigid-13.jpg


14637d1356618465-rigid-flush-mount-leds-rear-bumper-pics-how-rigid-14.jpg


14638d1356618477-rigid-flush-mount-leds-rear-bumper-pics-how-rigid-15.jpg
 

Attachments

  • Rigid-11.jpg
    Rigid-11.jpg
    50.9 KB · Views: 9,111
  • Rigid-12.jpg
    Rigid-12.jpg
    51.1 KB · Views: 9,051
  • Rigid-13.jpg
    Rigid-13.jpg
    50.8 KB · Views: 15,895
  • Rigid-14.jpg
    Rigid-14.jpg
    52.3 KB · Views: 9,181
  • Rigid-15.jpg
    Rigid-15.jpg
    53.7 KB · Views: 9,047
Last edited:

shooterAMG

FRF Supporting Member
Supporting Member
Joined
Aug 10, 2012
Posts
1,381
Reaction score
925
Location
Far northern Chicago suburbs
Reptar this is really awesome, thanks so much for taking the time. I can't wait to hear how you wired them. I'm assuming a relay from battery and backup lights.


Thanks again!
 
OP
OP
Reptar

Reptar

FRF Addict
Joined
Aug 24, 2010
Posts
2,454
Reaction score
619
Location
Jersey
Pic 1-2: Installed! As I mentioned, it's a nice balance of the remaining "gray area" of the rear bumper sides. Not clustered around the tag, not hanging all the way out on the outer edges, right in the middle, making the bumper look "complete".

Pic 3-4: And smack centered with the exhaust tips. Didn't even intend for it at first, but it would have drove me crazy if it ended up being 1/2 centered on one tip or something. Shot 4 captures a few must-do mods...painted tail edges, LED reverse lights, Roush catback, and PDP Mudflaps!

Pic 5: This one is hard to see the small detail, I'll have to use the SLR to get a good pic, but the hardware says "316" stamped on it for 316 SS. I made sure the "316" was at the top of every allen bolt securing the lights on lol. Small details that count!

14639d1356618761-rigid-flush-mount-leds-rear-bumper-pics-how-rigid-16.jpg


14640d1356618774-rigid-flush-mount-leds-rear-bumper-pics-how-rigid-17.jpg


14641d1356618784-rigid-flush-mount-leds-rear-bumper-pics-how-rigid-18.jpg


14642d1356618793-rigid-flush-mount-leds-rear-bumper-pics-how-rigid-19.jpg


14643d1356618803-rigid-flush-mount-leds-rear-bumper-pics-how-rigid-20.jpg
 

Attachments

  • Rigid-16.jpg
    Rigid-16.jpg
    51.5 KB · Views: 14,494
  • Rigid-17.jpg
    Rigid-17.jpg
    51.2 KB · Views: 10,058
  • Rigid-18.jpg
    Rigid-18.jpg
    36.8 KB · Views: 8,993
  • Rigid-19.jpg
    Rigid-19.jpg
    30.3 KB · Views: 8,983
  • Rigid-20.jpg
    Rigid-20.jpg
    49.7 KB · Views: 11,112
Last edited:
OP
OP
Reptar

Reptar

FRF Addict
Joined
Aug 24, 2010
Posts
2,454
Reaction score
619
Location
Jersey
RESERVING THIS POST FOR WIRING INSTRUCTIONS


It started raining after I finished the install, so I didn't get around to wiring them up yet. I'm itching bad though so stay tuned!


HOW CAN I GET MY ATTACHED PICS TO SHOW UP!?!?!?! THey used to at least show up as thumbnails. Now it only shows up as I have to click every one. WTF?!


Anyway I'll update this post with wiring details when I get to it, but here's how I plan to wire them.

It comes with a SPST switch, inline fuse, and connectors to both lights. I'm ditching the switch and replacing it with a DPST switch. One pole of the switch will go to the reverse light wire in the reciever hitch. When I go into reverse, the lights will automatically come on. The other pole will go to 12v continuous.

So with the switch "off", the lights will operate with my reverse lights.

With the switch "on", they'll turn on whenever I want them to. The idea of this is for at night when I'm loading my trailer up, or wrenching on something behind the truck in the dark. I'll be able to use the lights without having the key in the ignition.

I was going to hook them up to an aux switch so I can turn them on while driving if there's an azzhole behind me up my ***, but the bumper is angled slightly downward, so it wouldn't really work for an "F-U" light lol. Which is probably better off LOL! Saves me work and saves me getting into trouble. I'll put the switch under the bedrail, so it'll be protected from the weather, and protected from anybody walking by and turning my lights on. I'll probably build a bracket off the bak-flip rail. Also doing bed LEDs eventually, so I can build my bracket to hold 2 switches.

I'll update hopefully this weekend with wiring info!
 
OP
OP
Reptar

Reptar

FRF Addict
Joined
Aug 24, 2010
Posts
2,454
Reaction score
619
Location
Jersey
Thanks for this awesome How To. They look really clean in the back of a Raptor bumper.

Thanks for supporting Rigid Industries and an American Made company!!

No prob! I wasn't going to do the how-to because it really is very simple install, but some may be nervous about cutting their bumper. It really is a piece of cake! And really steps the look of the bumper up from plane-jane to screaming RAPTOR!

Can't wait for the A-series LEDs to come out, I definitely want to install some in the bed! Guess I'll go back-to-front on outfitting my truck with LEDs lol


Guess I'll also reserve this post so I can edit in some night shots! Sucks only attaching 5 pics at a time. The last post will be for wiring/switch pics. This post will be for night shots.

Factory reverse, Rigid reverse, Factory + Rigid reverse, then a pic or two of the back of the truck with the lights on! :secret:
 
Last edited:
Top