Install and wiring XL80s and Onx6+ with relay

Disclaimer: Links on this page pointing to Amazon, eBay and other sites may include affiliate code. If you click them and make a purchase, we may earn a small commission.

Ryan C

Full Access Member
Joined
Oct 6, 2019
Posts
160
Reaction score
176
Location
Vancouver, Canada
Thought I would share some ideas for how to wire XL80s on A pillar mounts and an 30" onx6+ bar on the bumper. I had the xl80s on my last truck, but hadn't wired a relay before. I'm obviously not a pro, so please let me know if I should adjust anything or you have other tips for me or others!

First, here's a pic of the truck as it sits now.
IMG_4261 2.jpg
I purchased crimpers for the weather pack connectors, https://www.amazon.ca/dp/B0732W6HQR/, and also got the hollow weather pack release tool from a local auto parts store.

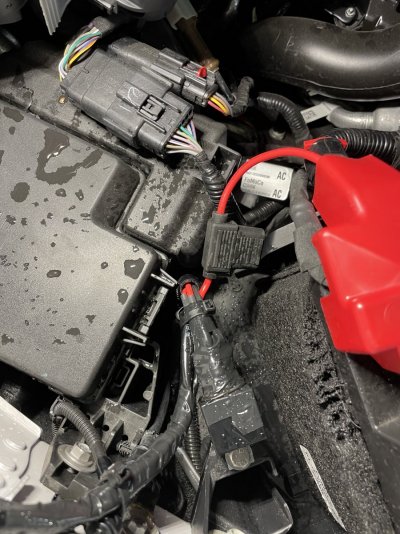
I then cribbed together some wiring harness parts from what Baja Designs supplies, so that I could run the right lengths from the lights at the A pillars down to the location of the upfitter behind the battery tray, without excess lengths or overlap. I attached a 2 slot weather pack to one of the upfitter wires (15A), and made the connection to the harness from there. Note I had to remove battery and battery tray to get the up fitter wires out. The ones with power are wrapped with red tape on my 22. I ran the ground from the lights back to the ground right behind the battery, and through the weather pack connection so I can disconnect the harness easily at that location. I used 16ga wire, which may be a bit light TBH given the length and power of these lights. I used heat shrink where possible. You can sort of see how I did this in these pictures.

IMG_4256 2.jpg

IMG_4254 2.jpg

IMG_4258 2.jpg
 
OP
OP
R

Ryan C

Full Access Member
Joined
Oct 6, 2019
Posts
160
Reaction score
176
Location
Vancouver, Canada
For the Onx6+ I posted elsewhere about this, describing how I mounted and what I cut. https://www.fordraptorforum.com/threads/onx6-30-arc-on-front-bumper.95665/

moving to the wiring, I ran 12ga wire from connection on the light, up to the cab side of the battery tray, where I connected to a four pin 40amp relay. A picture showing the routing of the battery up to the battery area is here (its the flexible loom attached to the taped large wire pack, and the metal bar that goes in the flexible loom)
IMG_4251 2.jpg


For those who don't know (like me before this project), a relay is an electric switch that is turned on by applying current. A good explanation is here:
More on this below.

I wrapped the positive and ground wires from the light in flexible split wire loom all the way to the battery, and exited the ground wire from the light part of the way through the loom at the ground location behind the battery (that ground wire is shown in this pic, closest to the camera looping up from the bottom)IMG_4258 2.jpg

The relay itself has four connections. There is a line from the battery, that I connected with an inline 30A fuse.

Battery connection is:
IMG_4257 2.jpg

here's a pic showing the inline fuse and connection to the relay, which is bolted to the battery tray. Conveniently there is a hole already drilled into the battery tray, so I used a 1/4" rivnut in that hole to create a blind nut for the stainless bolt.

IMG_4252 2.jpg

In the above pic you can also see how I ran the wire harness coming from the XL80s, secured it to the wires going into the relay, and then looped it down and around the battery tray to the weather pack connect around the side of that tray where the ground and up fitter wires are.

As for the relay, I heat shrink wrapped all the connectors and then taped it all up.

The relay works like this. The power comes from the battery, and is interrupted by the relay. The upfitter switch power wire comes into the relay on one end, and goes to ground on the other (that ground wire is run through the flexible wire loom again back to the ground location on the side of the battery tray - so grounds from the xl80s, light bar, and relay are all in the same spot). When the up fitter power is on, the relay engages and allows power to flow from the battery directly through to the light bar.

I was intimidated by all this as I had never set up a relay, but in the end it was thankfully quite easy. It took some fiddling to reduce wire length and get everything like I wanted. Pretty happy with how it turned out, as things are pretty clean in the engine bay, with no extra wire sticking out and everything tucked away.

Thanks for looking, and hopefully this helps you with your own projects!

p.s. the lights are incredible
 

Attachments

  • IMG_4252 2.jpg
    IMG_4252 2.jpg
    282.5 KB · Views: 10

GEN3LV

Full Access Member
Joined
Mar 1, 2015
Posts
117
Reaction score
159
Location
Las Vegas
This is the route I went I wanted all of my upfitter switches
on relays for my current lights and future lighting installs. I went with the LVJ Motorsports relay box installed waterproof connectors. Made everything plug and play. Bought my light kits form SVP so they came with harnesses' already built which made things pretty painless.

It was a little pricey but I will never have any power issues with any thing I decide to run. Just some food for thought.

image0.jpegimage2.jpeg
 
Top