ntm
Full Access Member
So with my last install thread I did the brenthel long travel kit for the front.
I quickly found the rear end's 3.0 bypass, national +3 springs and rpg bumps were not up to task anymore.
The rear end would start kicking from a lack of up travel, or yaw unpredictably due to a lack of droop compared to the front. I adjusted the bypasses as best I could to make do until a solution presented itself.
A number of options were considered and dismissed.
Icon rxt- good if you plan to not alter the truck, a step up from a standard deaver/3.0 setup, lacks in performance compared to more crazy setups.
Rogue cantilever/ sprung under- really nice quality, good motion ratio, shifts weight back, retains full bed, added complexity, uniballs in a bad spot to get at for maintenance/cleaning, cost $, and still has leafs.
Bed cage, sprung under and larger bypasses- a good cost vs performance solution for most, but having rode in a linked truck and a long leaf truck, I was ruined. No comparison in performance and tractability.
That left me desiring a four link, but I was unwilling to do a cab cage for nvh reasons. I still want to enjoy the truck on longer trips without earplugs and mics for comms. I also wanted to keep a bit of the bed for hauling rc airplanes, kayaks, etc.
So I didn't want to turn it into a full time toy.
I looked into a three link setup, but nobody manufactures a "kit" persay. I'm a long way from any fab shop, and didn't want to take the truck to the states and leave it there for 8 months while work was performed, and then take the chance of getting it back across the border without legality issues.
I stumbled upon the Giant motorsports daily driver link kit kind of by accident. It's been out for three or four years at this point and is such a radical departure from traditional thinking on link/driveline design that there was a lot of second guessing and speculation on the net as to it's viability.
I phoned and spoke to Geoff at length and voiced my concerns on things like the axle control air shocks ability to control pinion angle, etc.
He set my mind at ease indicating that they had these on diesel trucks without issue.
There was next to no information, or even photographs on the net about the ddl in actual use, somewhat reminiscent of my brenthel experience. I rolled the dice again and ordered one.
There is fab work involved, as with the brenthel, but it's manageable as all the brackets, links, and shock mounts are prefabbed.
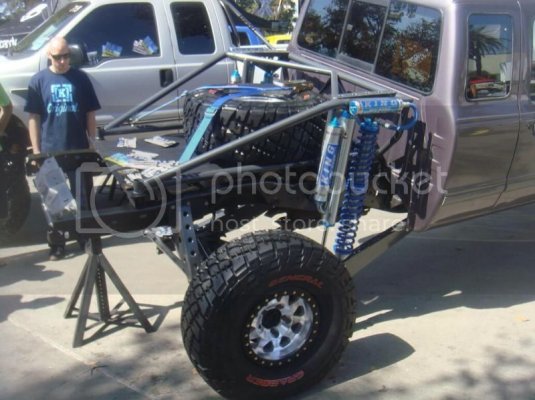
This is one on a ranger, the kit is more or less universal with slight changes for the chassis brackets and link length.
And then I waited...
Several months later I ran down to the border to make a pickup.
I received a bed cage, king 2.5x16 coilovers, king 3x18 bypasses, links, link chassis mounts, axle brackets, rad-flo air shocks, panhard bar, panhard mounts, uniballs and heims. No hardware is included in terms of bolt up.
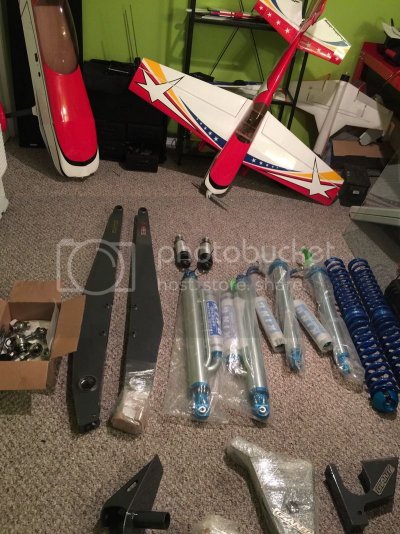
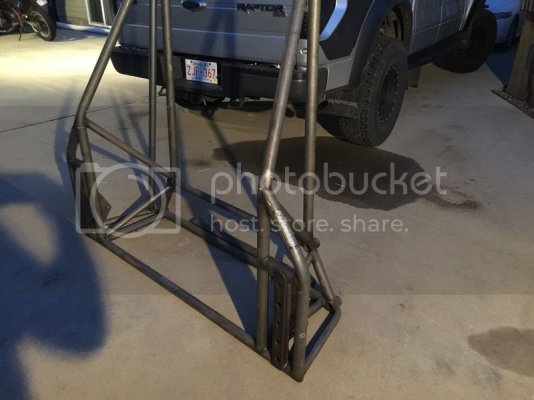
Pulled the box pretty much immediately and started stripping the leafs, shocks and axle. Taking a picture of the pinion angle at ride height is a good idea at this point, gives you a reference point for later when the axle brackets get welded. Pull the gas tank.
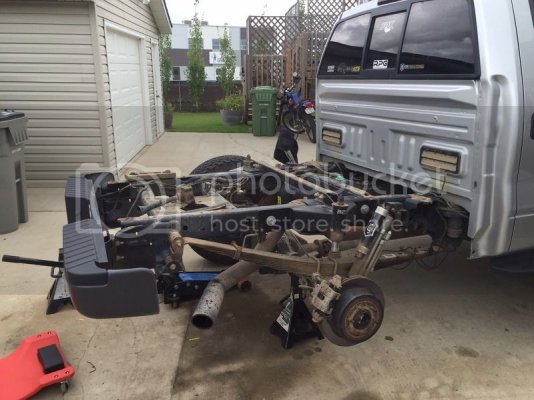
Put some spacers under the bed cage to approximate the bed thickness, mocked the axle up into position, used the front leaf spring hole to measure back and square the axle, and used the bump stop mounting points to determine the center point. Lifted the links up and determined the link center points.
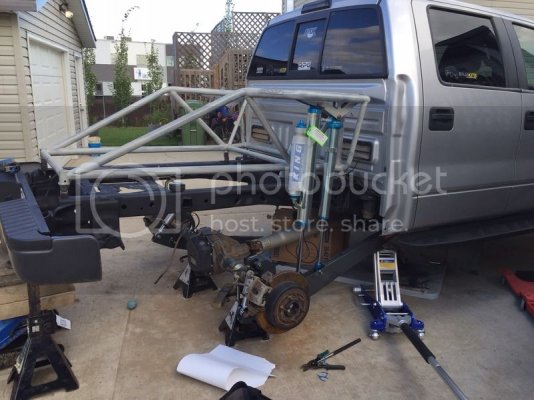
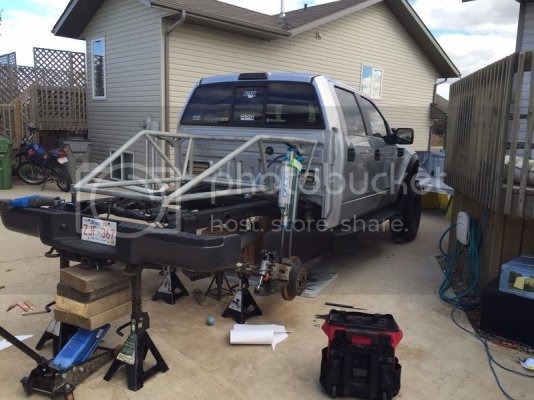
The existing holes in the frame can be used as reference points as seen here.
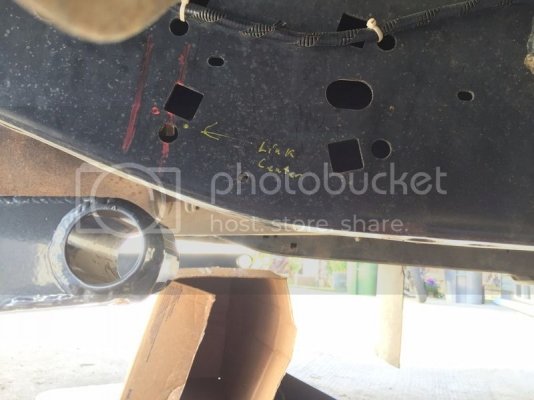
Carbide tipped hole saw and some oil and: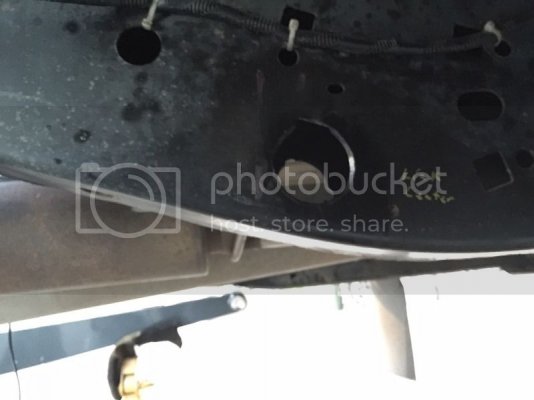
The link to chassis brackets have a 2" o.d. extension that goes through the outer frame rail and through the inner frame rail. it gets backwelded and shortened flush with the frame on the gas tank side, for gas tank clearance.
The outer frame rail hole will require some die grinding to open it up a little for the weld bead that's on the backside of the link bracket.
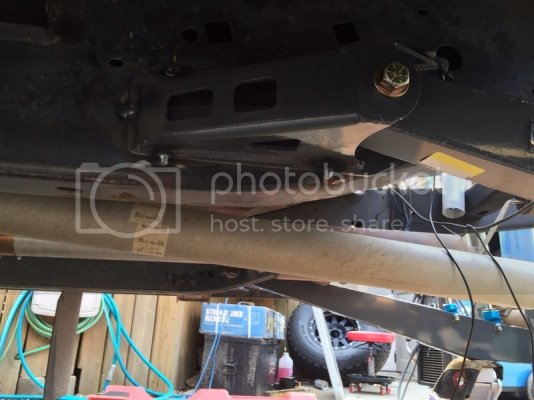
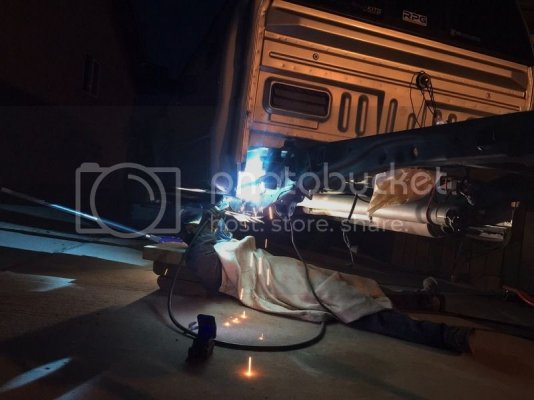
Once that's done, the links get bolted up and it's time to start tacking things on the axle.
Set the axle to ride height ( you recorded that measurement right ?), push the link to axle brackets as far outwards on the axle as possible, and reference the photo of the pinion angle you took before tearing the stock stuff apart. You want to set the pinion angle so it's pointing down a little more than stock. This is kind of adjustable later, so don't let ocd make you break out the angle finder.
Tack weld the brackets.
One thing I ran into was I pushed the brackets out so far that I need to shorten the caliper guide bolt and pin, no big deal, fresh brake pads still fit no problem.
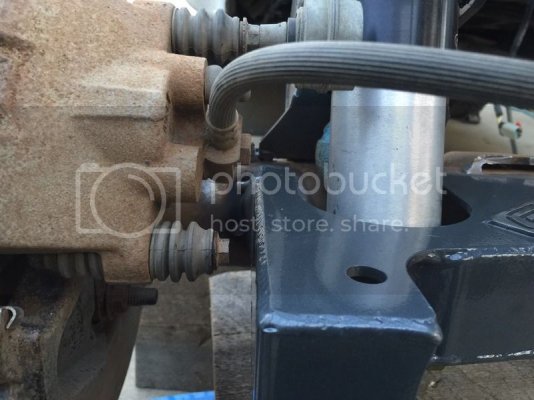
Another issue was the axle brackets I received were cut out for an axle tube larger than mine, luckily my buddy is a rockstar welder. I made Geoff aware of the issue and it should be corrected in future kits, perhaps the raptor he mocked it up on had a currie axle or something ?
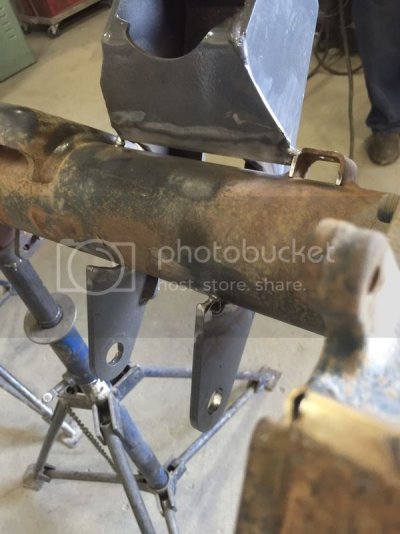
Panhard fitment:
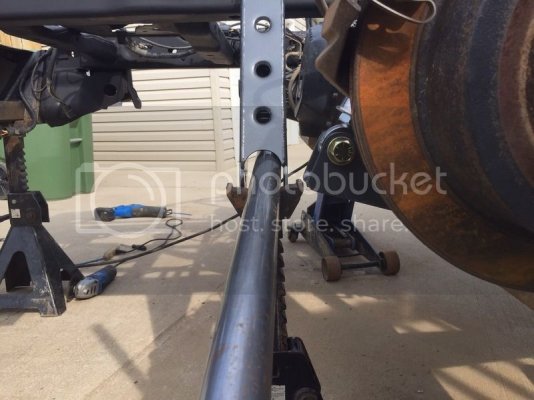
Set the axle bracket with the axle bumped out, roll the bracket up as high as possible for better panhard geometry.
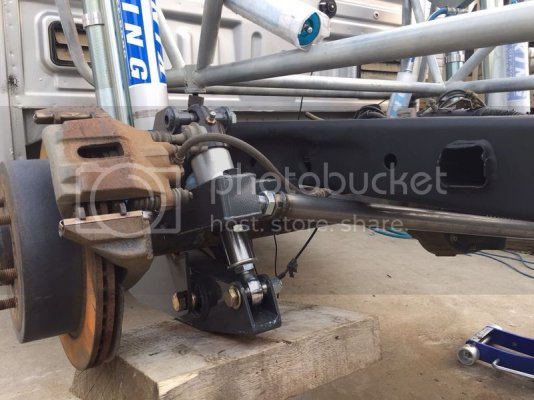
The axle needs to be centered at ride height and then panhard bar can be cut to length.
Then cycle everything to make sure its clearing and if good to go pull the axle and weld it all up solid. Note that half the drivers side spring perch must go to make room for the panhard bracket.
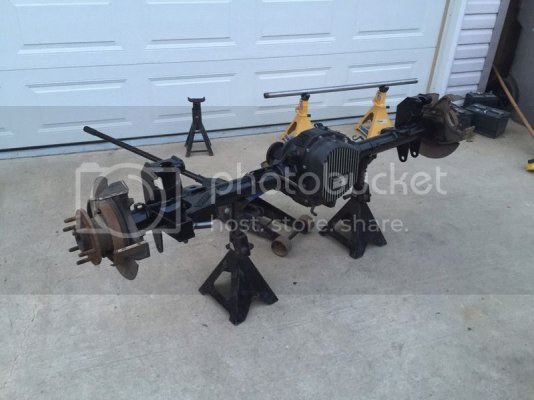
At this point I did something I don't think was necessary.
I questioned Geoff repeatedly about bump stops, he told me use the stock ones. I didn't believe him, after all raptors bend their frames every day with stock bumps right ?
So I built some bump mounts and landing pads.
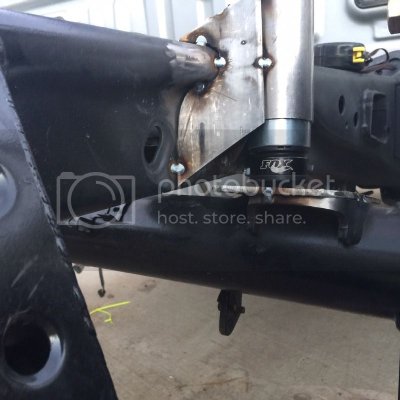
I don't think they were necessary at all. I gained an inch or two of compression travel by doing so, but have not been able to even touch the bumps yet in testing, and use that travel.
Now with that little bit of travel I gained I had some serious articulation, and consequently the bed got attacked big time with a sawzall.
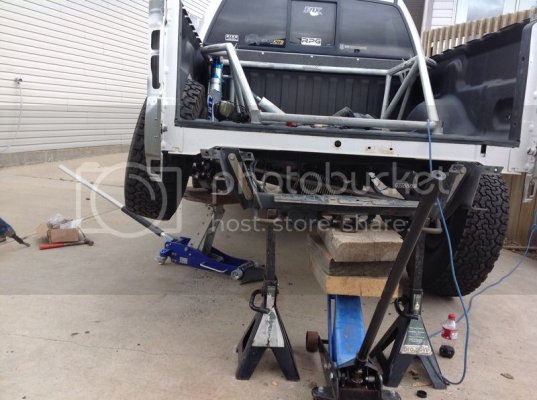
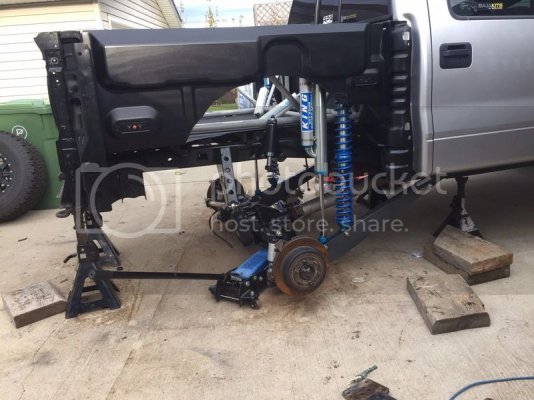
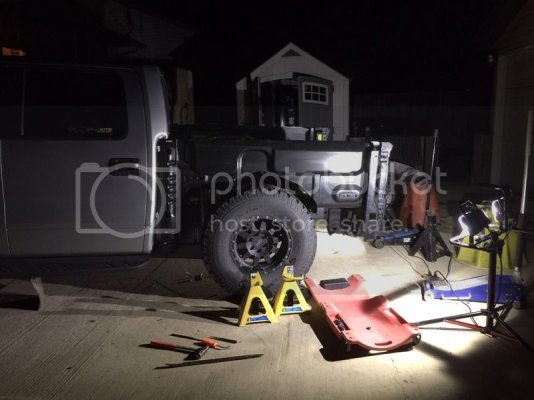
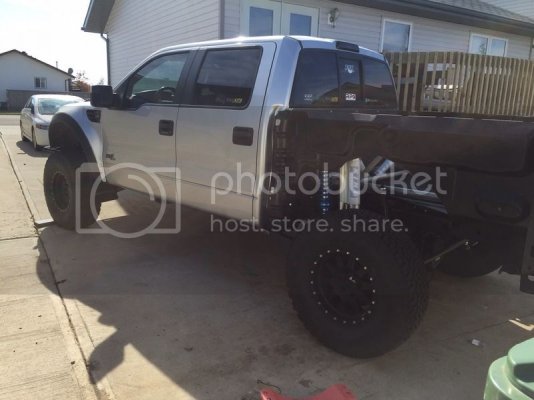
I got a little crazy here, once again after testing I'm not sure this was necessary. If I could do it over I'd have even tried stock bedsides and just trimmed where rubbing was happening.
Don't think I have any good pictures of the limit straps and brake lines, but they're pretty straight forward. Used 20" sdhq straps, 24" sdhq brake lines with -3 an adapter fittings. The electric locker cable is long enough with the retention clips removed, the diff breather hose is replaced with a longer one.
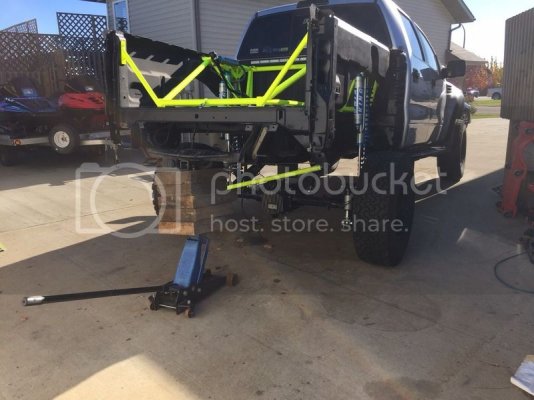
As the shocks are in the way of the stock gas tank filler line, it gets rerouted on the cage:
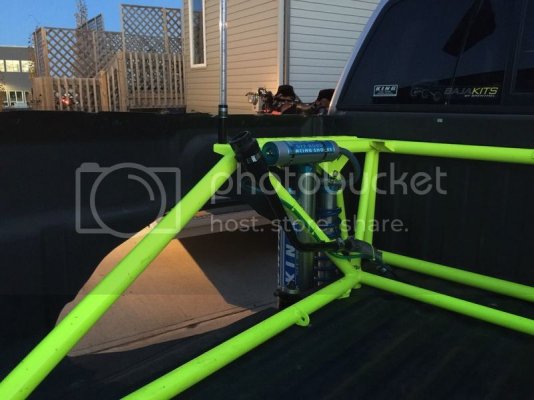
Used a few weld on reservoir mounts from sdhq to hose clamp it to.
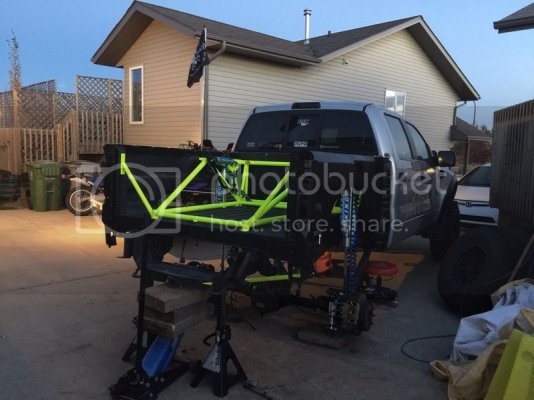
I had also added some bedside support braces to the bed cage before powdercoat:
I'm still waiting to pick up some bedsides on black Friday, but have done a little testing and been very impressed.
It's definitely better than any leaf setup I've had the fortune to experience.
It's the match to the long travel front, and the front is actually getting into trouble before the rear now. It has some unique traits that lend it to being a "daily driver".
The pinion angle rolls up under acceleration, pushing down on the air shock and back of the link arm. The link arm seems to use the axle as a fulcrum and apply an upward force on the chassis. It's a very noticeable anti squat behaviour. Also the air shocks on the axle work like a sway bar, resisting to a certain extent the movement of one link and not the other. There's certainly more body roll, but not as severe as a true four link with a sway bar.
The bypasses have a single bleed tube, which is proving to have a very large adjustment range. It's working really well, as the pistons compression valving is very stiff, when it gets past the bypass into the bump zone it really acts like that's all it needs for bottoming control.
I'll have more videos, pictures, and a "to buy" list added to this eventually.
https://youtu.be/3qu286Q5geo
5 seconds, note the anti squat behaviour
24 seconds, cross an 8 foot deep water run
37 seconds, fairly hard u turn, note the body roll
46 seconds, back through the water run, note the front tires in the air exiting it, and the front end has a lot of droop travel... never uses all of the available droop or compression travel on the rear.
The jangling noise is the spare tire tie down clevis' flopping around on the tube structure (no spare tire mounted at the time).
I quickly found the rear end's 3.0 bypass, national +3 springs and rpg bumps were not up to task anymore.
The rear end would start kicking from a lack of up travel, or yaw unpredictably due to a lack of droop compared to the front. I adjusted the bypasses as best I could to make do until a solution presented itself.
A number of options were considered and dismissed.
Icon rxt- good if you plan to not alter the truck, a step up from a standard deaver/3.0 setup, lacks in performance compared to more crazy setups.
Rogue cantilever/ sprung under- really nice quality, good motion ratio, shifts weight back, retains full bed, added complexity, uniballs in a bad spot to get at for maintenance/cleaning, cost $, and still has leafs.
Bed cage, sprung under and larger bypasses- a good cost vs performance solution for most, but having rode in a linked truck and a long leaf truck, I was ruined. No comparison in performance and tractability.
That left me desiring a four link, but I was unwilling to do a cab cage for nvh reasons. I still want to enjoy the truck on longer trips without earplugs and mics for comms. I also wanted to keep a bit of the bed for hauling rc airplanes, kayaks, etc.
So I didn't want to turn it into a full time toy.
I looked into a three link setup, but nobody manufactures a "kit" persay. I'm a long way from any fab shop, and didn't want to take the truck to the states and leave it there for 8 months while work was performed, and then take the chance of getting it back across the border without legality issues.
I stumbled upon the Giant motorsports daily driver link kit kind of by accident. It's been out for three or four years at this point and is such a radical departure from traditional thinking on link/driveline design that there was a lot of second guessing and speculation on the net as to it's viability.
I phoned and spoke to Geoff at length and voiced my concerns on things like the axle control air shocks ability to control pinion angle, etc.
He set my mind at ease indicating that they had these on diesel trucks without issue.
There was next to no information, or even photographs on the net about the ddl in actual use, somewhat reminiscent of my brenthel experience. I rolled the dice again and ordered one.
There is fab work involved, as with the brenthel, but it's manageable as all the brackets, links, and shock mounts are prefabbed.
This is one on a ranger, the kit is more or less universal with slight changes for the chassis brackets and link length.

And then I waited...
Several months later I ran down to the border to make a pickup.
I received a bed cage, king 2.5x16 coilovers, king 3x18 bypasses, links, link chassis mounts, axle brackets, rad-flo air shocks, panhard bar, panhard mounts, uniballs and heims. No hardware is included in terms of bolt up.


Pulled the box pretty much immediately and started stripping the leafs, shocks and axle. Taking a picture of the pinion angle at ride height is a good idea at this point, gives you a reference point for later when the axle brackets get welded. Pull the gas tank.

Put some spacers under the bed cage to approximate the bed thickness, mocked the axle up into position, used the front leaf spring hole to measure back and square the axle, and used the bump stop mounting points to determine the center point. Lifted the links up and determined the link center points.


The existing holes in the frame can be used as reference points as seen here.

Carbide tipped hole saw and some oil and:

The link to chassis brackets have a 2" o.d. extension that goes through the outer frame rail and through the inner frame rail. it gets backwelded and shortened flush with the frame on the gas tank side, for gas tank clearance.
The outer frame rail hole will require some die grinding to open it up a little for the weld bead that's on the backside of the link bracket.


Once that's done, the links get bolted up and it's time to start tacking things on the axle.
Set the axle to ride height ( you recorded that measurement right ?), push the link to axle brackets as far outwards on the axle as possible, and reference the photo of the pinion angle you took before tearing the stock stuff apart. You want to set the pinion angle so it's pointing down a little more than stock. This is kind of adjustable later, so don't let ocd make you break out the angle finder.
Tack weld the brackets.
One thing I ran into was I pushed the brackets out so far that I need to shorten the caliper guide bolt and pin, no big deal, fresh brake pads still fit no problem.

Another issue was the axle brackets I received were cut out for an axle tube larger than mine, luckily my buddy is a rockstar welder. I made Geoff aware of the issue and it should be corrected in future kits, perhaps the raptor he mocked it up on had a currie axle or something ?

Panhard fitment:

Set the axle bracket with the axle bumped out, roll the bracket up as high as possible for better panhard geometry.

The axle needs to be centered at ride height and then panhard bar can be cut to length.
Then cycle everything to make sure its clearing and if good to go pull the axle and weld it all up solid. Note that half the drivers side spring perch must go to make room for the panhard bracket.

At this point I did something I don't think was necessary.
I questioned Geoff repeatedly about bump stops, he told me use the stock ones. I didn't believe him, after all raptors bend their frames every day with stock bumps right ?
So I built some bump mounts and landing pads.

I don't think they were necessary at all. I gained an inch or two of compression travel by doing so, but have not been able to even touch the bumps yet in testing, and use that travel.
Now with that little bit of travel I gained I had some serious articulation, and consequently the bed got attacked big time with a sawzall.


I got a little crazy here, once again after testing I'm not sure this was necessary. If I could do it over I'd have even tried stock bedsides and just trimmed where rubbing was happening.
Don't think I have any good pictures of the limit straps and brake lines, but they're pretty straight forward. Used 20" sdhq straps, 24" sdhq brake lines with -3 an adapter fittings. The electric locker cable is long enough with the retention clips removed, the diff breather hose is replaced with a longer one.

As the shocks are in the way of the stock gas tank filler line, it gets rerouted on the cage:

Used a few weld on reservoir mounts from sdhq to hose clamp it to.
I had also added some bedside support braces to the bed cage before powdercoat:

I'm still waiting to pick up some bedsides on black Friday, but have done a little testing and been very impressed.
It's definitely better than any leaf setup I've had the fortune to experience.
It's the match to the long travel front, and the front is actually getting into trouble before the rear now. It has some unique traits that lend it to being a "daily driver".
The pinion angle rolls up under acceleration, pushing down on the air shock and back of the link arm. The link arm seems to use the axle as a fulcrum and apply an upward force on the chassis. It's a very noticeable anti squat behaviour. Also the air shocks on the axle work like a sway bar, resisting to a certain extent the movement of one link and not the other. There's certainly more body roll, but not as severe as a true four link with a sway bar.
The bypasses have a single bleed tube, which is proving to have a very large adjustment range. It's working really well, as the pistons compression valving is very stiff, when it gets past the bypass into the bump zone it really acts like that's all it needs for bottoming control.
I'll have more videos, pictures, and a "to buy" list added to this eventually.
https://youtu.be/3qu286Q5geo
5 seconds, note the anti squat behaviour
24 seconds, cross an 8 foot deep water run
37 seconds, fairly hard u turn, note the body roll
46 seconds, back through the water run, note the front tires in the air exiting it, and the front end has a lot of droop travel... never uses all of the available droop or compression travel on the rear.
The jangling noise is the spare tire tie down clevis' flopping around on the tube structure (no spare tire mounted at the time).
Last edited:


