Ok Gang, here is the install for the ambient lighting pieces.
All credit goes to JHForman over at gen14
for the two harnesses and wiring diagram.
If you want the harnesses from him, email at [email protected] he charges $80 and that includes shipping.
I ordered the parts from OEM Ford Parts Direct. Shipping was like $8.00.
www.oemfordpartsdirect.com
Glovebox Lamp/ML3Z-14A411-C/$23.40
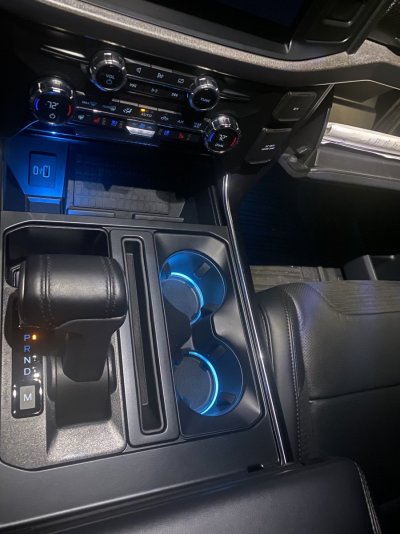
Cup Holder/ML3Z-1513562-CB/$21.19
Media Bin Lamp/ML3Z-14A318-C/$21.24
The cup holder came with the LED ring, harness and KV Antenna. I swapped out my original KV Antenna in case it was programmed to my truck. Not sure what it does but I think it has something to do with the fobs.
Side Note: If you want to change your HVAC unit out for the LED temp dials now is the time.
I used plastic trim removal tools that way you don’t scratch or mar your trim.
Like these:

I started by removing the glove box and the two side trim pieces on the center console, these two pieces pull out from the side and pull back from the dash, then, remove the lower trim piece (passenger side only).


Next you need to remove the screen bezel and the center trim piece on the dash. These need to come off so we can take out the HVAC controls, as you can see the console top trim piece goes under the controls. Make sure you pry the trim at the clip points with your trim tool. It’s on there pretty good so you have to use some force but be careful.


The HVAC controls are held on by four screws (in red) and two clips, one on each side. Take out the screws and pull straight out. I only disconnected a few of the wires so i could move the controls out of the way (yellow circle).
Now you can remove the top trim piece. (Green arrow). There are six clips on each side and two in the middle. The cup holder is attached to this piece.
Continued in Part 2 thread.
All credit goes to JHForman over at gen14
for the two harnesses and wiring diagram.
If you want the harnesses from him, email at [email protected] he charges $80 and that includes shipping.
I ordered the parts from OEM Ford Parts Direct. Shipping was like $8.00.
www.oemfordpartsdirect.com
Glovebox Lamp/ML3Z-14A411-C/$23.40
Cup Holder/ML3Z-1513562-CB/$21.19
Media Bin Lamp/ML3Z-14A318-C/$21.24
The cup holder came with the LED ring, harness and KV Antenna. I swapped out my original KV Antenna in case it was programmed to my truck. Not sure what it does but I think it has something to do with the fobs.
Side Note: If you want to change your HVAC unit out for the LED temp dials now is the time.
I used plastic trim removal tools that way you don’t scratch or mar your trim.
Like these:
I started by removing the glove box and the two side trim pieces on the center console, these two pieces pull out from the side and pull back from the dash, then, remove the lower trim piece (passenger side only).
Next you need to remove the screen bezel and the center trim piece on the dash. These need to come off so we can take out the HVAC controls, as you can see the console top trim piece goes under the controls. Make sure you pry the trim at the clip points with your trim tool. It’s on there pretty good so you have to use some force but be careful.
The HVAC controls are held on by four screws (in red) and two clips, one on each side. Take out the screws and pull straight out. I only disconnected a few of the wires so i could move the controls out of the way (yellow circle).
Now you can remove the top trim piece. (Green arrow). There are six clips on each side and two in the middle. The cup holder is attached to this piece.
Continued in Part 2 thread.
Last edited: