2020Raptor
Full Access Member
I just finished installing the Baja Designs S8 light bar in the grill of my 2020 Raptor.
There are some variances with earlier model years, and here are a few tips.
1. The small white clips that attach the headlamp and lower grill trim:
Recommend ordering a bag of four, I completely removed the three pieces and broke two clips.
2. The four studs that attach the grill to the shutter assembly:
Recommend trying to order these, they are not shown in the parts diagram.
I had issues, but glued and reinstalled.
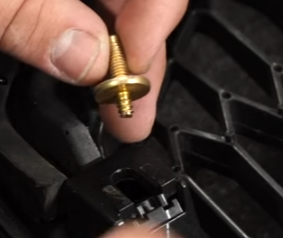
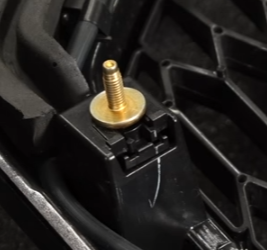
In the CJ Off-Road YouTube install video, the stud is shown as ******** in to a piece that slides into the shutter assembly, as shown below:


But on my truck, the studs are press-fit into the plastic slider.
A bit too much tightening, and it breaks free of the plastic slider.
I would order replacement pieces if possible, and do not over-tighten.
In fact, I would roll-the-dice and order the older ones shown above also, if they are still available.
They appear superior to the later version, and hopefully will fit into the newer shutter assembly.
3. There is no guidance from Baja on how best to aim the lamp, so I made the face level.
From my initial drive, that works well.
4. When aimed level, the back of the lamp pushes against the shutter assembly.
I installed the lamp this way, and appears fine, but it must put the components under some strain.
Recommend using a Dremel or such to carve out a bit of clearance.
***Per JohnyPython below, there may be sufficient adjustability with the brackets to avoid the clearance issue.
Perhaps my installation did not suitably situate the components.
5. One of the owner's manual supplements lists the wire colors for the upfitter switches and pass-throughs.
These are different than what I have seen for 2018 & 2019 (which are supposedly the same).
The hot wires are the pack closest to the fender, which is what I have seen here on the forums.
However, either I misread the manual or it was incorrect and indicated that the hot wires were the pack closest to the motor.
I used switch 1 (yellow) for the lamp and switch 6 (yellow with stipe) for the backlight.
Otherwise, it is not too traumatic and provides good results.
I took the opportunity to ceramic coat the grill and shutter assembly while they were out of the truck.
Hopefully mud will stick to the shutters less now.
Let me know if you have any questions.
Have fun.
There are some variances with earlier model years, and here are a few tips.
1. The small white clips that attach the headlamp and lower grill trim:
Recommend ordering a bag of four, I completely removed the three pieces and broke two clips.
2. The four studs that attach the grill to the shutter assembly:
Recommend trying to order these, they are not shown in the parts diagram.
I had issues, but glued and reinstalled.
In the CJ Off-Road YouTube install video, the stud is shown as ******** in to a piece that slides into the shutter assembly, as shown below:


But on my truck, the studs are press-fit into the plastic slider.
A bit too much tightening, and it breaks free of the plastic slider.
I would order replacement pieces if possible, and do not over-tighten.
In fact, I would roll-the-dice and order the older ones shown above also, if they are still available.
They appear superior to the later version, and hopefully will fit into the newer shutter assembly.
3. There is no guidance from Baja on how best to aim the lamp, so I made the face level.
From my initial drive, that works well.
4. When aimed level, the back of the lamp pushes against the shutter assembly.
I installed the lamp this way, and appears fine, but it must put the components under some strain.
Recommend using a Dremel or such to carve out a bit of clearance.
***Per JohnyPython below, there may be sufficient adjustability with the brackets to avoid the clearance issue.
Perhaps my installation did not suitably situate the components.
5. One of the owner's manual supplements lists the wire colors for the upfitter switches and pass-throughs.
These are different than what I have seen for 2018 & 2019 (which are supposedly the same).
The hot wires are the pack closest to the fender, which is what I have seen here on the forums.
However, either I misread the manual or it was incorrect and indicated that the hot wires were the pack closest to the motor.
I used switch 1 (yellow) for the lamp and switch 6 (yellow with stipe) for the backlight.
Otherwise, it is not too traumatic and provides good results.
I took the opportunity to ceramic coat the grill and shutter assembly while they were out of the truck.
Hopefully mud will stick to the shutters less now.
Let me know if you have any questions.
Have fun.
Last edited:

