
GEN 1 2014 Raptor DRL - Using Marker Llights

Disclaimer: Links on this page pointing to Amazon, eBay and other sites may include affiliate code. If you click them and make a purchase, we may earn a small commission.

jad568

Member
Joined
Jun 4, 2018
Posts
1
Reaction score
0
I just stared using Forscan and although I have searched on this topic I have yet to find a solution. Has anyone figured out how to enable the marker lights in the grill of a gen 1 Raptor to act as the daylight running lights? I found another post but it appears to be for a gen 2, it had the following:

726-26-02 - x1xx xxxx xxxx
726-50-01 - 017F

There is not a setting of 726-26-02 in my BCU and I get an error on the 726-50-01 setting when trying to write.

Any insight would be greatly appreciated...

-John
 

Martin Arnold

Member
Joined
Dec 26, 2018
Posts
40
Reaction score
13
Location
Utah, USA
Hey Thanks.... none of the links really help. They all have the same problem.
I have enabled the DRL's through Forscan but the amber marker lights are separate. I guess it takes a rewire, but electrical is not my strong suit. :(
 

Viper32

Full Access Member
Joined
Jul 25, 2015
Posts
107
Reaction score
33
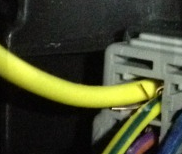
I connected my brown AUX 4 wire to the yellow w/ blue wire on pin 6 from the BCM connector. This makes AUX 4 control both my front and rear lights when the key is on regardless of headlight switch position. It essentially turns on all the lights that would normally be on when the headlight switch was in the parking light position, but it does not dim the interior lights or gauges.

Above is what I did, easy to do. Maybe 15 minutes.

com%2Falbums%2Fww183%2FSonnya1a%2Fnull_zps9b807656.png
 

Martin Arnold

Member
Joined
Dec 26, 2018
Posts
40
Reaction score
13
Location
Utah, USA
Oh thats cool! thanks! Is this in the kick panel passenger glovebox? - Im guessing you just leave AUX 4 on constantly?

Also, not to sound like an ass but, when you say brown, it looks Yellow in the photo and the other wire looks yellow and green, not yellow and blue - just making sure I dont screw this up!
upload_2018-12-26_15-55-10.png
 

Viper32

Full Access Member
Joined
Jul 25, 2015
Posts
107
Reaction score
33
Oh thats cool! thanks! Is this in the kick panel passenger glovebox? - Im guessing you just leave AUX 4 on constantly?

Also, not to sound like an ass but, when you say brown, it looks Yellow in the photo and the other wire looks yellow and green, not yellow and blue - just making sure I dont screw this up!
View attachment 116777
Aux 4 wire is brown, on the passenger side footwell just pull the plastic cover off and you will see the BCM, will help removing the glove box (3 bolts on bottom). The front parking lights are connected to the grey 10 pin connector with the green tape around the wire you want to tap into is yellow with green trace only one in that connector.

Sent from my SM-G965U1 using Tapatalk
 
Last edited:

Martin Arnold

Member
Joined
Dec 26, 2018
Posts
40
Reaction score
13
Location
Utah, USA
Soooooo I totally hooked it up as specified, but I got nothing :/ did the aux 4 brown wire to the yellow and green in the 10 pin grey junction box. Also I did remember to turn the aux switch on..... after 2 minutes of saying WTf .... but then I went straight back to WTF
 
Last edited:

Viper32

Full Access Member
Joined
Jul 25, 2015
Posts
107
Reaction score
33
Soooooo I totally hooked it up as specified, but I got nothing :/ did the aux 4 brown wire to the yellow and green in the 10 pin grey junction box. Also I did remember to turn the aux switch on..... after 2 minutes of saying WTf .... but then I went straight back to

So did it not work for you? I did a 2013 and 2014 the exact same way and it worked on both.

Not understanding your comment you went straight back to

Also it needs to be the larger yellow wire with green trace. The wire is much larger than the brown aux wire. Also you need to tap into it, you cannot disconnect it from the BCM.

The 10-pin connector is C2280E and the yellow w/ blue wire is on pin 6. It's associated with BCM fuse #30 which controls side marker lamps, high mounted stop lamp, park/stop/turn lamps, and front marker lamps.

On the 2010 year, the parking light wire is purple/white in the same connector not sure what year you are working on.
 
Last edited:

Martin Arnold

Member
Joined
Dec 26, 2018
Posts
40
Reaction score
13
Location
Utah, USA
Its on a 2013 also, I had to extend the brown wire, the. Ran it to exactly where you are saying. I’ll have to go back and double check all the connections, it’s possible I didn’t make full contact with such a small area.

Just to confirm.... apart from that one wire, there is nothing else needed to be done?

Thanks again
 

Viper32

Full Access Member
Joined
Jul 25, 2015
Posts
107
Reaction score
33
Its on a 2013 also, I had to extend the brown wire, the. Ran it to exactly where you are saying. I’ll have to go back and double check all the connections, it’s possible I didn’t make full contact with such a small area.

Just to confirm.... apart from that one wire, there is nothing else needed to be done?

Thanks again

That's correct, you are tapping the brown Aux switch 4 wire to the wire I specified. The with truck on and Aux 4 switch turned on you will get all park lights on. You can leave the switch on as it powers down with ignition switch. Make sure your switch is lighting up and maybe check the fuse for Aux4 it could be blown or something.
 

jgwoody

Active Member
Joined
Mar 11, 2018
Posts
96
Reaction score
33
Location
Houston, TX
I know this thread is dead, but just wanted to let people know you can do it with Forscan. I just did it on my 2013. Very easy to do , only took a couple minutes.
 

EricM

FRF Addict
Joined
May 11, 2016
Posts
4,397
Reaction score
4,787
Location
OHIO
I know this thread is dead, but just wanted to let people know you can do it with Forscan. I just did it on my 2013. Very easy to do , only took a couple minutes.


What lines did you change and to what values? Or is it a "toggle" now?
 

jgwoody

Active Member
Joined
Mar 11, 2018
Posts
96
Reaction score
33
Location
Houston, TX
What lines did you change and to what values? Or is it a "toggle" now?

I'm not around my computer so I can't check, but it's definitely a toggle now. You don't have to manually modify any hex values. I'm going from memory here but check the "BodyCM module configuration" section (toggles), not the "as built" section (manual value editing). Then you can enable "daytime running lights". Also it will ask you if you want to use parklamps, which I believe I said yes. Then it also asks if you have HID or halogen headlights. I can't remember the exact answer combination I used to those 3 questions to get it to use only the hood led's. You can tinker with different combinations, writing to the trucks computer without needing to cycle the key like it says. Keep in mind you wont see the DRL in park, it will have to be put into drive so it helps to do with your headlights in auto in the daytime and with someone standing in front of the truck giving you a thumbs up! Also worth noting, it requires the free extended forscan license. Hope that helps! Good luck!
 

Dr_Chooch

Full Access Member
Joined
May 21, 2019
Posts
85
Reaction score
43
Location
Louisiana (Northshore)
You must have done it wrong. You can set it to do the amber hood lights and all side markers.
I’m fully aware this was years ago, but all of the spreadsheets for are trucks are dead on GoogleDocs.
You have any idea what the magic answers to have the grill + parking lights work as DRL?
I’m playing with Forscan in the next week to get the DRL set on my 2012 SCREW.
 

Forum statistics

Threads
101,098
Posts
2,151,442
Members
60,259
Latest member
bfosterbf
Top