GEN 1 2012 nav aftermarket upgrade

Disclaimer: Links on this page pointing to Amazon, eBay and other sites may include affiliate code. If you click them and make a purchase, we may earn a small commission.

jchargu3

Member
Joined
Jul 1, 2018
Posts
9
Reaction score
0
I didn't. I just bought one of the ones that bolts on to your license plate. I plan on trying again when I get a new front camera.

Sent from my Pixel 2 XL using Tapatalk


Ol'Crank... I found something interesting when digging today, from F150 Forums

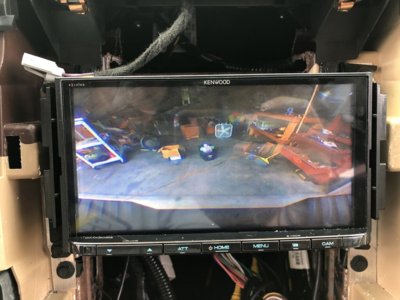
I have a 2010 Lariat with OEM camera, Sync, but no nav. The camera displays in the rearview mirror, but kinda small. I installed an aftermarket Nav/DVD system last weekend (Kenwood DNX-6160) and today finished hooking the Kenwood's reverse camera input into the OEM system. I found some wiring diagrams on the Internet. Let me try to explain how I did it:

1. Run a ~6 foot video cable from your aftermarket unit under the dash, under the steering wheel and down toward the hood release.
2. Remove the driver side left kick panel, just pull it out. You will slide it over the hood release. You will also have to lift up the plastic door sill protector (just the front) to get the panel out.
3. Remove the hood release. There is a single 8mm silver bolt. Once it is out, just slide the assembly housing up and it will come loose. Set aside.
4. Now, behind where the hood release bracket was, you should see a large black connector that has a white retaining clip. This clip can be unhooked and then rotated up to release the connector. Pull the connector out.
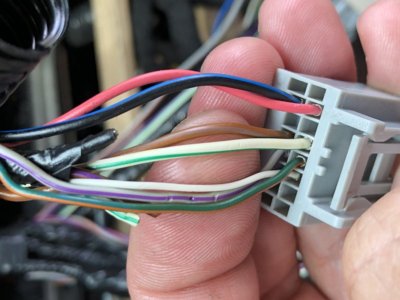
5. On the lower right on the connector you will see a brown wire and a brown-yellow stripe wire. These are the camera video. Brown is Video (+) and brown-yellow stripe is Video (-). I used wire taps with some short 18 gauge wire to attach to the video cable (cut off the end of the video cable - the inner cable that is also the plug's tip goes to the brown wire, the outer part of the video cable goes to brown-yellow stripe).
6. To verify you have the right set, you will notice that the two wires combine along with a another wire wrapped in black tape as they go up towards the dash. That third wire is the shield.
7. Put everything back together. Note you will have to peel the weatherstriping back to get the kickpanel cover to seat correctly.

Now, granted this is a NON-NAV truck but the model year and wiring would be the same...

I'm going to investigate tonight and see if I can find these wires in the kick panel and if that yields better results.

Otherwise, I'm beginning to think MAYBE the camera isn't getting power because of the HU being disconnected... I may trace that back to the tailgate tonight and see if that's true.

I will not be defeated!!!
 

jchargu3

Member
Joined
Jul 1, 2018
Posts
9
Reaction score
0
Ol'Crank... I found something interesting when digging today, from F150 Forums


Now, granted this is a NON-NAV truck but the model year and wiring would be the same...

I'm going to investigate tonight and see if I can find these wires in the kick panel and if that yields better results.

Otherwise, I'm beginning to think MAYBE the camera isn't getting power because of the HU being disconnected... I may trace that back to the tailgate tonight and see if that's true.

I will not be defeated!!!


Just got home and looked this does NOT exist in the harness by the hood release on my truck...

So it's back to troubleshooting until someone that has done this is able to shed some advice!!! PLEASE :)
 
OP
OP
O

Ol'cank

Member
Joined
May 11, 2018
Posts
20
Reaction score
0
Just got home and looked this does NOT exist in the harness by the hood release on my truck...

So it's back to troubleshooting until someone that has done this is able to shed some advice!!! PLEASE :)
Thats unfortunate. I think it's a power issue. Like something isn't sending power to the harness. I'm not good at electrical at all. Obviously lolz.

If the two wires from the factory harness are only signal then it's gotta be a power wire. My aftermarket camera didn't work until I ran power to the reverse power wire even tho that one really shouldn't matter.

Sent from my Pixel 2 XL using Tapatalk
 

jchargu3

Member
Joined
Jul 1, 2018
Posts
9
Reaction score
0
Thats unfortunate. I think it's a power issue. Like something isn't sending power to the harness. I'm not good at electrical at all. Obviously lolz.

If the two wires from the factory harness are only signal then it's gotta be a power wire. My aftermarket camera didn't work until I ran power to the reverse power wire even tho that one really shouldn't matter.

Sent from my Pixel 2 XL using Tapatalk


That’s all I can think of too. Unfortunately I need batteries for my meter and someone I trust in the truck to put it in reverse with the brakes on. Soooo I’ll mess with t this weekend

I just tried a different RCA cable on the same two wires that are suggested to no avail

Something has to be missing.
 

jchargu3

Member
Joined
Jul 1, 2018
Posts
9
Reaction score
0
So, Crank.... I've discovered this:


Cutting the White/Green wire from both the 10 pin and 16 pin pigtail and plugging them into the SYNC unit.... I still get video...

Which means, those are not the correct wires.
 

jchargu3

Member
Joined
Jul 1, 2018
Posts
9
Reaction score
0
OL’CRANK I FIGURED THE EFFING THING OUT!!!!!

You WILL NOT touch any of the wires in the 10 pin harness

INSTEAD you use the White/Green and Brown/Grey wires in the 16 pin harness!!!!
 
OP
OP
O

Ol'cank

Member
Joined
May 11, 2018
Posts
20
Reaction score
0
OL’CRANK I FIGURED THE EFFING THING OUT!!!!!

You WILL NOT touch any of the wires in the 10 pin harness

INSTEAD you use the White/Green and Brown/Grey wires in the 16 pin harness!!!!
I had tried both but I'll give it another shot. Thanks!!


Sent from my Pixel 2 XL using Tapatalk
 

jchargu3

Member
Joined
Jul 1, 2018
Posts
9
Reaction score
0
I had tried both but I'll give it another shot. Thanks!!


Sent from my Pixel 2 XL using Tapatalk

Photo one, you'll want the two wires that my index finger are on, in the middle of the 16 pin plug.

DO NOT tap these wires, it won't work well... They will have to be cut and soldered....

AND even then, the picture quality isn't as good as the factory one... That's something else I need to figure out but for now, it's fine...

See photo #2 for proof of it working
 

Attachments

  • IMG_4675.jpg
    IMG_4675.jpg
    81.4 KB · Views: 32
  • IMG_4676.jpg
    IMG_4676.jpg
    86.9 KB · Views: 35
Top