Slimneill's Blue Devil Raptor Build

Disclaimer: Links on this page pointing to Amazon, eBay and other sites may include affiliate code. If you click them and make a purchase, we may earn a small commission.

Slimneill

Member
Joined
Jul 2, 2014
Posts
28
Reaction score
8
Hey guys, so it's time to start personalizing my Raptor. I'll list the Mods as I go and show how long they took to do:

MOD 1: 37" Toyo on bottom perch
I started with putting 37" Toyo MTs on stock bottom perch. I had a thread on here, was told it couldn't be done, decided to give it a try and it worked out fine. I had to hammer the pinch welds, rust kill primer the bare hammered metal and then use truck bed liner spray can over the entire area to prevent the Canadian salty winter from destroying the truck. I also had to trim the plastic front fenders by the firewall to give the monster tires some room to move but I don't have any rubbing issues on a regular basis. To make the contact worse they are mounted on Zero offset Methods 17R rims which made the contact even worse.

Only time I get any rubbing is when I'm hard on the brakes and turning the wheel at the certain angle when the outside edge of the tire sweeps past the back section of the fender. But like I said, this only happens during hard braking. Normal breaking and driving I have no issues at all.

On an effort scale, it's not that hard, just time a consuming task. I decided to do it on the hottest day of the summer on my driveway so it was a slow go. The first fender took about 4 hours to figure out how much needed to be trimmed, there were numerous iterations of mounting and un-mounting the big tire to find out how much clearance I was getting and how much I needed to keep going. Once I had the first one done and a reference the second wheel well went easy, I completed that one in about 2 hours. I took all day on and off mounting all 4 tires.
 

Attachments

  • DSC00624e.jpg
    DSC00624e.jpg
    106.8 KB · Views: 196
  • DSC00630e.jpg
    DSC00630e.jpg
    92.6 KB · Views: 167
  • DSC00625.jpg
    DSC00625.jpg
    105.8 KB · Views: 196
  • DSC00606.jpg
    DSC00606.jpg
    141.9 KB · Views: 162
OP
OP
S

Slimneill

Member
Joined
Jul 2, 2014
Posts
28
Reaction score
8
MOD 2: Front bumper offset for tire clearance

MOD 2: Front bumper offset for tire clearance
I didn't want to grind into the powder coat on the front bumper to give myself some additional clearance for the larger 37" tires. I decided to Offset the front bumper using washers on the 4 main bumper bolts. This is a pretty easy task, there are videos online showing how to take the bumper off.

Basically there are:
-Two bolts under the hood release lever (but not the hood latch that is left alone).
-3 push pins that get pulled back for the rubber mud guard located in front of the rads.
- I loosened off the 4 front bolts on the Silver skid plate underneath. Didn't hae to take it fully off.
-Initially I took the entire bumper off by taken off the 4 main nuts (2 per side) that secure the bumper to the frame but later realized (after struggling with washers that kept sliding off the studs) that if you loosen off the passenger side nuts almost all the way and take off the driver side nuts, you can get enough play to be able to pull the bumper out far enough and slip on some regular metal washers as shims and not have to remove the bumper from the truck at all. Then slip the bumper back in place, put the nuts back on the driver side and then do the passenger side the same way.

On an effort scale, I did this change including taking bumper on and off on my own in 30 min. It can be done in 10 mins if the bumper isn't taken off completely.
 

Yukon Joe

FRF Addict
Joined
Nov 16, 2011
Posts
18,378
Reaction score
11,619
Location
Russellville, AR
Truck looks great. 2011? How many miles? Is it a 5.4 or 6.2?

Are there plans for gear changes to go with the larger tires?

Yukon Joe :baby: :baby:
 

RLTW

FRF Addict
Joined
Jan 18, 2013
Posts
3,626
Reaction score
2,464
Location
TX
Also interested in the type of offroading you do, if its anything serious where your suspension see's real compression and you get tucked I can only imagine those fenders will crack eventually.
 
D

Deleted member 12951

Guest
When you read threads that 37's won't work you need to take in consideration that everyone is stating this if you want to off-road it. Depending on the type of driving you are planning then yes they will work as you have seen but as others are already asking, think twice if you want to play hard with it.
 
OP
OP
S

Slimneill

Member
Joined
Jul 2, 2014
Posts
28
Reaction score
8
It's a 2010 5.4L that was babied by it's previous owner. I got it a year ago with only 37K miles on it. I put 12K on it since then.

That is correct, if you plan to do any real offroading then you are going to want to lift the front end. It was aksed previous can 37" toyos be used for street use and i could never find a yes answer. My plan was to go mid perch but the Fox shock perch's are seized solid to the shaft so i couldn't do anything with out either getting new shocks or a 2" spacer kit. I've grown to like the look of the tires filling the fender wells instead of having the lifted look for now. Next time i need an allignment i'll reconsider lifting the front end prior to.

I've done some light off roading in some sand dunes near by but thats all there is around here to do. It's pretty much a street queen.

I'd much rather beat up my quads then beat on my truck. Plus up here in Ontario we don't have any real high speed off road truck desert or trails just farmer fields or mud bogs. The truck is too wide to take it on the quad trails, when i have taken it off road i'm constantly getting rubbed up against by bush and schrubs.
 
OP
OP
S

Slimneill

Member
Joined
Jul 2, 2014
Posts
28
Reaction score
8
MOD 3: Plasti-dipped Rear bumper & exhaust
Rust removal from rear bumper powder coating and plastidip black. This was one of the first thing I did as I didn't want my bumper to rot away on me.

I started off by grinding away all of the rust to bare shiny metal and then used brake cleaner to clear the fresh metal of any grease/contamination. Then taped off the black plastic parts of the bumper and shot multiple coats of Black plastidip on to the bumper. This was my first time using plastidip, it went on a little clumpy but evened out with time as it cured. I didn't get any runs in it. I put down 7-8 coats. I was actually surprised how good it ended up looking I couldn't see where the blending of the powder coat to bare metal had occurred. I haven't taken it off yet to see how well it will remove and also how well it keeps moisture away from the bare metal from corroding again. When I perform my next mod (vinyl wrapping the bumper I will see how it held up over the last 6 months) I'll put the rust check rust kill primer on the bare metal prior to wrapping too.

On an effort scale, pretty much your typical body work, grinding/polishing away corrosion prior to primer/paint. If you have all the right tools, I give it an hour and two taking your time and learning plastidip the first time.

I coated the rear exhaust tip which was looking pretty oxidized with black plastidip, it went on easy, looked good for the first month but now it's back to looking like a darker shade of the sand blasted original exhaust pipe.

Update: I removed the Plastidip from the rear fender so that I could vinyl wrap it. The verdict: It was good at keeping the bare metal underneath corrosion free it was mostly as shiny as I left it. The bad, it didn't peel off as easily as the you tube videos suggest. A lot of rubbing with my thumb, took about 30min to get one side of the rear bumper clear. I couldn't imagine trying to remove plastidip from an entire vehicle if it didn't pull off easily.

Would I do it again? For small pieces yeah, for large pieces No way!!!
 
OP
OP
S

Slimneill

Member
Joined
Jul 2, 2014
Posts
28
Reaction score
8
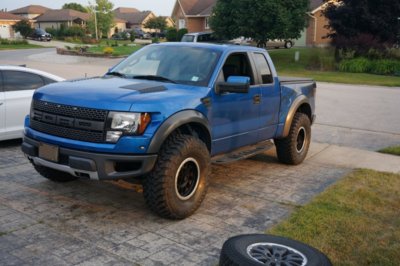
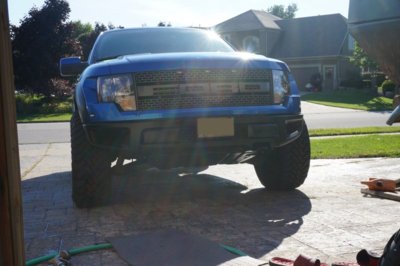
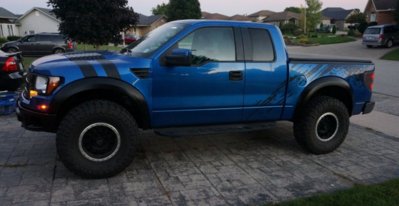
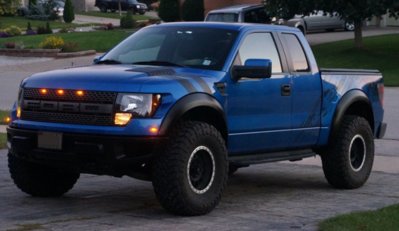
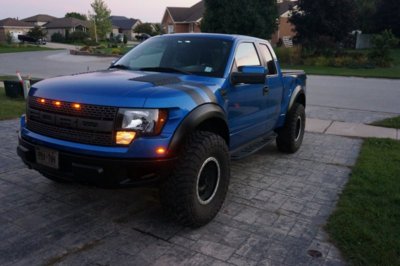
MOD 4: Vinyl wrapping all of the Exterior grey trim

I went back and forth about plastidipping vs vinyl wrapping the fender flares, front and rear bumper. I posted online and got some feedback from people who said that vinyl would last longer than plastidip on the fenders and bumpers. I'm in Canada so there is no really cheap way to get plastidip other then $20/spray can at crappy tire. Based on my rear bumper it seemed to get dirty really quickly so I decided that I would give vinyl a go instead.

This has been a Mod in preparation for months. I've been collecting samples from all the various vinyl vendors for months. I was going to use black or carbon fiber for the exterior. It came down to 3M Nidoc, 3M 1080 and Vvivid vinyl Satin Matte Stealth Jet Black.

I ultimately decided to be cheap for my first vinyl wrap attempt and not go with carbon fiber. I found all three to be pretty easy to apply and of similar quality, I ended up going with Vvivid Vinyl, it had the same feel as the 3m at a lot lower price (1/3 the cost) I got 5x25ft roll for $150 Cdn which is like $115 USD. I think they are a newer start up, so far the reviews on Amazon I have read were positive and I figured for the lower initial price I would give it a shot after all I have no experience with vinyl or wraps at all and if it turns out horrible I only wasted $150 + many frustrating hours of my life vs $400 on 3m; it was my practice.

I also got a can of the 3m Vinyl Adhesive primer, a 2 speed heat gun from harbor freight, felt tipped plastic vinyl applicator, utility knife and a role of knife tape. When I ordered the vinyl it was supposed to come with a starter kit that had the applicator, knife tape, knife and primer sticks but it didn't. I got that rectified and shipped but it took over a week to straighten out and I was running out of time so I started the wrapping with only the 3m primer, vinyl in hand, heat gun, an old credit card and my fingers or remove all the air bubbles.

Well it turns out I decided to vinyl wrap all of the hard pieces with curves and cut outs!!!

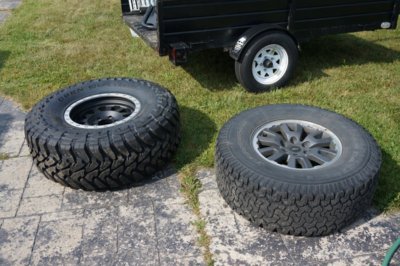
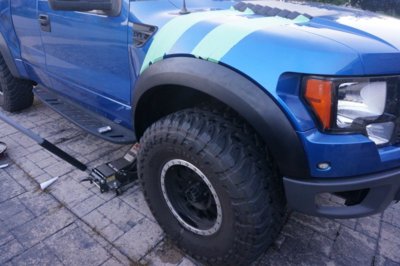
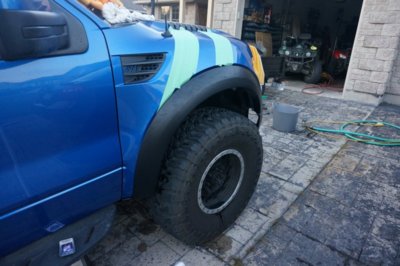
The first night I took the driver side fender off and into the dining room table, well I learnt the hard way that you need a way to hold the part your wrapping solid and stop it from moving. I didn't have enough hands to hold the part, hold the heat gun and stretch the vinyl and squeegee the air out at the same time. I ended up giving up thinking what did I get myself into. The next day I regrouped and read online that it's easier if the parts are left of the truck. I tried the other fender and it was a lot easier when the part is held stationary. I managed to wrap the passenger side fender flare with only a heat gun, my fingers and a lot of patience. Taking the fenders on and off is pretty simple, I did it for the 37" tires and if you have the right body trim removal tools they come off in seconds. One of the most messy and time consuming parts was getting the parts CLEAN. And I mean squeaky clean. Each piece getting wrapped got the same treatment.
1-Full strength industrial degreaser was scrubbed on with a plastic potato scrubber brush. Then rinsed off and repeated.
2-Same degreaser with a kitchen sink sponge, 2x
3-High ratio of water/Dawn dish soap with a separate kitchen sink sponge, 2x
4-Rub the parts with Rubbing alcohol to clean any soap residue.

This regiment happened for every part of the truck that the vinyl could be touching during the install phase, including the rest of the truck fenders especially the back sides that the edges will be sticking to.

When it came to cleaning the trucks painted parts; instead of using the rubbing alcohol to remove any soap residue I used the Mcquiars' Clay Bar kit to get it squeaky clean and wax free. Once everything was clean I would cut a piece of vinyl that had 6" extra of all sides and drape it on to the truck. Eventually I could get it all on with no bubbles.

The trick I learnt was to not heat it too much and stretch it right away, try and get as much of it on the flat surfaces properly without stretching and then only heat it and stretch it when it comes to corners and edges because you can stretch it enough to remove all wrinkles and still look perfect.

Then I wrapped all of the vinyl around to the back edges where they would be snug up against the truck and then heated the vinyl using a heat gun and temperature gun to set the vinyl in key areas for good.

The cleaning takes as long as doing the vinyl wrap if you want it to last!

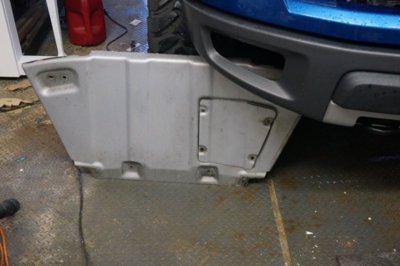
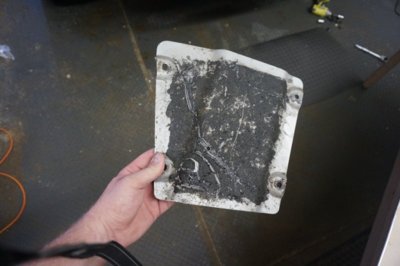
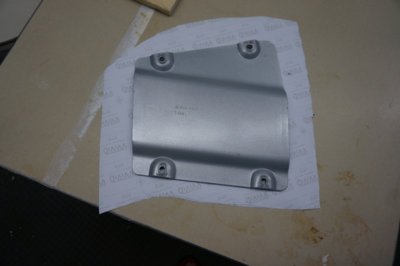
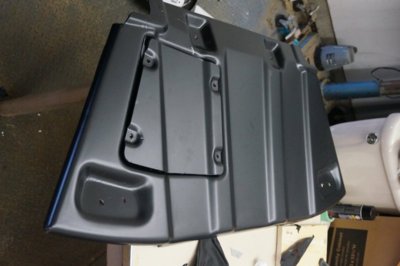
The skid plate was the easiest part because it was heavy and relatively flat enough that I did it on my work bench.

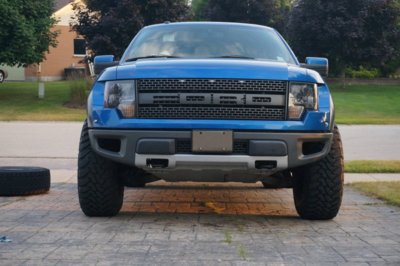
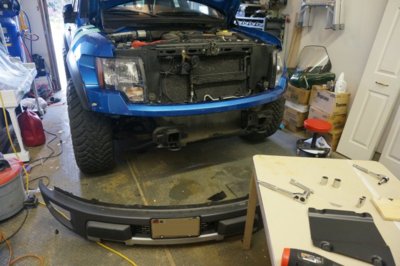
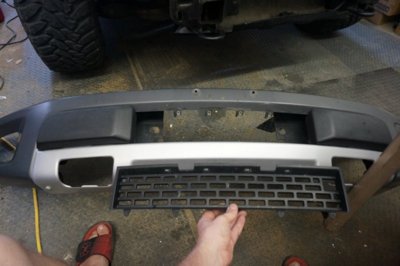
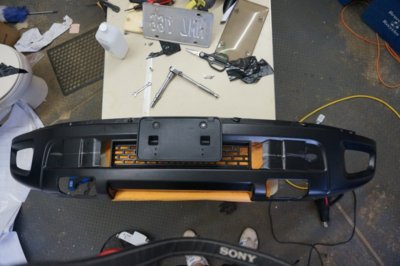
The front bumper was probably the hardest part. I ended up tearing it down to the single piece and degreasing it and cleaning it. I didn't want to pry off the bumperettes as I have read that they won't go back on as snug as they came off. If you're going to take the bumper off I would suggest just taking everything off, everything is just bolted on the back and easily reachable once the bumper is off the truck. The tear down took 20 mins. The degreasing took about 2 hours for all the parts. I had to wrap the bumper twice as I learnt the hard way not to put the primer on the visible side of the bumper because once the vinyl makes contact it's instantly 5x as strong a bond as just the vinyl on metal and a combination of exhaustion/too much heat/stretching/increased adhesion resulting it me putting my finger through one of the visible edges.

The second time around I used rubbing alcohol to remove some of the primer and it went much better and quicker. I also experienced removing the vinyl the first time around and found out that if you don't use heat to warm the vinyl and make it pliable you will end up pulling small strips and take forever like trying to start a roll of packing tape that has taped itself down. Once I started using heat I could tug most of it off pretty easily. It was a lot easier and quicker to remove then the plastidip was.

I will include some pics of the bumper dismantled so you can see what it looks like underneath all clean. I also wrapped the bumperettes separately and they came out great. Everything went back together and back onto the truck.

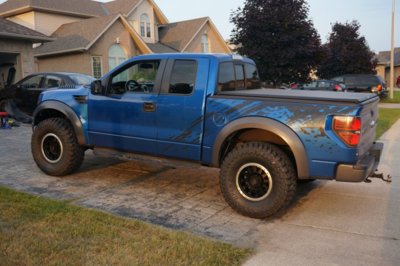
The rear fenders were the same as the front fenders just a little longer.

You can take the entire rear bumper off without removing the heavy and bulky hitch/receiver. There are 3 bolts that run diagonally on either side of the hitch. Once these 6 bolts are out you have to lift up on the bumper in the middle as there are plastic tabs in the bumper that sit in slots in the hitch that prevent you from just pulling outboard (mine broke when i was pulling it off, no big deal). (don't forget to disconnect the license plate lights by prying the lights out of the plastic body and turning them to separate the light socket from the housing.

Once you pull the bumper off, it separates into 3 pieces, A center plastic part and the two metal ends which are held on with two plastic pins and plastic clips molded into the center plastic bumper part.

I'm glad I took the rear bumper apart because the inside of the metal bumpers were worse than the outside portions that I fixed last spring. They were rusting away like crazy!!! Make sure you undercoat or protect these if you don't want to replace your bumpers in 5 years! Because I'm sure the Raptor shade of grey powdered coating bumper pieces will be pricey!

I will use the rust kill primer on the bare metal and then follow that up with truck bed liner and then undercoat when I re undercoat the entire truck pre snow fall.

Once you finish wrapping those 2 pieces they snap right into the main plastic bumper piece and bolt right back onto the truck the same way they came off.
 

Attachments

  • DSC09327 70.jpg
    DSC09327 70.jpg
    89.5 KB · Views: 92
  • DSC09328 70.jpg
    DSC09328 70.jpg
    90.4 KB · Views: 89
  • DSC09330 70.jpg
    DSC09330 70.jpg
    70.7 KB · Views: 85
  • DSC09331 70.jpg
    DSC09331 70.jpg
    64.5 KB · Views: 61
  • DSC09336 70.jpg
    DSC09336 70.jpg
    40.9 KB · Views: 88
  • DSC09339 70.jpg
    DSC09339 70.jpg
    58.5 KB · Views: 96
  • DSC09340e 7.jpg
    DSC09340e 7.jpg
    95.8 KB · Views: 99
  • DSC09341 70.jpg
    DSC09341 70.jpg
    71.7 KB · Views: 90
  • DSC09356 70.jpg
    DSC09356 70.jpg
    74.6 KB · Views: 77
  • DSC09359 70.jpg
    DSC09359 70.jpg
    78.1 KB · Views: 98
OP
OP
S

Slimneill

Member
Joined
Jul 2, 2014
Posts
28
Reaction score
8
More Pics...

Additional Vinyl Fender stripes, I've seen a few trucks with black fender stripes and I thought I would give it a shot. I had a roll of new unused Knife tape which has a small diameter cutting wire built into the edge of the tape. Some people just buy a role of vinyl tape, I just used some scrap vinyl that was laying around the garage for a free mod.

1- Cleaned the truck paint area that will get the vinyl
2- Used primer on the hood edges
3- Installed the cutting tape with the blade wire in the spot that I wanted to cut the vinyl.
4- Installed a large enough scrap piece of vinyl over top and made sure it was bubble free.
5- Pulled the wire out of the tape and through the vinyl leaving a perfect tear free edge.
6- Remove scrap vinyl and cutting tape from tuck.
7- Pushed down all the edges of the perfect strip one last time.

Note when using the knife tape, start the cutting action through the vinyl at least 4" away from the actual part, I didn't start with 4 inches of run up and I found that it didn't start cutting into the vinyl instantly. I had to apply some pressure and it took about an inch of cutting into the vinyl get to the point where the vinyl was cutting flawlessly. And don't use heat to try and cut through the vinyl easier, I did when it didn't start cutting right away and it just stretched the vinyl along the wire instead for cutting through it. Ultimately my first time using the tape was on the actual truck, I could have tested it out elsewhere first but I was in patient and wanted to see it on the final product. The good part is I was only using scrap vinyl so I will redo it if at the end of the job if the small blemish I can see bothers me.
 

Attachments

  • DSC09360 e.jpg
    DSC09360 e.jpg
    78.5 KB · Views: 90
  • DSC09362 E resized.jpg
    DSC09362 E resized.jpg
    88.8 KB · Views: 100
  • DSC09364 e Resized.jpg
    DSC09364 e Resized.jpg
    67 KB · Views: 100
  • DSC09369 E resized.jpg
    DSC09369 E resized.jpg
    67.1 KB · Views: 88
  • DSC09363.jpg
    DSC09363.jpg
    82.7 KB · Views: 94
Top