6.2L Leaking Coolant at the Thermostat Housing

Disclaimer: Links on this page pointing to Amazon, eBay and other sites may include affiliate code. If you click them and make a purchase, we may earn a small commission.

Ruger

FRF Addict
Joined
May 16, 2011
Posts
9,234
Reaction score
8,293
Location
Northern Nevada
My GEN1 has developed a miniscule leak at the thermostat housing. Very minor - an ounce or two every time I drive it. I've replaced the o-ring with the (astoundingly pricey) Ford factory o-ring, and that sealed it briefly. But it's started to leak again.

My thought is to help the o-ring with its sealing duties by making a gasket to seal between the thermostat housing and the block. The surfaces are machined flat, the thermostat housing is cast aluminum, and it is bolted to the block with two bolts with 8mm hex heads.

Is that a viable solution to the problem? If so, what should I make the gasket out of - paper, cork, something rubberized? If that's not a good solution, what is?

Any solution advice and/or ideas will be most welcome. THANKS!
 

smurfslayer

Be vewwy, vewwy quiet. We’re hunting sasquatch77
Joined
Dec 16, 2016
Posts
16,265
Reaction score
23,938
I’m thinking that the helper gasket will be difficult to successfully implement with the o-ring because it will resist flattening evenly. Not impossible, but more difficult. I think rubberized or maybe just some RTV ? Is there a recess for the o-ring? if so, can you put it under a magnifying glass and see if there is a burr, imperfection or something that might be causing it?

Of course, I know you’re joking because it’s heresy to diss the gen1 here or even hint that one has any kind of problem. It is written that you may not impugn the reputation of the Gen 1 on FRF or face excommunication by the Gen1 tribe. ;-)
 

MTF

FRF Addict
Joined
Nov 27, 2010
Posts
5,358
Reaction score
2,284
Location
Celebration, Florida
I would take the thermostat housing and place it down on a very flat surface with some 400 or 600 grit black sand paper.
And carefully sand it down a hair to make sure you haven't bent the housing by over tightening.

Adding anything between the housing will raise the height and will not compress the ring around the thermostat.

Silly question, you are inserting the thermostat in the o-ring, yes?
You can put a very small amount of silicone inside the groove of the o-ring, they make a cylinder head silicone product.

Also there are differences between manufactures of these thermostats.
A good high-flow thermostat is the way to go.
 
Last edited:
OP
OP
Ruger

Ruger

FRF Addict
Joined
May 16, 2011
Posts
9,234
Reaction score
8,293
Location
Northern Nevada
I am putting the assembly together exactly as I found it when I first took it apart. That occasion was after a drive from Nevada to Colorado in which I became concerned that the engine was running a little hot. So I replaced the single-spring factory thermostat with a dual-spring NAPA unit of the same temperature rating (195 degrees). The thermostat sits in a little pocket machined into the block, the o-ring goes down on the thermostat, and a cylindrical protrusion with an angled end in the thermostat housing compresses the o-ring and makes it seal.

Except it doesn't seal. When I took it apart recently to see what was wrong I observed that the o-ring was no longer round in cross-section. That was the original factory o-ring that I'd reused when I replaced the thermostat in November. Thinking, "Ah-ha, I've found the problem!" I replaced the o-ring with a new one from the Ford dealership, and all was well for a couple of weeks. Now it leaks again. (Even though it's a GEN1.) ;)

It's hard to imagine that I've bent an aluminum casting by tightening its machined flat surface down against a machined flat iron surface, but a touch-up with some fine abrasive cloth isn't a bad idea. I'll try that, but I doubt that it'll solve the leakage problem because the seal isn't made where those two surfaces meet. It's made at the o-ring.

RTV might work.

I don't know, this has me quite puzzled. Hence my request for ideas. Since the original o-ring was deformed (after 80K miles), I thought that if I added a gasket or gasket material it might act as a spacer to allow the o-ring to seal without deforming it. Of course if it's too thick it'll prevent the o-ring from sealing at all.

Could it be that the NAPA thermostat is the culprit??? That seems unlikely, but one of the analytical rules of automotive mechanics is to diagnose a new problem by looking at the last thing you did.

Ideas?
 
Last edited:

smurfslayer

Be vewwy, vewwy quiet. We’re hunting sasquatch77
Joined
Dec 16, 2016
Posts
16,265
Reaction score
23,938
Ok, hahahaha... @Ruger is just kidding guys, his Gen 1 continues to be trouble free... no excommunication or disintegration necessary.

A point of clarification if you will.

housing was, or was not leaking prior to the t-stat change?

because now I’m suspecting the T stat is not seating, fitting or otherwise orienting properly enough for the o ring seal to work.
I say replace. Although I’ve not had one of these apart in a while <snark> because the Gen2 is ultra reliable, and has no problems </snark> I am familiar with that type of “gasket”. Not that I like them, but I’ve encountered them plus, for extra credit, I’ve actually disassembled and reassembled such an assembly and 1) had no parts left over after reassembly 2) said assembly did not leak after my intervention.

That qualifies me for an internet certified design engineer status.

before checking the housing joint, are we sure it’s not weeping up stream? we should be sure that the hose isn’t weeping, I usually hit a suspect area with something that will show evidence of a leak, so in this case I would coat the housing just below the hose mating with chalk line chalk, baby powder or similar. if it’s leaking upstream of the housing joint, that will show it.

Next, without seeing all the relevant stuff with my own eyes, I’d replace both gasket and T-stat; if you still have the old one, maybe that would work. I’d make sure the surface areas are clean, magnifying glass inspection, razor scrape and solvent. Clean and dry with alcohol, carefully reassemble. Hand tighten the bolts only.

stop. obtain adult beverage and confirm the torque values for these 2 bolts.
Also, confirm these bolts are not torque to yield; that is, not supposed to be reused. I’ve never seen one of these being reused cause a problem, but others on the internet proclaim otherwise and warn of dire consequences if you do.

On the off chance these are one use bolts, get replacements before actual truck use.

Write the torque down on a post it, take the post it, adult beverage and torque wrench to the truck and gradually tighten both bolts to the setting. I realize you probably know all this, but on the off chance something got missed - maybe you made a field expedient repair, who knows.

Once finally torqued with requisite new-ish and cleaned parts, finish adult beverage and retest by starting the truck. let it warm and observe. No need to go anywhere, because even though it’s a small leak here, there’s no sense adding to the potential trouble by finding out the hard way. If the truck passes the driveway smoke test, figuratively of course, take it for a drive where you’re sure to get the temps up. Either spirited driving or haul some cargo.

Good luck.
 

xtela

Full Access Member
Joined
Aug 18, 2012
Posts
102
Reaction score
106
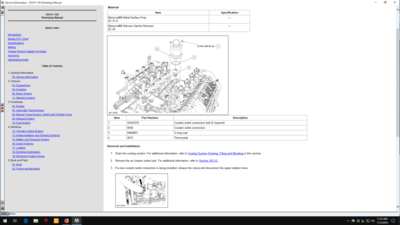
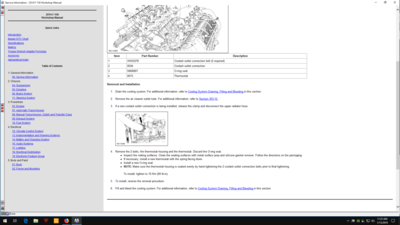
Here is the factory manual procedure. Very little torque required. You may be right about the new thermostat and the new o ring is out of position.
Screenshot (13).png Screenshot (14).png
 
Last edited:
OP
OP
Ruger

Ruger

FRF Addict
Joined
May 16, 2011
Posts
9,234
Reaction score
8,293
Location
Northern Nevada
Thank you very much, gentlemen.

Answers and comments:
- I don't know if the housing leaked prior to replacing the thermostat. I replaced it because it seemed to me that the truck was running hot (I have a digital coolant temp gauge), and I tore into it without noticing whether there was a leak.
- The thermostat does not seal against the block. There's nothing on the thermostat or under it to make a seal. It just sits metal-on-metal in its little pocket machined into the block. The seal is made by the o-ring which is placed on top of the thermostat. It seals against the thermostat below, against the sides of the thermostat pocket machined into the engine block, and against the thermostat housing above. It may be that too much is asked of that o-ring, but I'm not an "internet certified design engineer" or an engineer of any sort!
- It may be that the NAPA thermostat is the culprit. If the thermostat plate is too thick, then that would affect the ability of the o-ring to seal. Replacing the thermostat with a new Ford unit is likely what I'll do after running the baby powder test.
- I'm fairly sure that the leak isn't between the hose and the thermostat housing. When I discovered the leak I replaced the factory spring hose clamp with a worm gear type hose clamp and the leak persists. I'll do the baby powder test nonetheless to be certain.
- Gents, there is absolutely no way to get a torque wrench in that area. I can barely get a 1/4 inch drive ratchet in there, and I have to use an extension on one of those bolts. I bet I'm over-torqueing those bolts.
- Manual says to clean using "metal surface prep" (whatever that is) and silicone gasket remover. There's no silicone gasket to remove, so that puzzles me.
- How would I determine if those bolts are one-use?

@smurfslayer and @xtela , again I thank you.
 
Last edited:

xtela

Full Access Member
Joined
Aug 18, 2012
Posts
102
Reaction score
106
I think the shop manual would specify to use new bolts if required. It must be either the Napa thermostat or you are getting the o ring misaligned some how during installation.

I too thought that the cleaners specified was odd. The only thing that comes to mind is it's used to remove any stuck deteriorated o ring pieces and metal corrosion.Or sometimes small dabs of silicone are used to keep the thermostat from moving during installation. I have to do this on older F-150 where the thermostat is vertical and will slip down during installation. Two bb size dabs on the housing,place the thermostat, let it set and then it will not slip down.

I bet that you will get it fixed with the Ford thermostat, careful alignment and evenly applied low torque on the bolts. You may also want to lubricate the o ring with clean coolant so it wont stick and bind unless the package says otherwise.
 
OP
OP
Ruger

Ruger

FRF Addict
Joined
May 16, 2011
Posts
9,234
Reaction score
8,293
Location
Northern Nevada
@xtela, I think you're probably right. But there is no way to get the o-ring misaligned. You drop the thermostat into the pocket, push the o-ring down on top of it in the pocket, the pocket aligns it with no avenue for error, and you put the thermostat housing down on top of it. Also, having drained the radiator enough so that you don't get a gush of coolant from the upper hose and thermostat housing, the pocket remains full of coolant. There's no way to not lubricate it with coolant.

On that, the manual seems to suggest that the installation be done completely dry. After using the metal surface prep and the silicone gasket remover, there's no mention of lubing the o-ring with coolant. I lube the oil filter gasket when I install a new one, and the only thing that makes this different is that an oil filter turns as you make the seal and the thermostat o-ring doesn't turn and is compressed from above by a separate, non-turning part.

I'm thinking that I've been over-torqueing the bolts and causing the o-ring to deform. But there is no way to get a torque wrench in there. I've been turning the bolts until the housing snugs up against the block. I don't have an internet certified design engineer's calibrated fingertips. (hee-hee!)

I need a beer.
Correction, I need another beer.
 

MTF

FRF Addict
Joined
Nov 27, 2010
Posts
5,358
Reaction score
2,284
Location
Celebration, Florida
Ruger, I change my thermostat twice a year from 160 in the summer to 180 in the winter, I've been doing this for 6 years now.
Never had an issue, never replaced the bolts either.

I really think you need to get the correct rubber ring!!!

The o-ring does not sit on top of the thermostat, if you have the correct o-ring the thermostat sits inside the double lipped rubber ring.
The rubber ring is square along the edge and thermostat sits inside the groove to keep the o-ring from collapsing.
I have to remove this rubber and put in on the thermostat I will use.

I see many parts websites are showing non-Raptor 6.2L thermostats and plain o-ring, don't listen to them!!!
The non-Raptor 6.2L thermostat housing is different,
it has a lip that protrudes down to keep a regular o-ring for collapsing when the thermostat is close.
Makes sense, yes?

Take a look at xtela's diagram, he's showing a non Raptor engine and you can see the lip I'm talking about.
The Raptor has flat surfaces on both the head and the housing.

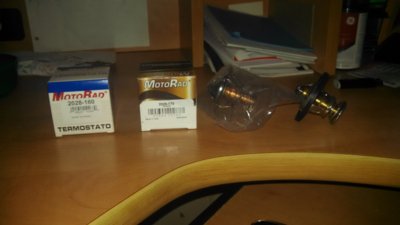
I bought these on Amazon, these are 1" opening high flows.

Look at the rubber ring on the one on the right. (Actual stock 195 thermostat and rubber ring!!!)
That is how it should be. This will make the correct height you need and keeps the rubber against the walls of the hole.
It's actually a little bit of a bitch to get the thermostat back in the hole.


Thermostats.jpg


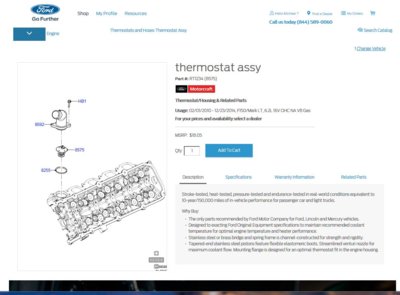
Ford owners parts website doesn't show it right either but that rubber ring is what you need #8255
Maybe the rubber comes with the assembly part# RT1234

thermostat 1.JPG
 
Last edited:
Top