KaiserM715
Kaiser Söze
I have been looking into doing the perch mod for quite a while. I had been debating between pulling the shock assembly and adjusting it on the truck. For a couple of reasons, I decided to give it a try on the truck. I followed the same method as JTRAX. I had a buddy come give me a hand, which definitely made the job easier.
I got a lot of good info from this thread:
http://www.fordraptorforum.com/f9/how-adjust-fox-shock-perch-height-level-front-6969/
Here is a list of tools I used:
1 x C clamp
1 x Strut compressor set (loaned from the auto parts store)
2 x 1/2" drive ratchets
2 x 3/4" or 19mm sockets
2 x 3/4" or 19mm wrenches
1 x 3/32" Allen key
1 x flat prybar
1 x external snap ring pliers
1 x can Boeshield spray
Rags
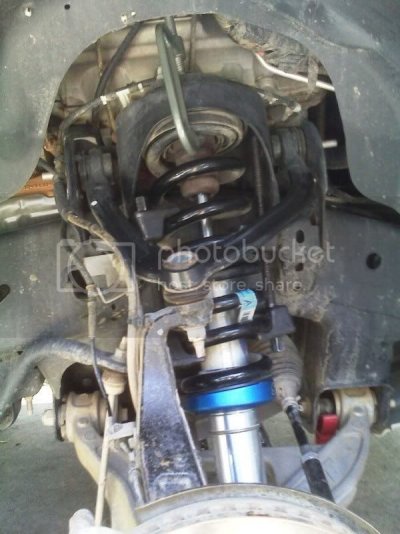
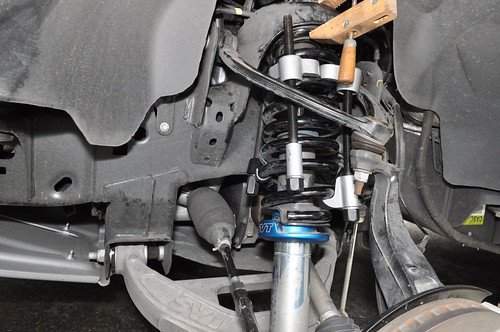
The first thing I did was get the truck up on jack stands and remove the wheels. I cleaned the suspension with soap, water and a brush (needed to remove some of the remaining evidence of the TRR!!). I placed a c-clamp to hold the spring up as it was compressed (as suggested by JTRAX). Then, I installed the strut compressors.

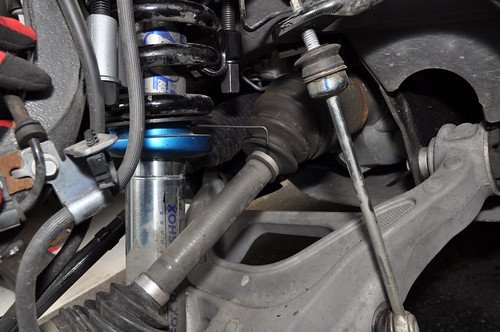
It is a little hard to see the second one in the pic. I took my time getting them situated. We cranked on them at the same time, until the spring was compressed to the point where the spring was loose. At that point, one of us would use the ratchet on one side while the other side was held with a wrench. Once we had clearance, we used the prybar to lift the black plastic liner off of the lower retainer. The set screw was oiled and removed. We compressed the spring until the lower retainer could be lifted clear of the second groove.
I used the snap ring pliers to open up the circlip and move it to the next groove. Then, the set screw was reinstalled and the removed the compressors using the same method as installation.
At each step, I cleaned everything up. I also sprayed the shock body with the Boeshield (as suggested by several folks). I was impressed with the coating it left on the shock and I am looking forward to seeing how it will hold up.
The results:
The front was raised about 1.25 inches. The front end went from about 4.24 inches of down travel to about 3 inches.
Comments:
It took my buddy and I about 1-1/2 hours. That 3/32" set screw is the only English fastener I have found on the truck. I know the top perch is very popular, but that would seem to leave only 1.75" of down travel, which doesn't seem like enough to me (my opinion). I also wish more of the frame was flat and level forward of the tranny mount, sure would make it easier to get both a jack and jack stand under the frame.
I will get it aligned (to the specs recommended by pirate air) and have the SPC camber kits installed on Monday.
For reference, here is the alignment thread:
http://www.fordraptorforum.com/f9/your-raptor-its-alignment-539/
I got a lot of good info from this thread:
http://www.fordraptorforum.com/f9/how-adjust-fox-shock-perch-height-level-front-6969/
Here is a list of tools I used:
1 x C clamp
1 x Strut compressor set (loaned from the auto parts store)
2 x 1/2" drive ratchets
2 x 3/4" or 19mm sockets
2 x 3/4" or 19mm wrenches
1 x 3/32" Allen key
1 x flat prybar
1 x external snap ring pliers
1 x can Boeshield spray
Rags
The first thing I did was get the truck up on jack stands and remove the wheels. I cleaned the suspension with soap, water and a brush (needed to remove some of the remaining evidence of the TRR!!). I placed a c-clamp to hold the spring up as it was compressed (as suggested by JTRAX). Then, I installed the strut compressors.

It is a little hard to see the second one in the pic. I took my time getting them situated. We cranked on them at the same time, until the spring was compressed to the point where the spring was loose. At that point, one of us would use the ratchet on one side while the other side was held with a wrench. Once we had clearance, we used the prybar to lift the black plastic liner off of the lower retainer. The set screw was oiled and removed. We compressed the spring until the lower retainer could be lifted clear of the second groove.
I used the snap ring pliers to open up the circlip and move it to the next groove. Then, the set screw was reinstalled and the removed the compressors using the same method as installation.
At each step, I cleaned everything up. I also sprayed the shock body with the Boeshield (as suggested by several folks). I was impressed with the coating it left on the shock and I am looking forward to seeing how it will hold up.
The results:
The front was raised about 1.25 inches. The front end went from about 4.24 inches of down travel to about 3 inches.
Comments:
It took my buddy and I about 1-1/2 hours. That 3/32" set screw is the only English fastener I have found on the truck. I know the top perch is very popular, but that would seem to leave only 1.75" of down travel, which doesn't seem like enough to me (my opinion). I also wish more of the frame was flat and level forward of the tranny mount, sure would make it easier to get both a jack and jack stand under the frame.
I will get it aligned (to the specs recommended by pirate air) and have the SPC camber kits installed on Monday.
For reference, here is the alignment thread:
http://www.fordraptorforum.com/f9/your-raptor-its-alignment-539/
Last edited:


