

canamds450
Full Access Member
- Joined
- Feb 20, 2014
- Posts
- 462
- Reaction score
- 80
hello sorry for the re post of the H&m racing design long travel kit, but i going to try to keep my installation process clean step by step.
-parts on the kit.
-installation process.
-issues with the kit on the installation process.
-pros and cons.
parts on the kit.
this kit comes with the next parts listed
- lower a arms +3" per side
- UCA with hem joints and UCA mounts.
- spindles.
- tie rods.
- axles
- limit straps with adjusters.
- bump stop cup holders.
making it 70% ARTR(almost ready to run) kit

you need to buy
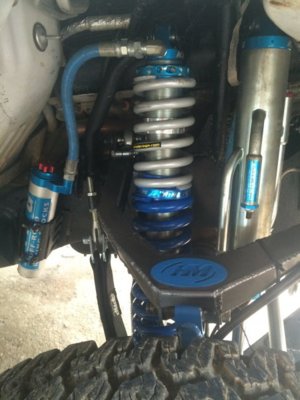
kings or fox shocks
3.0 bypass remote reservoir king shocks
2.5 coil on shocks remote reservoir with adjuster king shocks
2.5 bump stops kings
installation process.
installation manual that came on the kit is just a 15% of the process
it was a print of the angles at UCA mounts with some measures.
my first impression was that something was missing on the kit, when i realized that upper shock mount bucket was not included.
i called to h&m and they told me that i need to wipe out stocks upper shock mount
bucket to remake the new ones. i hold the project for a week took it on the garage sales section. after a week or so i decided to keep going with the installation, selling the kit was kind of difficult.
what helped me for the upper shock mount build was some pictures of outlaw off road pre runner picture section.
i gave a try to keep stocks shock mount bucket, but it was a crazy idea. i went at the right way.
after frame was cleaned, i called the vendor and he explained how to make it right with simple measures.
it takes to measure front cabin mount to front upper UCA pocket.
i measure the all i need and took all the angles with a pretty good tool that i got on amazon a digital angle very accurate.

called them and i got a close measure of collapse and compressed shock travel.
to make sure where upper shock mount bucket needed to be placed.

took me another week to make it done to get a pretty close reading of what they sent me on the pictures and tapped the mounts to make the mounts outside the vehicle and making sure all was measure correctly i welded into the frame.
took me a while to get all the info needed and calls emails ad the waiting keeps going. long story short.
it was a pain in the a$$ for the upper shock mount bucket.
the welder was inexperience on that kind of build, it took it almost 6 weeks to complete the installation. i applied the engineering and he applied welding. making a lot of correction in my behalf.
the cost of the installation i was $1200, was pretty hi.


pros and cons
what is cheap comes expensive.
the kit had a lot of issues.
i needed to remake misalignment spacer at my local lathe.

what i needed to remake.
- lower a arms to spindles spacer.
- outside tie rods spacer

- abs brackets did not come in the kit so i had to mod spindles in order to fit abs.

i forgot some others issues that i had, but fixed.
at the frame
-cutting the stock upper shock mount
bucket.

-you need to relocated the brake master pump a little bit forward in order to kit UCA front pocket.


- i was told i could use stocks rims, but luckily i had a 1.5" spacer to make rear axle a bit wide with the kit that i had to move 1.5" spacer to the front in order to make them fit.
you need aftermarket wheels for this kit. 17" with less offset.

- i had to cut lower a arms front pocket lids. to make lower a arms able to go a bit higher for more drop travel.
- your truck is going to be 92" wide at the front and 86" at the rear.
- only vendor who makes wider fender for that kit is glassworks 4.5" flare fenders.
i installed the sdhq +3" flare fenders.


pros
you will have a bad ass truck with 18" of suspension travel

one more time, it took me 6 weeks to complete the task.
i have not finish the fenders installation yet.
-parts on the kit.
-installation process.
-issues with the kit on the installation process.
-pros and cons.
parts on the kit.
this kit comes with the next parts listed
- lower a arms +3" per side
- UCA with hem joints and UCA mounts.
- spindles.
- tie rods.
- axles
- limit straps with adjusters.
- bump stop cup holders.
making it 70% ARTR(almost ready to run) kit
you need to buy
kings or fox shocks
3.0 bypass remote reservoir king shocks
2.5 coil on shocks remote reservoir with adjuster king shocks
2.5 bump stops kings
installation process.
installation manual that came on the kit is just a 15% of the process
it was a print of the angles at UCA mounts with some measures.
my first impression was that something was missing on the kit, when i realized that upper shock mount bucket was not included.
i called to h&m and they told me that i need to wipe out stocks upper shock mount
bucket to remake the new ones. i hold the project for a week took it on the garage sales section. after a week or so i decided to keep going with the installation, selling the kit was kind of difficult.
what helped me for the upper shock mount build was some pictures of outlaw off road pre runner picture section.
i gave a try to keep stocks shock mount bucket, but it was a crazy idea. i went at the right way.
after frame was cleaned, i called the vendor and he explained how to make it right with simple measures.
it takes to measure front cabin mount to front upper UCA pocket.
i measure the all i need and took all the angles with a pretty good tool that i got on amazon a digital angle very accurate.
called them and i got a close measure of collapse and compressed shock travel.
to make sure where upper shock mount bucket needed to be placed.
took me another week to make it done to get a pretty close reading of what they sent me on the pictures and tapped the mounts to make the mounts outside the vehicle and making sure all was measure correctly i welded into the frame.
took me a while to get all the info needed and calls emails ad the waiting keeps going. long story short.
it was a pain in the a$$ for the upper shock mount bucket.
the welder was inexperience on that kind of build, it took it almost 6 weeks to complete the installation. i applied the engineering and he applied welding. making a lot of correction in my behalf.
the cost of the installation i was $1200, was pretty hi.
pros and cons
what is cheap comes expensive.
the kit had a lot of issues.
i needed to remake misalignment spacer at my local lathe.
what i needed to remake.
- lower a arms to spindles spacer.
- outside tie rods spacer
- abs brackets did not come in the kit so i had to mod spindles in order to fit abs.
i forgot some others issues that i had, but fixed.
at the frame
-cutting the stock upper shock mount
bucket.
-you need to relocated the brake master pump a little bit forward in order to kit UCA front pocket.
- i was told i could use stocks rims, but luckily i had a 1.5" spacer to make rear axle a bit wide with the kit that i had to move 1.5" spacer to the front in order to make them fit.
you need aftermarket wheels for this kit. 17" with less offset.
- i had to cut lower a arms front pocket lids. to make lower a arms able to go a bit higher for more drop travel.
- your truck is going to be 92" wide at the front and 86" at the rear.
- only vendor who makes wider fender for that kit is glassworks 4.5" flare fenders.
i installed the sdhq +3" flare fenders.
pros
you will have a bad ass truck with 18" of suspension travel
one more time, it took me 6 weeks to complete the task.
i have not finish the fenders installation yet.
Last edited:
")


