Calling RPG Raceline Rear Owners -Vision X HD Solstice Install Help

Disclaimer: Links on this page pointing to Amazon, eBay and other sites may include affiliate code. If you click them and make a purchase, we may earn a small commission.

oxfordraptor

FRF Addict
Joined
Apr 11, 2013
Posts
2,660
Reaction score
2,524
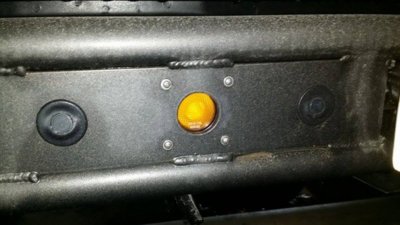
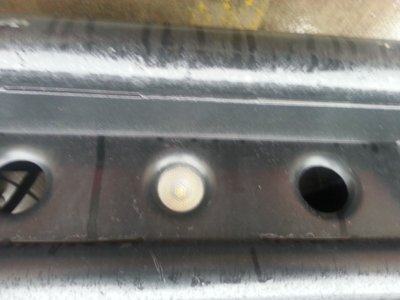
Ok so I have a RPG rear bumper and want to mount the Vision X HD Solstice lights I got from RPG to fit the holes. My question is how did you all mount these lights?

Working with these: 2.05" Solstice Solo - Vision X Lighting

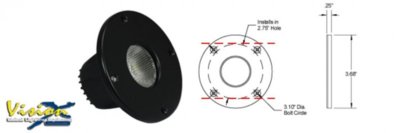
I saw this option Vision X Lighting Part XIL-SFLUSH - Solo Flush Mount Adapter - 4 Wheel Parts

But it seems the size is 3.68" for the outer cover and the space in the middle of the bumper is 3" so the cover would be too big. I also have seen pics of these lights mounted without the flush mount covers. Any pics or custom brackets, etc. would be greatly appreciated.

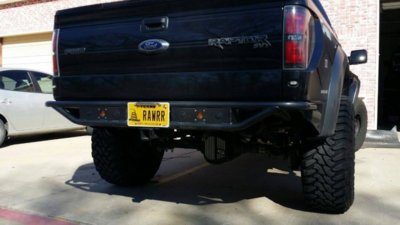
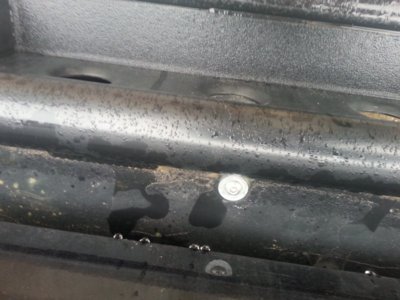
Looking to accomplish this:
IMG_0600_zpsccydcxd9.jpg
 

bradsmith

Full Access Member
Joined
Apr 14, 2013
Posts
79
Reaction score
33
Location
McKinney, TX
I have the Raceline with sensors. I purchased the Solstice Flushmounts from amazon (Amazon.com: Vision X XIL-SFLUSHS1101 Flush Mount for 2" Solstice Lights: Automotive)

I cut the top and bottom of the flush mount disc (along the red lines in the attached pic). Using the flushmount disc on the outside of the bumper, I marked 4 holes and used stainless hardware to secure it. In the pic, the lights are Amber. The Solstice lights come with a clear lens I tinted with transparent vinyl.
 

Attachments

  • 11025449_591454970999111_1849988972_o.jpg
    11025449_591454970999111_1849988972_o.jpg
    61.8 KB · Views: 186
  • 11039946_591463357664939_712835238_n.jpg
    11039946_591463357664939_712835238_n.jpg
    91.1 KB · Views: 149
  • VisionX Solstice Flushmount.jpg
    VisionX Solstice Flushmount.jpg
    20.6 KB · Views: 167

TMX Engineer

Supporting Vendor
Supporting Vendor
Joined
Jan 12, 2013
Posts
204
Reaction score
253
Here is how we did it. It works out so a little slotting of the bracket will allow to mount to the "step" surface. Sorry for the incredibly crappy pictures.
 

Attachments

  • 20150303_094130.jpg
    20150303_094130.jpg
    66.1 KB · Views: 136
  • 20150303_094133.jpg
    20150303_094133.jpg
    97.7 KB · Views: 119
  • 20150303_094310.jpg
    20150303_094310.jpg
    49.4 KB · Views: 123
OP
OP
oxfordraptor

oxfordraptor

FRF Addict
Joined
Apr 11, 2013
Posts
2,660
Reaction score
2,524
Awesome guys, I appreciate everything so far. This gives me some ideas. @Bigg50 any input you can provide big dog?

I have the bumper with sensors by the way and no step FYI.
 
Last edited:

Bigg50

FRF Addict
Joined
Dec 19, 2012
Posts
1,621
Reaction score
1,630
Location
Vallejo, CA
Mine don't sit flush against the whole. Probably about a half inch to inch back infact. The pic below is taken at a bad angle and makes it appear the light isn't lined up with the opening but it is.

There is a whole drilled through the top plate which they are fastened to.

16521765549_7580164142_b.jpgUntitled by Big5050, on Flickr

16706834982_63bff2c7c6_b.jpgUntitled by Big5050, on Flickr
 
OP
OP
oxfordraptor

oxfordraptor

FRF Addict
Joined
Apr 11, 2013
Posts
2,660
Reaction score
2,524
There is a whole drilled through the top plate which they are fastened to.

Did you use the provided mounting bracket or did you do something custom here? I haven't looked at this myself which might be my problem. I took it to 4 Wheel Parts over the weekend to have them install and run the wires (yeah I know being lazy). They called me and said if they use the bracket it won't hang low enough to line up with the holes.

@TMX Engineer did you all slot the mounting bracket vertically so it hung lower? Or was this a vertical slotting to move it closer to the holes towards the rear?
 
Top