Zombiekiller's "Donkey" build up

Disclaimer: Links on this page pointing to Amazon, eBay and other sites may include affiliate code. If you click them and make a purchase, we may earn a small commission.

Booth9999

Professional basket weaver level 7
Joined
Nov 19, 2017
Posts
1,890
Reaction score
823
Location
Idyllwild
I will take more pics this weekend if some of my parts show up in time to install them.

Anything that you are particularly interested in?

I am just about to install the RPG stage 3 and was curious to see a few pics of it installed on a gen 2. All I have seen seem to be gen 1

Also your bed set up, I am going with the rst18 setup in the future and was wo derringer how you were mounting your rotopax etc for Inspiration.

Also what makes you want to go with the new mid travel kit over the bolt kit?
 

Baja Designs

Supporting Vendor
Supporting Vendor
Joined
Apr 12, 2012
Posts
1,748
Reaction score
1,217
OP
OP
zombiekiller

zombiekiller

OG BooBooRunner
Joined
Sep 24, 2017
Posts
2,793
Reaction score
3,831
Location
New Orleans
quick update:

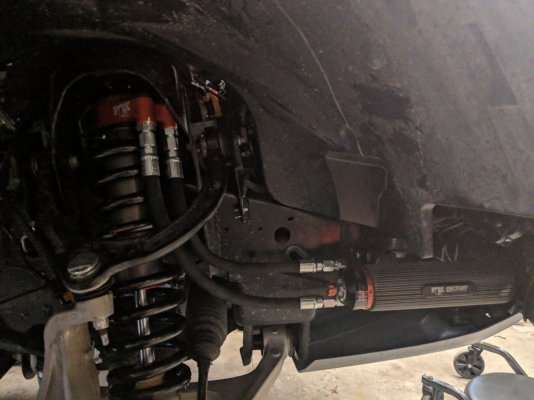
Ended up finding a solid deal on Fox DSC 3.0s for the front of the truck. Pulled the trigger this afternoon.

Yes, I'm going fox in lieu of kings because reasons.


Next up for parts orders with be a bunch of XL80s first, Then an RST18 + fox 3.5s w/ QAB to finish off the back.
 
OP
OP
zombiekiller

zombiekiller

OG BooBooRunner
Joined
Sep 24, 2017
Posts
2,793
Reaction score
3,831
Location
New Orleans
I am just about to install the RPG stage 3 and was curious to see a few pics of it installed on a gen 2. All I have seen seem to be gen 1

Also your bed set up, I am going with the rst18 setup in the future and was wo derringer how you were mounting your rotopax etc for Inspiration.

Also what makes you want to go with the new mid travel kit over the bolt kit?

I'm after more control and damping, not really a bunch of extra front travel.

I used the Builtright rotopax base mounts. The actual rotopax bases don't quite line up with the racks.

Mid travel + the RST18 setup will let you push the truck harder than you think. Going any further than that, it's time for back halfs and cages.

Plus, I honestly don't feel like widening the gate to my yard or widening my garage door to fit my now wider truck ( if I went bolt kit)

I also hate the way the deberti fenders and bedsides look.

I also don't really think that I want to drive from New Orleans to La Paz on 40s. :biggrin:
 

Booth9999

Professional basket weaver level 7
Joined
Nov 19, 2017
Posts
1,890
Reaction score
823
Location
Idyllwild
I'm after more control and damping, not really a bunch of extra front travel.

I used the Builtright rotopax base mounts. The actual rotopax bases don't quite line up with the racks.

Mid travel + the RST18 setup will let you push the truck harder than you think. Going any further than that, it's time for back halfs and cages.

Plus, I honestly don't feel like widening the gate to my yard or widening my garage door to fit my now wider truck ( if I went bolt kit)

I also hate the way the deberti fenders and bedsides look.

I also don't really think that I want to drive from New Orleans to La Paz on 40s. :biggrin:

10-4; is it required to run 40’s with the bolt kit? I plan on staying with the 35’s at the moment.
 
OP
OP
zombiekiller

zombiekiller

OG BooBooRunner
Joined
Sep 24, 2017
Posts
2,793
Reaction score
3,831
Location
New Orleans
10-4; is it required to run 40’s with the bolt kit? I plan on staying with the 35’s at the moment.

not required, but I think any gen2 would look pretty goofy with an RPG BOLT kit, +6 deberti fenders and 35" tires.

The bolt kit, in this scenario, would be the "cheap" part.

Add in another 6500-7K for coilovers & bypasses.

Add another 750 for bumps

Then add 1500 + shipping for the fenders and bedsides.

Then add another 3-4K for a solid body shop to install the fenders/bedsides, then paint.

then add $$$ for wheels that are the right size/offset.

Your bolt kit ends up being 6K or so...

The rest of the front setup will be $16K-ish with poor guy wheels.

Add a simple rear setup that is leaf spring/bypass rack/3.5s, and some 39s to round it out and you're in the range of $30-35K from cradle to completion, since I'm assuming at a minimum, someone would opt to upgrade the rear suspension to sort of match. I would tend to imagine that cages and other safety gear, plus some upgraded brakes to stop the truck with 39s/40s on it would be Apt too. That would mean you're probably adding another 5-8K.

Now we're at 43K on the high-ish side.


Just not my bag if you consider that for 45K...

I could buy a project truck, not feel bad about stripping away anything that I wasn't going to use for scrap...

then go full-on back-half, linked, LT, 500HP+, etc etc etc for the same price, if not less, depending on which truck platform i bought and if it had any work done yet.

There's a 72 F-150 with a fresh monster 514ci big block, beefy C6 and a 40 spline full floater 9" local to me for $6500. If I started there for a crazy, do-anything toy, I'd be all-in for less than $40K. 100% certain. and I wouldn't have to deal with not being able to use my raptor unless i was going to the desert, or the starbuck's drivethru speed bumps were too much for my daily.

:biggrin:


On the raptor project front, I ordered the BD lights that I'll need to complete my plan. I've been spending time building out my relay/junction box and wiring harness to make everything clean, easy to troubleshoot/understand, centralized and safe.

I am using a waterproof full-size pistol case (pelican style) to mount everything into it.

What is my plan for the electrical?

When I added the pro eagle jack to the bed, I didn't feel like I needed to keep the factory scissor jack in the truck anymore.

Removing this gives me space to mount my relay/junction box and my TK790H remote head radio behind the rear passenger seat in the cab.

I'll end up organizing my aux switches as: Racer spot, Spot, Driving, Wide, Chase, and Reverse.

The Factory Aux switches will be dedicated for lights.

For my relay box, I have a 6 position fuse panel inside of it. I have it wired to use 6 30 amp relays. these are wired to a 6 position marine fuse panel with blown fuse indicator lights.
Everything but positions 5 and 6 are fused with 30A fuses. positions 5&6 are fused at 15A.
(I do not plan to go nuts with chase or reverse lights. My supplemental cargo area lighting are rechargeable magnetic mount handhelds).

I'm using a 200A master SPST relay to control master power to the whole setup. Right now it is fused at 100A. It will be triggered by ignition power.

If I add additional draw/circuits to this setup, I have the master relay and fuse for it wired in modularly, so I can expand and either just use a more robust fuse, or replace the master relay and fuse easily.

I am going to wire the TK790H separately, on its own relay/fuse that will be triggered by a circuit that is tied to the Aux ignition function. the relay will be housed in the same junction box.

If I end up needing additional switches, I'd probably just pick up a switchpros rig and mount ( that replaces the sunglass holder), however, I'm only really contemplating onboard air, a roof lightbar, adding a single rear-facing blue LED and adding a single rear-facing green LED. (so I have the chase light requirement for different states ORV areas)

Those 4 additions don't really scream "spend 700 bucks on a fancy switch panel" to me though.

so far, I have about $150 into my whole wiring project. If i didnt have the aptitude, or I just wanted the easy button, I'd probably either just buy the painless wiring rig that performs a similar function, or a switchpros rig to wire it all.


The last few bits that I am waiting to be delivered are for the showme flasher that I'll be using for the chase lights. The little gadget cost me $40. I am wiring 2 power sources to the chase lights with heavy duty diodes. I'll tie the chase lights to a SPDT relay.

This will make it so in the relay's "off" position, The showme flasher will power the lights and will give me all my different pattern selection. When I flip the upfitter switch, The chase lights will now be on constant, as the spdt flips power from pin 87A to 87.

turn the upfitter switch back off and the chase lights will flash again until I power off the showme.

I am only undecided on whether to wire my front yellow s2 pros to the showme as well to have flashing pattern output front and rear.
 
Last edited:
OP
OP
zombiekiller

zombiekiller

OG BooBooRunner
Joined
Sep 24, 2017
Posts
2,793
Reaction score
3,831
Location
New Orleans
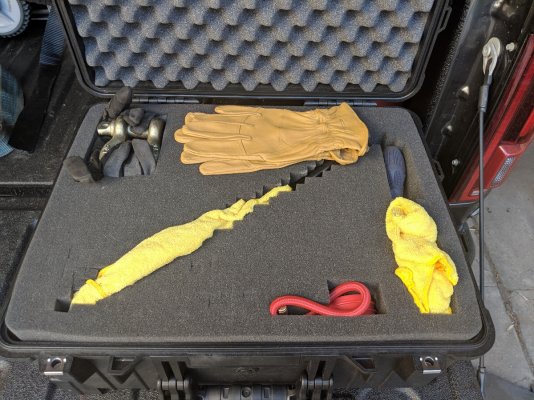
I had some time this afternoon, So I decided to fit my tools to the pelican 1560 case that I'll be using to secure them.

The case ends up being two layers of tools encased in thick foam, with a thin sheet on the bottom. I has some extra foam around from my rifle cases, so I also cut a piece to fit between the thick layers.

Inside the case is: a 20v 900ft/lbs on, 1100 ft/lbs off dewalt cordless impact with settings for 100 ft/lbs max, 400 ft/lbs max and 900 ft/lbs max.

I have a full 1/2" impact socket set, including the 27MM for the lower shock bolts. Hand tools include: 1/2" ratchet, 3/8" ratchet, various extensions for both, snips, pliers, adjustable wrenches, a few crescent wrenches. screwdrivers, spare fuses, picks, weatherpack terminal remover, mini weatherpack crimper, hacksaw blade, razor blades, gloves, lock pick kit, spare add a circuits, some spare wire, a lug wrench, key for locking lug nuts, a tire deflator, rages stuffed in to tighten up some of the free space. and some small samples of grease.

I left some extra room to add some Allen and Torx keys plus anything else that I can think of to complete it.
1DsZH26.jpg

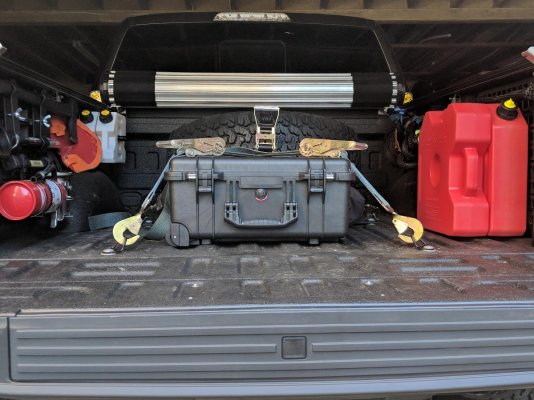
Here are a few shots of my bed setup as it will sit until I get a bypass rack installed and am ready to fab my own cargo rack system.
B0JnSuV.jpg

You can see in the pic that when the cover is rolled up, you can still see my chase lights from the rear.

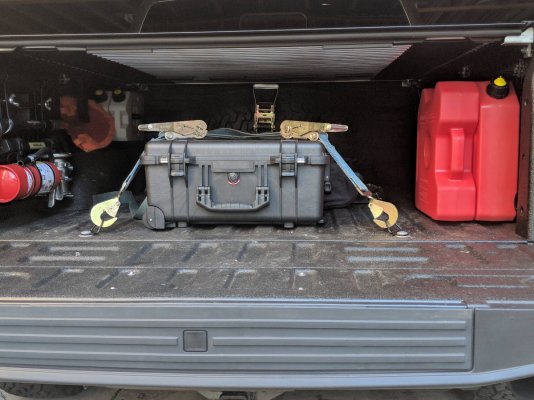
and with the cover down.
S8GRQFU.jpg

The plan is to be able to pack 2 spares, a cooler, my tools, a power tank, proeagle big wheel jack, and a suitcase or 2 in the back with the cover down. it will be a little tight, but i think i have my design hashed out.

the proeagle jack is currently sitting between the spare and the tool case. The rear facing side of the tire is elevated by and 8" tall riser that I made. There is a triangular metal bar that runs side to side that is held down by the center bed bolts. This bar has a 3/8" steel plate welded to it that the proeagle cradle mounts to. I added a tab to the bar to function as the mount point for the tire Y strap.
 
Last edited:

dude1782

FRF Addict
Joined
Sep 2, 2016
Posts
1,381
Reaction score
1,176
Location
PHX, AZ/SLO, CA
Plus, I honestly don't feel like widening the gate to my yard or widening my garage door to fit my now wider truck ( if I went bolt kit)

I also hate the way the deberti fenders and bedsides look.

Mid travel doesn't require the enormous fiberwerx fiberglass, they're just the only ones out right now. They were designed for a truck with long travel, 39s, and -12 offset wheels to tuck with the increased up travel it had. People then used them to fit ridiculous tires on mid travel kits.

Whenever some +2-4s come out, the RPG BOLT or whatever other mid travel kit with 37s and 0ish offset wheels would probably tuck because they do not increase up travel. They just need to allow for increased width, offset, and 37" tires. Just wanted to clear that up.

Not wanting to widen your gate and garage is a legitimate reason. Combining the strength of stock width kits and the power of bypass shocks does allow for a lot more control and they can really take a beating.
 
OP
OP
zombiekiller

zombiekiller

OG BooBooRunner
Joined
Sep 24, 2017
Posts
2,793
Reaction score
3,831
Location
New Orleans
Mid travel doesn't require the enormous fiberwerx fiberglass, they're just the only ones out right now. They were designed for a truck with long travel, 39s, and -12 offset wheels to tuck with the increased up travel it had. People then used them to fit ridiculous tires on mid travel kits.

Whenever some +2-4s come out, the RPG BOLT or whatever other mid travel kit with 37s and 0ish offset wheels would probably tuck because they do not increase up travel. They just need to allow for increased width, offset, and 37" tires. Just wanted to clear that up.

Not wanting to widen your gate and garage is a legitimate reason. Combining the strength of stock width kits and the power of bypass shocks does allow for a lot more control and they can really take a beating.

yeah. I could swing +2s and not have to do house and gate mods to support them. I may end up going that route eventually. a 92" track width with fenders to match would run me about 10K in supporting house modz, so that's out unless i move.


Oh as an update to the build, these happened today...

kp4kTnB.jpg

BUT, I'm an idiot because I forgot to order a spanner wrench and backup wrench for 3.0s. I have 6 freaking different spanner wrenches in my toolbox, none of them fit.

The ride height as it sits now is about 3/8" front high with all of my current off-road stuff in the bed. This means that The new fox shocks bring the front end up 7/8" from where the RPG adjustable collars set at 2.5" had me.

It is a little crazy to me how much extra tire clearance that 7/8" gives the tires. If the truck was a street queen only, I don't think I would have had to trim any plastic.

I still need to add an additional spare, a full cooler and probably an additional human to the truck for it to mimic how I'll run in the sand.

So, with that being said, I'm going to pull the 1" lowering shackles off the truck and replace them with camburg Tig shackles.

I will probably end up bringing the front down 3/8" or so as well. I'm going to wait to adjust them until i get the bypass rack done and two spares in the truck.

I'm hoping to get my radio installed and all of my redone wiring finished before the end of the week. I kind of hate having boxes of parts sitting in my home office staring at me. :)
 
Top