What did u do to your raptor today?

Disclaimer: Links on this page pointing to Amazon, eBay and other sites may include affiliate code. If you click them and make a purchase, we may earn a small commission.

CoronaRaptor

FRF Addict
Joined
Dec 17, 2012
Posts
28,961
Reaction score
31,173
Location
CANADA
Was working the rear suspension and found out that one of the leafs were broken. ********, thats something you don't want to find when you live other side of pond :mad:
Well i might be first one to have bypass rack and stock leafs :ROFLJest:
Damn!!!!
 

Ditchplains1

FRF Addict
Joined
Sep 4, 2013
Posts
1,243
Reaction score
960
Location
Trescott, ME
Did the fuse 27 to 70 change. After reading about the many with burned 27 fuses I went out and sure enough my 27 fuse was brown on one side. I flipped the fuse around and reinserted it.
Went online to Tasca, and ordered the part $12, and 3 days later it arrived. Read through the instructions and in about 1/2 hour was done. I only needed to unwrap the drivers side of the power distribution block and was then able to rotate if back enough to be sure I had the correct Blue/Red wire...I think I saw at least 4 with the same color combination.
I did change the procedure a bit. Instead of clipping the wire and sealing the end with one of the two provided shrink wrap sections, I simply pulled the wire out of the box, thereby preventing the possibility of the end shorting. It also gave me and extra 1 to 2 inches of wire. I backed out the wire from the birds nest of wires that inhabit the underside of the power distribution block, giving ample surplus to solder. I always use newspaper to catch the solder drippings, thereby decreasing the risk of shorting if I had used aluminum foil. (Of course both leads were off the battery, but with a stiff breeze the aluminum foil might have arced across the terminals...well not really as they were both covered with electrical tape....)
Taking my time I'd say it took about 30 minutes of steady work. Of course my Newfoundland wanted to play so it really took about 2 and a half hours..
Started right up, no codes, all the electronics appear to be working.

NOTE: The power distribution box is cradled in a cast aluminum, (Magnesium?), saddle. The upper arms are extremely thin, and I broke the passengers side rear post. After putting everything back together there is no play. I'll wrap the entire box to the saddle with a big Zip tie, (as soon as I get one), just to be sure.
Eddie
 

Dutch451

Full Access Member
Joined
Aug 31, 2015
Posts
125
Reaction score
111
Location
Madison, WI
Gotta ask, What is a bumper balance strip?


Oops, typo, should be Valance strip, Rappy Graphics sells them t continue the black down the entire front if you do a hood wrap. I bought the piece when I got my wrap, just never put it on, now I'm just tired of having a roll of black vinyl moving from shelf to shelf in my house waiting to be stuck on.

https://rappygraphics.com/collections/gen-1-products/products/matte-black-bumper-strip


Sent from my iPhone using Tapatalk

---------- Post added at 07:36 PM ---------- Previous post was at 07:33 PM ----------

Did the fuse 27 to 70 change. After reading about the many with burned 27 fuses I went out and sure enough my 27 fuse was brown on one side. I flipped the fuse around and reinserted it.
Went online to Tasca, and ordered the part $12, and 3 days later it arrived. Read through the instructions and in about 1/2 hour was done. I only needed to unwrap the drivers side of the power distribution block and was then able to rotate if back enough to be sure I had the correct Blue/Red wire...I think I saw at least 4 with the same color combination.
I did change the procedure a bit. Instead of clipping the wire and sealing the end with one of the two provided shrink wrap sections, I simply pulled the wire out of the box, thereby preventing the possibility of the end shorting. It also gave me and extra 1 to 2 inches of wire. I backed out the wire from the birds nest of wires that inhabit the underside of the power distribution block, giving ample surplus to solder. I always use newspaper to catch the solder drippings, thereby decreasing the risk of shorting if I had used aluminum foil. (Of course both leads were off the battery, but with a stiff breeze the aluminum foil might have arced across the terminals...well not really as they were both covered with electrical tape....)
Taking my time I'd say it took about 30 minutes of steady work. Of course my Newfoundland wanted to play so it really took about 2 and a half hours..
Started right up, no codes, all the electronics appear to be working.

NOTE: The power distribution box is cradled in a cast aluminum, (Magnesium?), saddle. The upper arms are extremely thin, and I broke the passengers side rear post. After putting everything back together there is no play. I'll wrap the entire box to the saddle with a big Zip tie, (as soon as I get one), just to be sure.
Eddie


Damn, I forgot I gotta do this too, lol... already bought it, just been super lazy lately. My truck sat parked for 2 months because I didn't want to do the brakes, finally did them now I'm all motivated to do all the small things I've been meaning to do for the last year.


Sent from my iPhone using Tapatalk
 

Aaron

Meme Corps Commandant
Joined
Jun 13, 2011
Posts
13,097
Reaction score
7,473
Location
WA
Old being stock? Take it Travis convinced you to go this route?

Old being stock, then modified stock. Yeah, Travis talked me into it, but I didn't need much convincing, I've been down to ADS and seen the internals and also seen the internals that came out of trophy truck shocks that were in for a rebuild. Very, very impressive.
 

John813

FRF Addict
Joined
Feb 2, 2015
Posts
1,024
Reaction score
711
Location
PSL/Jupiter
Going to be a guinea pig for the Cooper MTPs(from what I can tell).

Stuck between 35's or 315s. Want to get them installed before hitting the trails this weekend.
 

ogdobber

FRF Addict
Joined
Feb 9, 2017
Posts
1,154
Reaction score
1,558
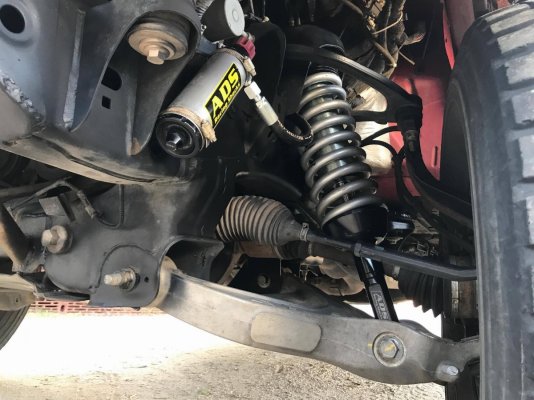
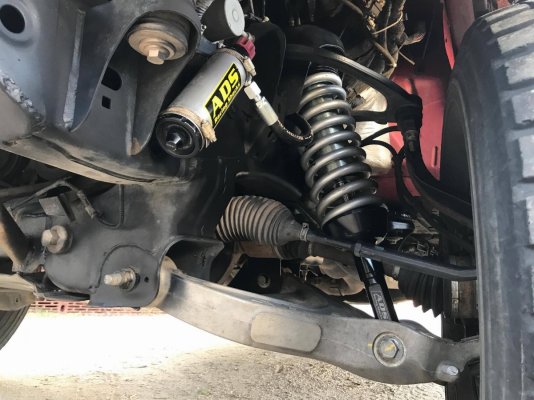
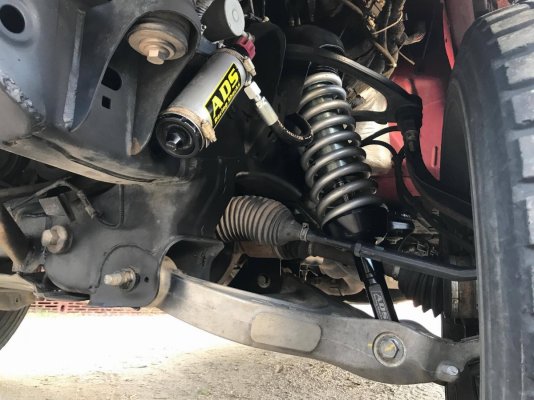
Got some new shocks installed. These things are such an insane improvement over my old ones.

q0ZKfba.jpg


Did you get the kit? Front and rear?
Also on the front i take it they aren't height adjustable... So my question is would you say they sit "mid perch", "top", or higher?


Sent from my iPhone using Tapatalk Pro
 

Aaron

Meme Corps Commandant
Joined
Jun 13, 2011
Posts
13,097
Reaction score
7,473
Location
WA
Did you get the kit? Front and rear?
Also on the front i take it they aren't height adjustable... So my question is would you say they sit "mid perch", "top", or higher?


Sent from my iPhone using Tapatalk Pro

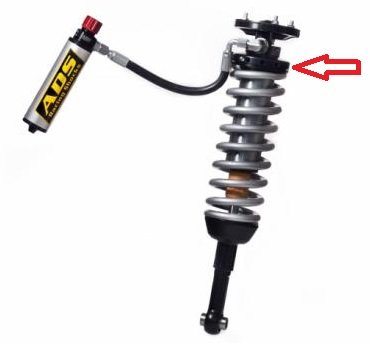
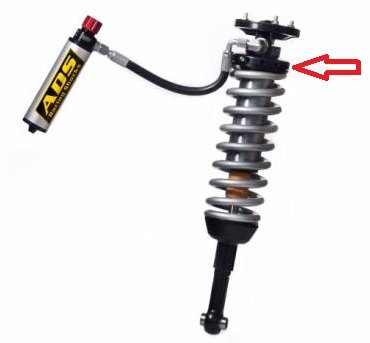
They are adjustable just like the other aftermarket options, but they sit really close to 'top perch' with the adjustment collar almost all the way at the top. So there was no need to crank them at all. I may go back and put another inch or so in just for the look of it. Here's a pic that shows the adjustment ring

zuKMZpv.jpg

I just did the fronts for now, saving to go spring under and bypass rack in the rear eventually.
 
D

Deleted member 12951

Guest
They are adjustable just like the other aftermarket options, but they sit really close to 'top perch' with the adjustment collar almost all the way at the top. So there was no need to crank them at all. I may go back and put another inch or so in just for the look of it. Here's a pic that shows the adjustment ring

zuKMZpv.jpg

I just did the fronts for now, saving to go spring under and bypass rack in the rear eventually.


So out of the box, lowest setting is basically top perch and if you adjust them then it goes even higher? Issues with CV's then with these ADS's?
 
Top