After receiving multiple inquiries about installation, I've taken a stab a putting together some installation instructions/recommendations. These will continue to evolve as I receive feedback from customers but for now I hope this helps.
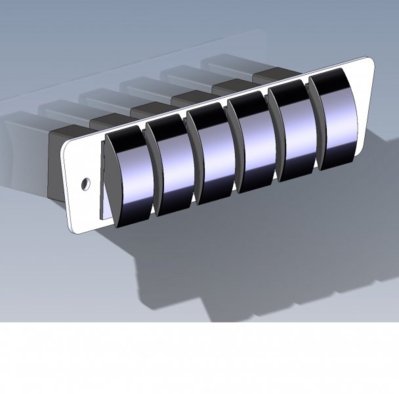
Installation Suggestions for Crown Offroad’s Aux Switch Panel:
1) Remove the sunglass holder/overhead plastic console. Open the sunglass holder tray. Place both thumbs on the inside of the compartment while using your fingers to pull straight down on the plastic assembly. Pull hard as there are multiple clips holding this in place (no screws or bolts to remove). Recommend completely unplugging it and setting it aside.
2) Once the overhead plastic assembly is removed, you can remove the two small black screws that hold the plastic base (mounted to the roof of your vehicle almost directly over the top of the rearview mirror) in place where the sunglass holder attaches to. This will allow you to move the plastic base around and provide greater access to run any wiring.
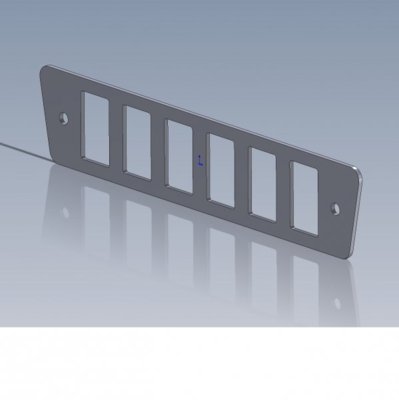
3) Remove the switches from the switch panel. Align the switch panel on the headliner in desired position. Trace holes using a sharpie or something similar from switch panel to headliner material. This will give you an approximate area that will need to be cut out to allow the switches to fit into the headliner. You can drill six individual holes; however it is recommended that you cut out an entire rectangle to allow more room for installation and running wires. Translation: a larger opening in the headliner will create less frustration.
4) Use a sharp utility knife to carefully cut the headliner material and thin layer of padding underneath the headliner material. This will prevent any unnecessary pulling, stretching, catching, tearing, etc of the fabric by your cutting tool. Once this fabric and padding is removed, a tool such as a Dremel can be utilized to carefully remove the plastic housing where the switches and wiring will reside. *Note, there are numerous ways to physically bolt the switch panel in. It is recommended that you only remove the plastic/headliner material directly behind the switches themselves. This will allow you to drill pilot holes directly through the headliner and into the plastic behind the headliner for the mounting bolts to screw into (mounting bolts provided with switch panel) whereby securing the switch panel down.
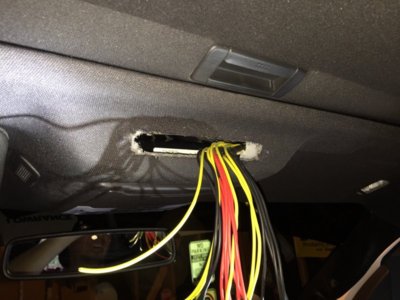
5) Headliner: you do not need to remove your headliner to run wires and install the switch panel. By removing the weather stripping on the door, removing the A pillar cover, removing the vanity mirror and loosening the overhead console, you are able to manipulate the headliner away from the roof enough to snake the wires up the A pillar and over to where the new switch panel will reside.
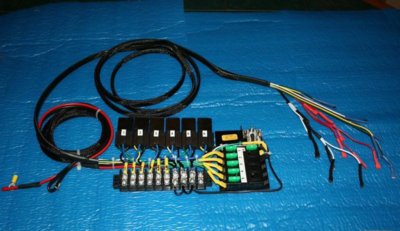
6) Wiring: There are numerous methods for wiring these into your vehicle. It is Crown Offroad’s suggestion that you run a single power, a single ground and then your six accessory wires up the passenger side of the vehicle. 18 gauge wire is ideal, 16 gauge will work but it is a tight fit. Recommend using electrical tape to secure wires together as zip ties or wire loom is too bulky. Note: due to low power consumption of LED switches, you are able to either daisy chain the power and ground or create six individual lead wires off of each power and ground to run to the individual switches.
7) Take your time! An unsteady or impatient hand can easily lead to a rip, tear or worse in your headliner. This project is not difficult, but does require some patience.
8) Distribution blocks, fuses and relays: there are numerous ‘do it yourself’ threads on the forum for adding additional switches. There are also kits such as the SPOD setup that takes care of most of this for you. Again, there are numerous options out there to complete this installation pick the one that best suits your preference.
9). Connect wires to switches, secure aux switch panel to headliner using provided hardware, reinstall the overhead console, the vanity mirror, A pillar cover and weather stripping.
10) Drink a beer or adult beverage of your choice and commence playing with switches.
If you get stuck, have issues or want to discuss how much fun it is to play with a total of 10 aux switches in your vehicle, call Chris at 480.620.3183.


")