How To DIY Painted Edges on Taillights

Disclaimer: Links on this page pointing to Amazon, eBay and other sites may include affiliate code. If you click them and make a purchase, we may earn a small commission.

never_summer

Active Member
Joined
Feb 12, 2015
Posts
53
Reaction score
16
I thought I was going to screw it up, mainly because I'm horrible at painting. Said screw it and if I messed it up id just get them tinted at my buddies shop. Well it really wasn't all that bad and Schmitty seems to have come up with a way better approach then what I attempted!
 

Nick@Apollo-Optics

Supporting Vendor
Supporting Vendor
Joined
Apr 3, 2011
Posts
7,412
Reaction score
3,071
Location
Houston, TX
Well guys, I'm going to try to pull this mod off this weekend. I found a squeeze bottle with a 20 gauge metal application tip. O after a thorough cleaning, I'm hoping this will be able to get in their easily. I was hoping to find the plastic pipettes posted above, but this was the best they had. Anyway, looking forward to testing this out as it'll be the cheapest mod on my truck so far [emoji23]

3f5833b6098260a19aeb207d794b8c23.jpg
 

Bigdog44SVT

Full Access Member
Joined
Sep 22, 2013
Posts
114
Reaction score
43
Location
SW Ohio
So I decided to give this a run. Bought some Ford Tuxedo black off of Amazon and a few paint brushes. A couple hours later and boom! Love it. This is a huge upgrade in looks. Glad you guys posted this's
 

Attachments

  • image.jpg
    image.jpg
    67.7 KB · Views: 144

jschell1309

Full Access Member
Joined
Jul 4, 2015
Posts
151
Reaction score
142
Location
STL
Well guys, I'm going to try to pull this mod off this weekend. I found a squeeze bottle with a 20 gauge metal application tip. O after a thorough cleaning, I'm hoping this will be able to get in their easily. I was hoping to find the plastic pipettes posted above, but this was the best they had. Anyway, looking forward to testing this out as it'll be the cheapest mod on my truck so far [emoji23]

3f5833b6098260a19aeb207d794b8c23.jpg


How did this turn out with the bottle and acrylic paint? Make it easier? Holding up ok to the elements and moisture? I got dragged to hobby lobby by the woman and figured I'd pick up some stuff to try on the lights.
 

Floyd91

Full Access Member
Joined
Oct 10, 2014
Posts
336
Reaction score
198
I couldn't get the paint to stick on mine so I ended up filling them in with black rtv. Made it 100x easier and filled everything perfectly.
 

jschell1309

Full Access Member
Joined
Jul 4, 2015
Posts
151
Reaction score
142
Location
STL
Decided to give this a go this weekend. Worst case I'm out ~$100 if I royally ****** it up. Bought the same stuff that @Nick@Apollo-Optics has pictures above from hobby lobby. I read through most of the other forum thread that was linked here and decided to pick up the black RTV gasket to seal the paint in as well. Acrylic is a pretty tough paint but these cracks accumulate a ton of dirt and water.

The biggest pain in the ass of this is chipping out the old glue/melted plastic from when the lights were assembled at the factory. That shit was tough and a bitch to remove from the tiny crack. Biggest thing for a nice finish is prep work so I took my time to remove every little piece with a box cutting blade.

Loaded up the fine tip bottle with the glossy black acrylic paint and just injected all around the opening making sure it bled all the way down to the edge. Then followed that around with a stiff bristle brush to paint the easy to reach surfaces. This applicator made the tail gate edge super easy to fill in. Overall I put in 3 total coats of paint with the applicator and brush. Two bottles is enough for 4-5 coats but I called it good.

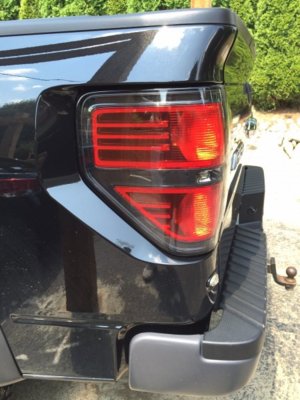
Once all coats dried overnight I followed it around with an initial layer of black RTV. I used the brush to press it all down deep into the crack and spread it out. I followed that with a thick 1/8th bead all the way around and smoothed it out with my finger. Both lights now have a continuous rubber seal over the paint. Hopefully this will make it last for the life of the truck. Pictures below show the final layer of RTV. I don't have any of the process as I was just focused on doing it clean with no problems. Waiting for this gasket to dry then will install.

YOX7afj.jpg
B7utO0Q.jpg
hzZ56yk.jpg
570xAEt.jpg
gulCCpN.jpg
nhRvKmD.jpg
 
Last edited:

Nick@Apollo-Optics

Supporting Vendor
Supporting Vendor
Joined
Apr 3, 2011
Posts
7,412
Reaction score
3,071
Location
Houston, TX
@jschell1309 I just saw this thread. Sorry I didn't get back to you. Truth is, I haven't done this project yet; just haven't found the time. I'm glad it worked out well for you and hopefully this can motivate me to get it done soon! Post pics once you get the lights finalized!
 

jschell1309

Full Access Member
Joined
Jul 4, 2015
Posts
151
Reaction score
142
Location
STL
No big deal Nick, figured I'd give it a go. Just installed them and cleaned the truck up. Night and day difference, blends so much better now with the black. Tough to get a good picture as the sun was setting and was away from the lights.

xKIS25Ah.jpg
HAffunbh.jpg
cSWBAW7h.jpg
TOpJatVh.jpg
AAjiBt8h.jpg
PWBtuFkh.jpg
 
Last edited:

Palerider

Full Access Member
Joined
Feb 13, 2015
Posts
499
Reaction score
468
Finally found this thread again!

Sent from my SM-G925V using Tapatalk
 
Top