Al Bastaki
Member
- Joined
- Aug 31, 2012
- Posts
- 39
- Reaction score
- 1
I used the following;
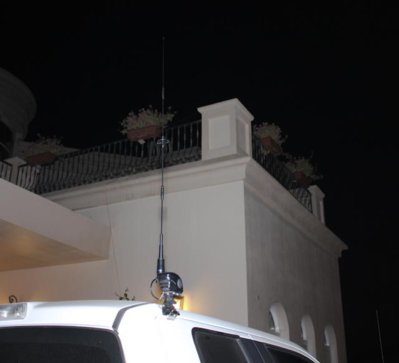
1 x CA-2x4SR Comet Dual Band Antenna
1 x KRS Diamond Roofside Gutter Mount Bracket (KRS)
1 x Comet RS-720/RS-720NMO Lip Mount
1 x K9000 Diamond Motor Driven Antenna Mount (Requires KRS or KRR or (K9000)
1 x Icom 2820H Dual Band Radio VHF/UHF Radio.
Step 1. Setting up the radio for FRS transmission + receive.
The icom 2820h came with a limited tx/rx.. so i couldn't do FRS channels... the radio was limited to 450mhz... i needed 460+ to do that... Here's the mod on youtube:
Icom 2820 Expanded Tx/Rx Mod How To - YouTube
Step 2. The Motorized mount.
I managed to use the comet lip mount and attached the diamond motor to it by using an extra or rather the half of the diamond roofside krs mount, The diamond motor mount allows me to level/retract the antenna as I please.
The motor mount's power was plugged into my center armrests cigar plug. and the wiring all hid underneath the console... which is all too easy and straight forward as raptor's parts can be pretty much pulled by a slight pull... and some easy cross screws unscrewed. a no brainer. and off i hid all the wires.. and voila.
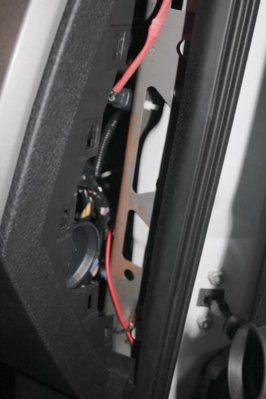
I hooked up the motor and new hybrid mount setup on my rear cab's door... the reason why I picked that place over the trunk is to basically;
1. Reduce SWR bumped off my car.
2. not harm anyone as i tx/rx.. and no one accidentally touching the antenna while i transmit.
3. i dont like the antenna coming down as i open the trunk's door.
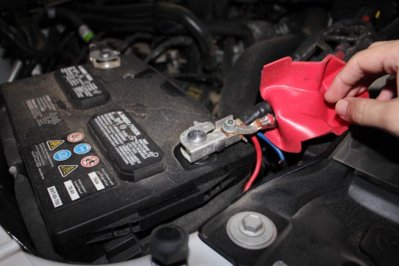
With the mount installed... it was about time i took the power from the battery and straight to the radio head.
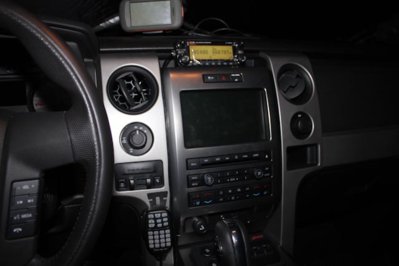
Step 3. Installing the radio.
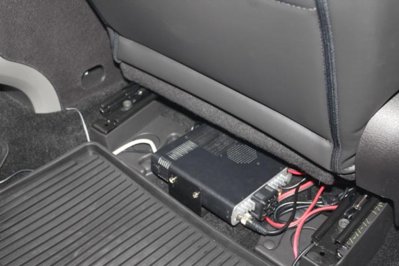
This is a no brainer. wired the Red cable to the red side of the battery.. off i pulled it right into the car's cabin and hid it underneath the plastic rail and placed the radio underneath the front passenger seat. The earth cable i litterally unbolted one of the metallic screws hidden in the vent box, placed the earth cable on the screw.. and screwed the screw back in. Then, Powered the baby, then i attached the antenna cable to my radio head.
To extend the mic, i used a standard cat6 ethernet cable and used a female to female adapter to attach both the cat6 cable and the mic together.
hid the cables underneath the seats.
I mounted my radio underneath the passenger seat because of ventilation, the radio gets prettttyyy hot.. and placing it underneath the rear sab seats is a no-no... as mine almost fried. the thing needs to be cool.. so unless you live in a cool country. i strongly advise that you keep your radio in a cool well ventillated place.
now all thats left is pretty much lift the center console's cover, hide the reader's wiring and done. I placed my mic near the steering for ease of access.
The reader (that has all the numbers)... i placed a double sided 3m tape onto its belly and attached it to where you can see on the top of my dash.
Smoothies.
1 x CA-2x4SR Comet Dual Band Antenna
1 x KRS Diamond Roofside Gutter Mount Bracket (KRS)
1 x Comet RS-720/RS-720NMO Lip Mount
1 x K9000 Diamond Motor Driven Antenna Mount (Requires KRS or KRR or (K9000)
1 x Icom 2820H Dual Band Radio VHF/UHF Radio.
Step 1. Setting up the radio for FRS transmission + receive.
The icom 2820h came with a limited tx/rx.. so i couldn't do FRS channels... the radio was limited to 450mhz... i needed 460+ to do that... Here's the mod on youtube:
Icom 2820 Expanded Tx/Rx Mod How To - YouTube
Step 2. The Motorized mount.
I managed to use the comet lip mount and attached the diamond motor to it by using an extra or rather the half of the diamond roofside krs mount, The diamond motor mount allows me to level/retract the antenna as I please.
The motor mount's power was plugged into my center armrests cigar plug. and the wiring all hid underneath the console... which is all too easy and straight forward as raptor's parts can be pretty much pulled by a slight pull... and some easy cross screws unscrewed. a no brainer. and off i hid all the wires.. and voila.
I hooked up the motor and new hybrid mount setup on my rear cab's door... the reason why I picked that place over the trunk is to basically;
1. Reduce SWR bumped off my car.
2. not harm anyone as i tx/rx.. and no one accidentally touching the antenna while i transmit.
3. i dont like the antenna coming down as i open the trunk's door.
With the mount installed... it was about time i took the power from the battery and straight to the radio head.
Step 3. Installing the radio.
This is a no brainer. wired the Red cable to the red side of the battery.. off i pulled it right into the car's cabin and hid it underneath the plastic rail and placed the radio underneath the front passenger seat. The earth cable i litterally unbolted one of the metallic screws hidden in the vent box, placed the earth cable on the screw.. and screwed the screw back in. Then, Powered the baby, then i attached the antenna cable to my radio head.
To extend the mic, i used a standard cat6 ethernet cable and used a female to female adapter to attach both the cat6 cable and the mic together.
hid the cables underneath the seats.
I mounted my radio underneath the passenger seat because of ventilation, the radio gets prettttyyy hot.. and placing it underneath the rear sab seats is a no-no... as mine almost fried. the thing needs to be cool.. so unless you live in a cool country. i strongly advise that you keep your radio in a cool well ventillated place.
now all thats left is pretty much lift the center console's cover, hide the reader's wiring and done. I placed my mic near the steering for ease of access.
The reader (that has all the numbers)... i placed a double sided 3m tape onto its belly and attached it to where you can see on the top of my dash.
Smoothies.