So I'm not sure if you guys have ever experienced issues like this, but I've seen threads of how people would have issues with the "Hill Descent Control Fault" popping up on their dashes randomly and how others would tell them to just clean their high mount brake light. Well I haven't really seen any step by step instructions on how to fix the issue. So as my good deed for the week, I've decided to post a step by step instructions list of how I repaired mine. 
So like everyone has stated in threads from the past.... The issue for the hill descent control fault popping up on the dash was due to moisture in the high mount brake light. Mine only happened after a heavy rainstorm. So after a week of rain, I got tired of seeing it pop up every time I started the truck, and not having the ability to utilize my cruise control... So here we go!!!
So this is usually what I would see every time I got in the truck and started it... (ignore the engine light... Already fixed it... Just a faulty thermostat that needed replaced)
.jpg")
First I started by unscrewing the two phillips head screws holding the high mount on to the cab (in the picture you can see the moisture build up in the light).

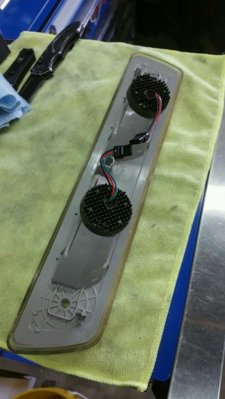
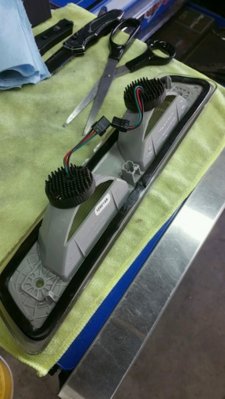
After removing the screws, it'll pull right off. On the back you can see there's two light bulb connectors (each side) and one LED connection (on the center). To remove the light bulbs, just twist the bulbs a half turn and they will pop right off.

Here is a close up on the LED connector. There's a little tab on the bottom of the connector you have to push in, in order to remove the connector.

After removing the light bulbs and the LED connector, I was able to fully remove the light from the cab and blow it out with the air compressor and let it sit and dry out in the house. Afterwards I sealed the openings with loctite waterproof silicone sealant and let it fully cure so that it doesn't peel off onto the truck.


After drying it out and sealing all the openings, it was ready to be mounted back on to the truck!

So far its been a month since I've fixed this issue and I haven't gotten that problem pop back up! So as for right now I believe it's working!
Hope that this thread has helped you a lot of you how to fix the same issues that you may be having with your raptors! It's a really simple fix and probably took me an hour to do. 45 minutes of it was just to let it air out, seal, and let the sealant cure.
This is my first thread on this site so hope that I have done well enough for you guys to appreciate the post. Thanks guys!

So like everyone has stated in threads from the past.... The issue for the hill descent control fault popping up on the dash was due to moisture in the high mount brake light. Mine only happened after a heavy rainstorm. So after a week of rain, I got tired of seeing it pop up every time I started the truck, and not having the ability to utilize my cruise control... So here we go!!!
So this is usually what I would see every time I got in the truck and started it... (ignore the engine light... Already fixed it... Just a faulty thermostat that needed replaced)
First I started by unscrewing the two phillips head screws holding the high mount on to the cab (in the picture you can see the moisture build up in the light).
After removing the screws, it'll pull right off. On the back you can see there's two light bulb connectors (each side) and one LED connection (on the center). To remove the light bulbs, just twist the bulbs a half turn and they will pop right off.
Here is a close up on the LED connector. There's a little tab on the bottom of the connector you have to push in, in order to remove the connector.
After removing the light bulbs and the LED connector, I was able to fully remove the light from the cab and blow it out with the air compressor and let it sit and dry out in the house. Afterwards I sealed the openings with loctite waterproof silicone sealant and let it fully cure so that it doesn't peel off onto the truck.
After drying it out and sealing all the openings, it was ready to be mounted back on to the truck!
So far its been a month since I've fixed this issue and I haven't gotten that problem pop back up! So as for right now I believe it's working!
Hope that this thread has helped you a lot of you how to fix the same issues that you may be having with your raptors! It's a really simple fix and probably took me an hour to do. 45 minutes of it was just to let it air out, seal, and let the sealant cure.
This is my first thread on this site so hope that I have done well enough for you guys to appreciate the post. Thanks guys!
Last edited: